QuickBooks Online Integration
This document applies to: Coworking & Workplace
Connect your QuickBooks Online Account to Proximity
Click here to learn more about Quickbooks Online.
From your Proximity dashboard, navigate to Settings > Integrations > QuickBooks Online tab.
- Select Connect to QuickBooks Online.
- This will bring you to QuickBooks Online.
- Log in to your QuickBooks Online account.
- Select the Company from the drop-down menu.
- Select Connect.
Once connected, you will be directed back to your Proximity site to configure the QuickBooks Online integration by mapping your accounts and your customers.
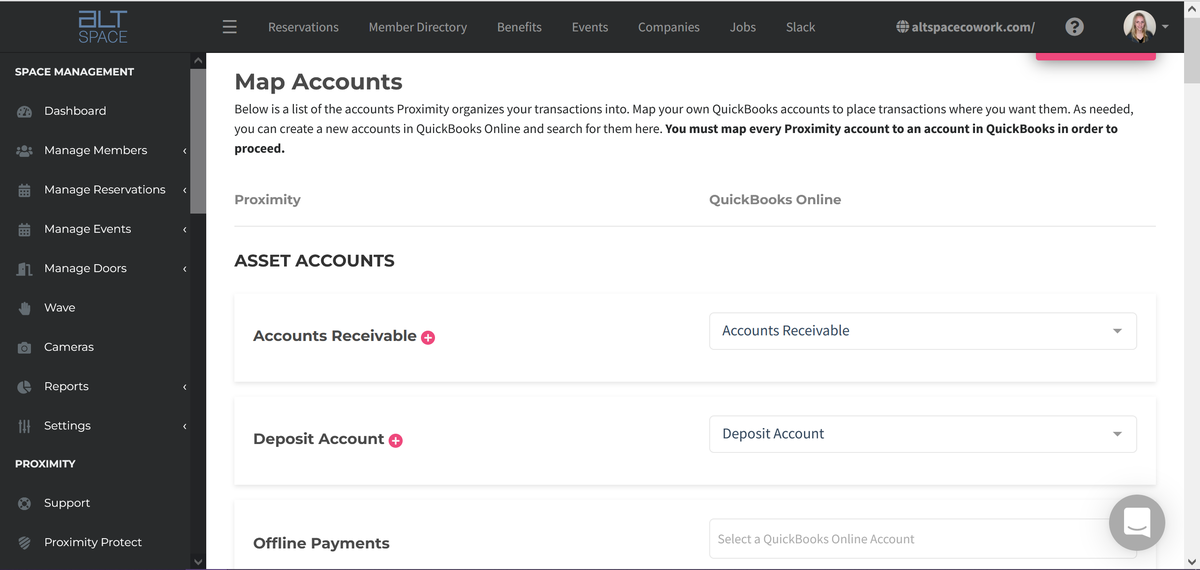
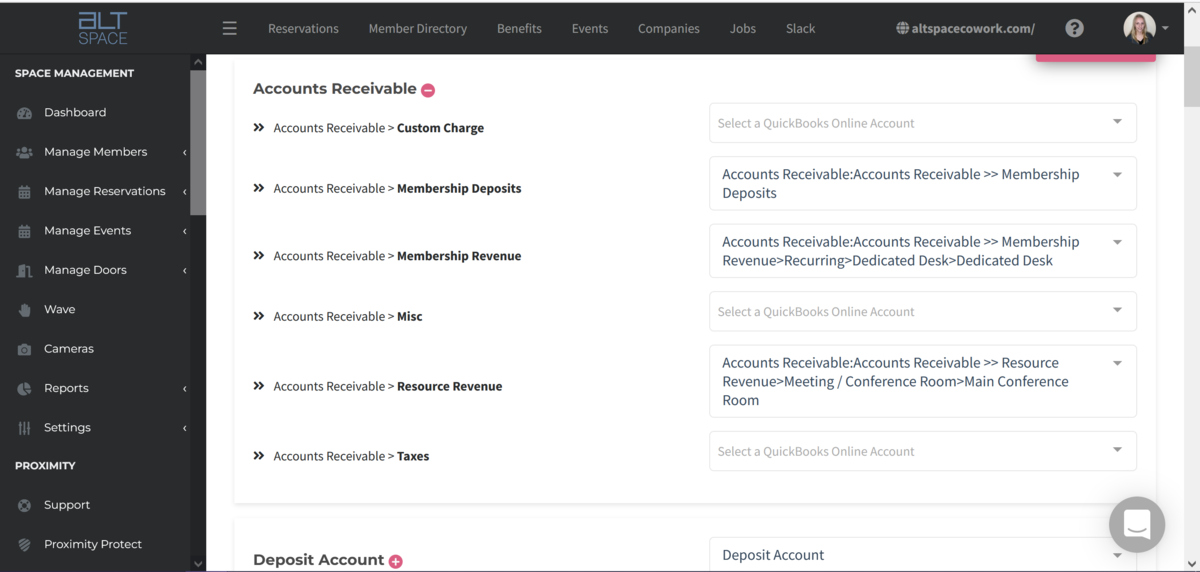
Map Proximity Accounts to QuickBooks Online Accounts
This page will list all of the accounts Proximity organizes your transactions into. You may map your own QuickBooks Online accounts to place transactions where you want them. If you don't select an account, one will be created in QuickBooks Online automatically when it's first needed (Advanced Mode only).
- On the left, you will see all of your accounts and sub-accounts within Proximity. On the right, you can choose the QBO account in which you want to place these transactions.
- If you already have accounts created in QBO for each account in Proximity, you can choose the account from the drop-down menu. If you're using Advanced Mode and you do not choose an account, an account will automatically be created in QBO when it's first needed. If you're not using Advanced Mode, you must select an existing QBO account for each Proximity Account in order to proceed.
- You can use the [+] sign on the Proximity (left) side of the mapping to view more of your sub-accounts within Proximity and subsequently choose corresponding accounts in QBO to map them to. These sub-accounts are directly related to your Proximity settings and the memberships, add-ons, resources, taxes, etc. you have set up on your site.
Once you have finished selecting the accounts and sub-accounts in which you would like your transactions to be recorded, you can select Save & Continue.
Map Proximity Customers to QuickBooks Online Customers
This page will list your current members. If any of these members already exist in your QBO account, you may map link them here. If you don't select a customer, one will be created in QuickBooks Online automatically when it's first needed.
- If you'd like to associate all members with one QuickBooks Online customer for credit card payments and/or ACH, you may select that here, and any individually-mapped customers will be used for all other payment types.
- Follow the prompts to continue to Save & Continue or you can choose to Save & Skip Remaining Pages (Choose this option if you want the integration to create the members in QBO for you.)
Select Save & Continue to Final Step.

Additional Settings
- Start Syncing From: This will be the start date from which your accounts transactions will sync to QuickBooks. If you used QuickBooks after the date you choose you will have Proximity's entries as well as your entries in QuickBooks. Double entries can only be removed manually from QuickBooks.
- Keep Proximity and QuickBooks in sync automatically: Check this box if you want Proximity and QBO to sync automatically.
- Otherwise, you can choose to sync anytime by navigating to Settings > Integrations > QuickBooks Online > Sync Now.
- Add a class to journal entries: You may specify a custom class that will be applied to all of the journal entries that are synced to QBO.
- Use classes to track your transactions by departments, product lines, or any other meaningful segments in your business - great to use for multispaces so that you can track which transactions come from which space.
- Classes are only available in QBO Plus and Advanced and have to be turned on in QBO first. You can do that in QBO by navigating to Settings > Advanced > Categories > Track Classes (turn it on).
- If you do not add a class from QuickBooks and leave it blank, a class will be created for you.
Select Save.
Important to Note:
- Once the information is synced, there is not a way for Proximity to remove the information from QuickBooks. If you are wanting to remove any entries or accounts, they must be removed manually.
- Proximity and the integration uses the accrual accounting method, meaning revenue and expenses are recorded when a transaction occurs in the Proximity platform rather than when a payment is received.
- If you choose to sync automatically, information will be synced once a day (around 1am local time).
- After transactions have been recorded from Proximity to QBO, if you choose to change the mapping of accounts or customers, it will not change information that's already been synced to QBO. Once the data is synced, it will stay where it was synced to in QBO. If you want to change where a transaction is recorded, you will need to manually do that in QBO.
- To get back to the last settings page, you can just select "Save and Continue" until you get there.
- The integration can also be used by spaces outside of the United States. QuickBooks users in Canada, Australia, New Zealand, and dozens of other countries can currently connect their QBO accounts with the Proximity platform via the integration. For a full list of countries supported by the integration, contact us.