History for "Panorama App (formerly Room View)"
-
Updated by Alex Neil, May 06, 2025 at 12:55pm
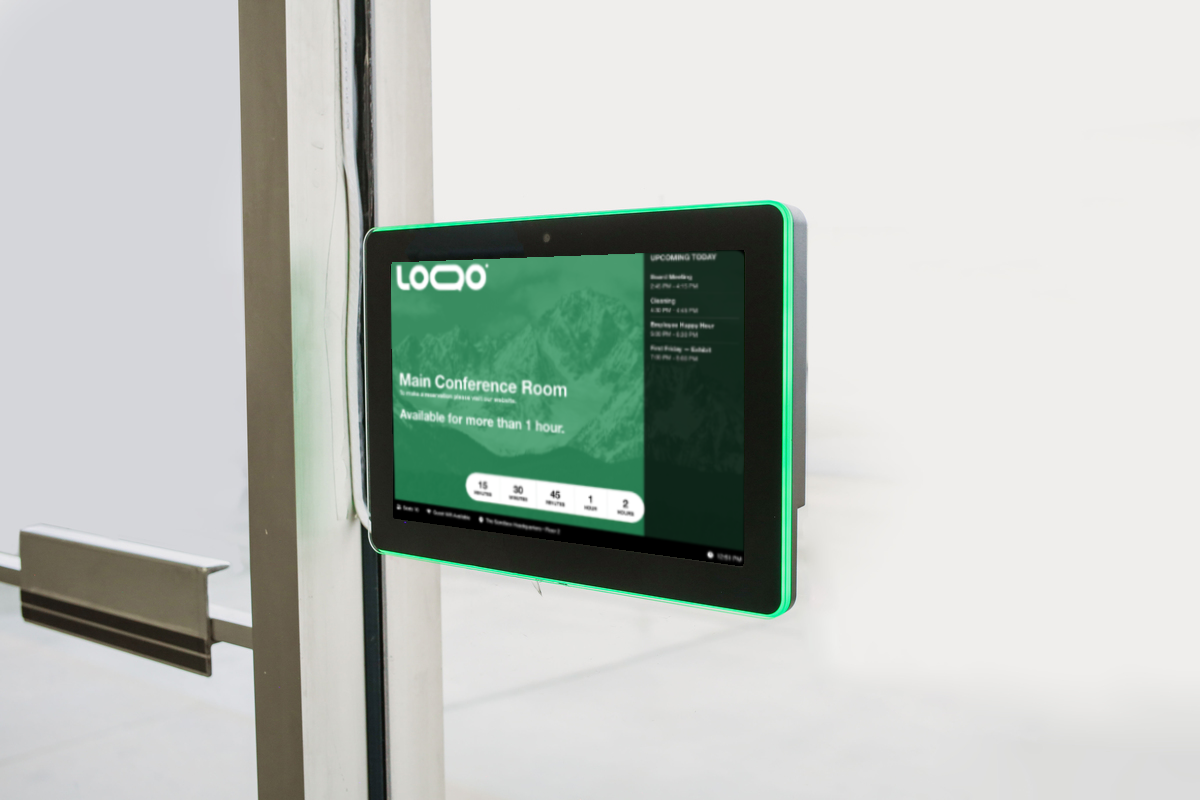
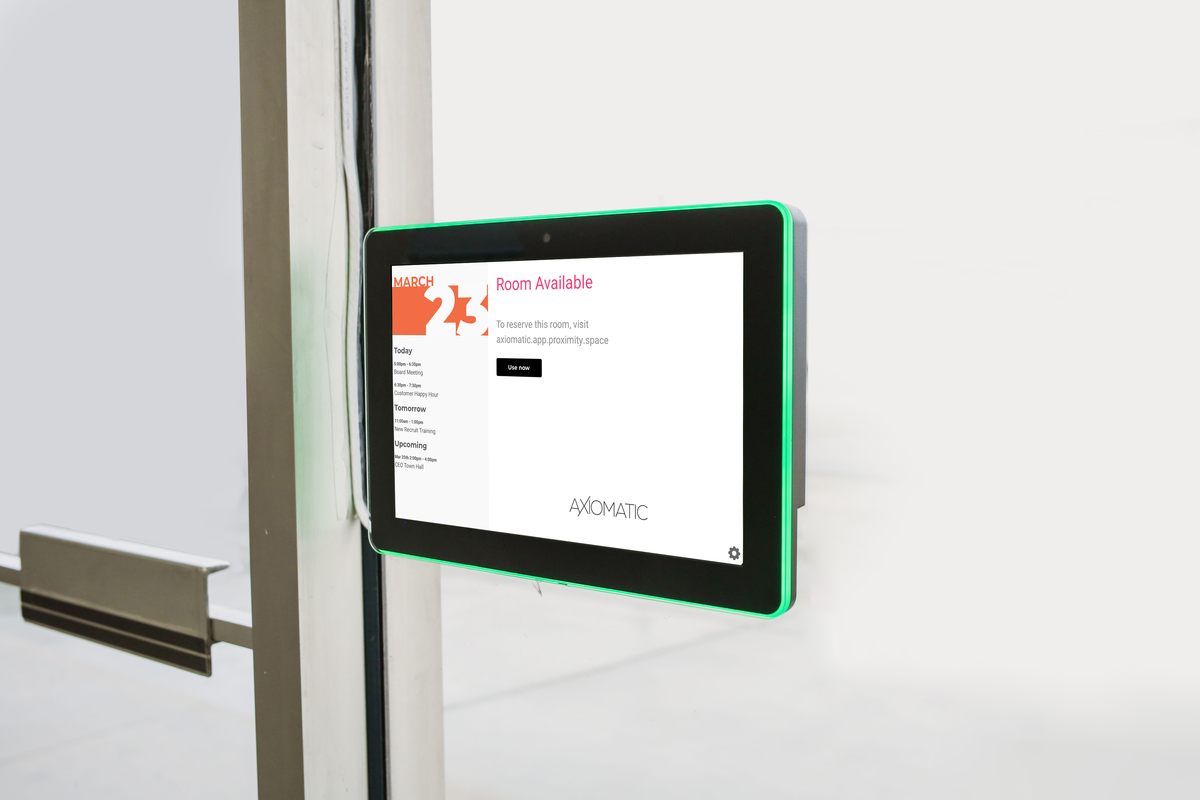
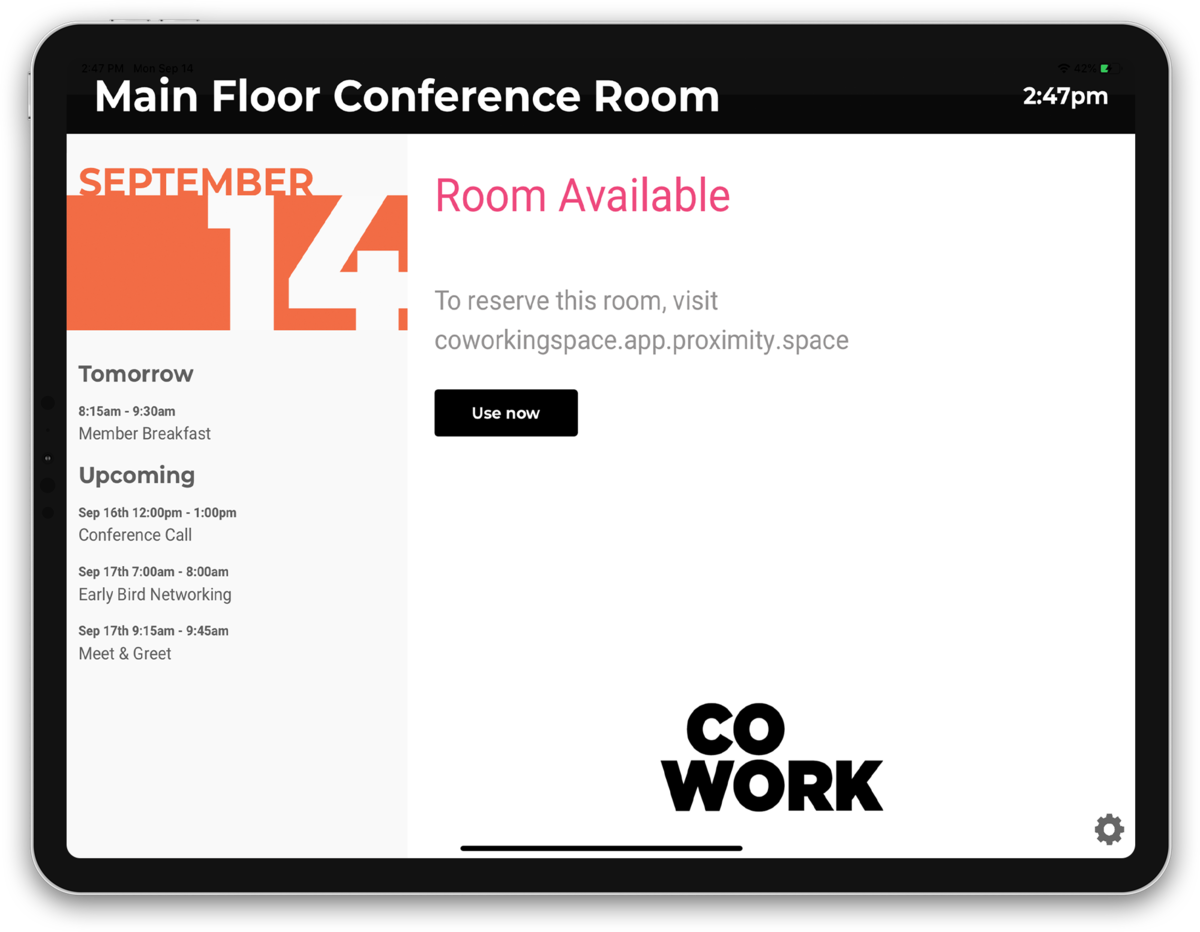
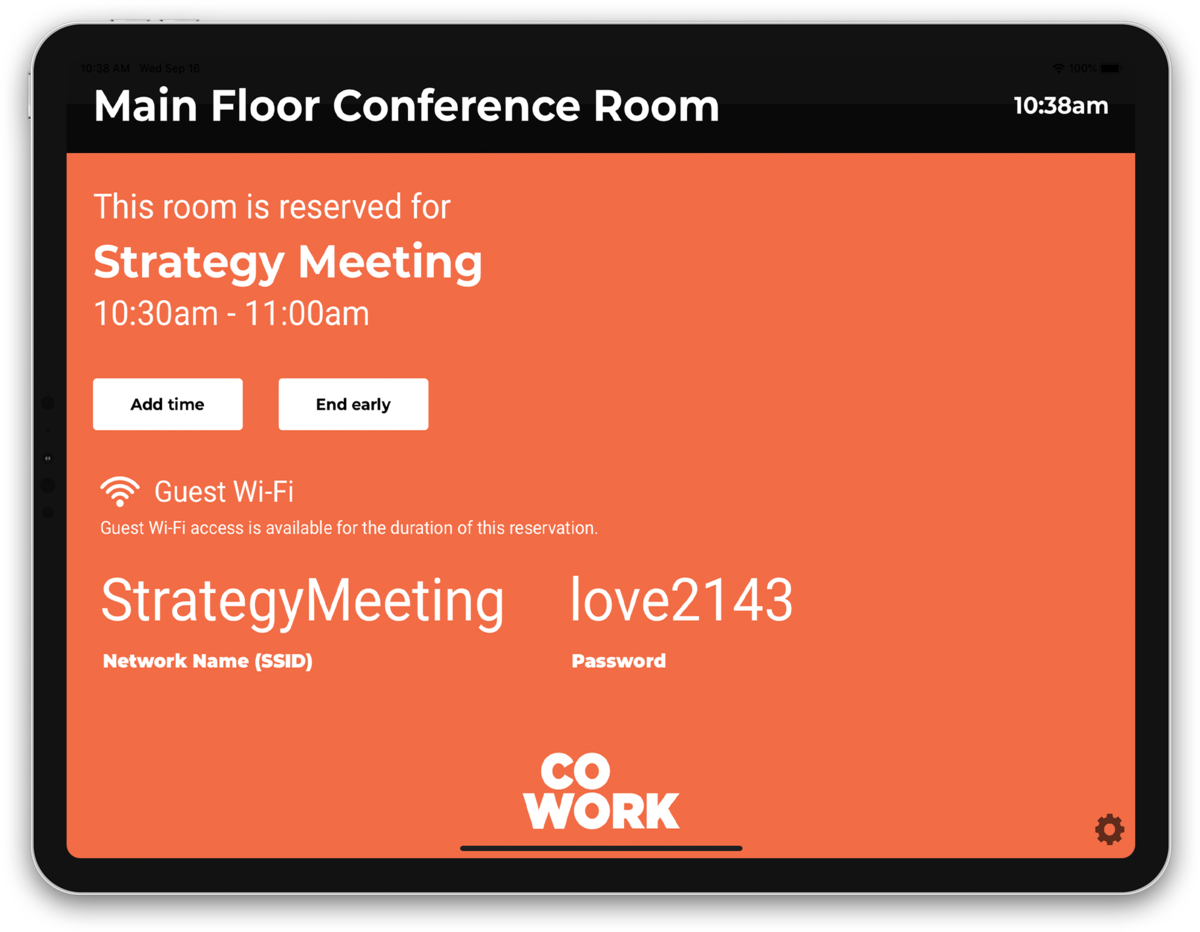
Panorama (formerly Room View) is your window into Proximity. Enhance the convenience for your users and visitors by allowing them to see reservations at a glance, effortlessly check in to conference rooms, access guest WiFi details, and manage their reservations directly from the room. They can easily end or extend their reservations without any hassle. The Panorama app is included with every Proximity subscription.
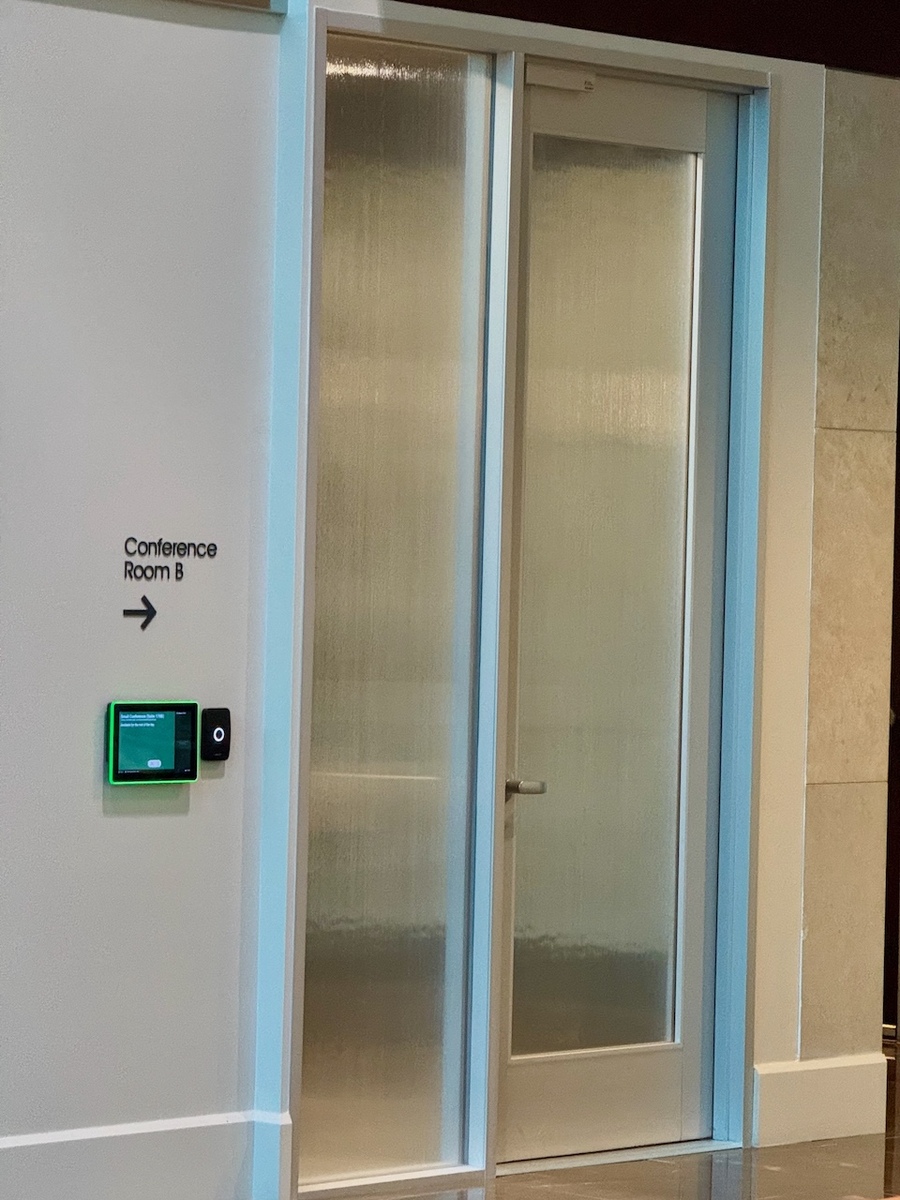
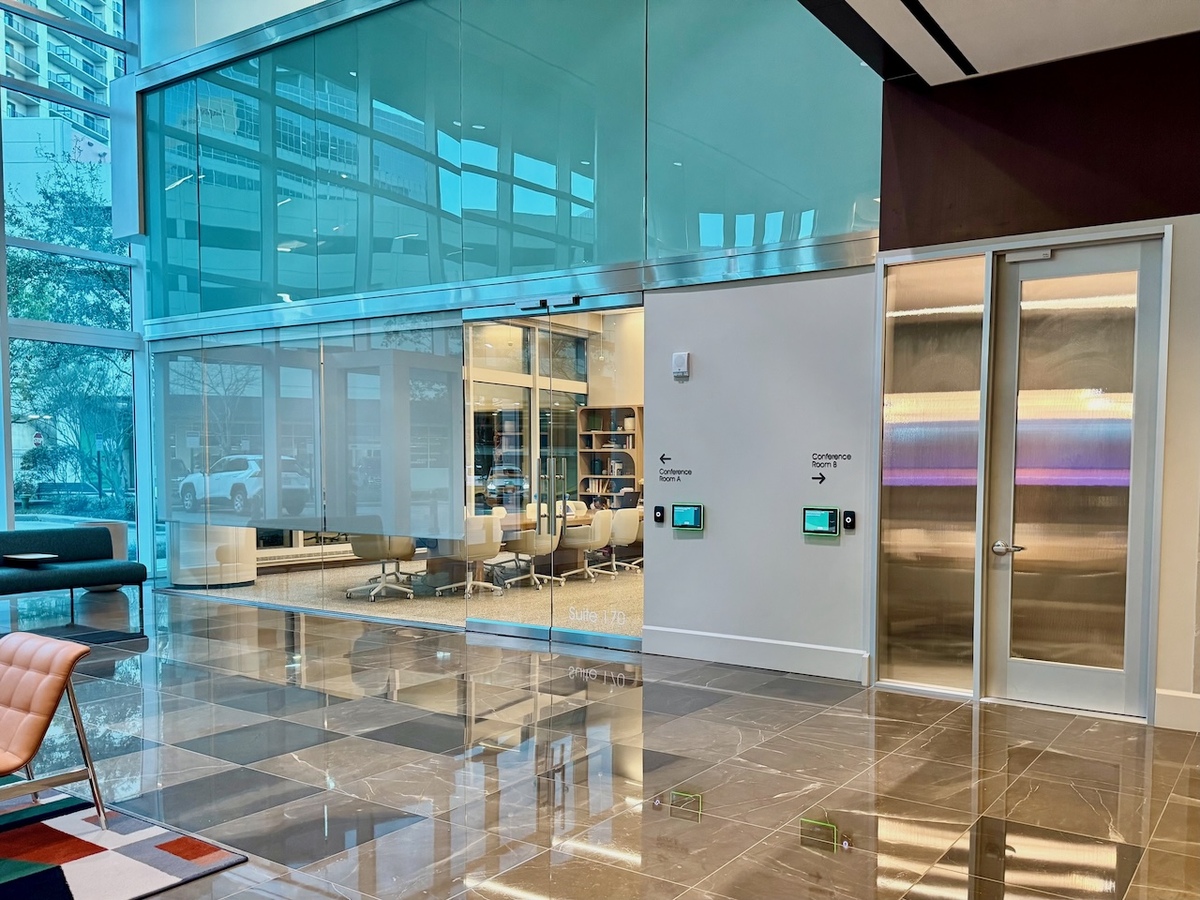
Mount an display equipped with Panorama to the wall near your conference room or other resource and you're good to go.
Place a second display inside a conference room to remind your users to check in, find the wifi info, see how much time they have left and even allow them to book additional time.
About the Panorama App:
- Seamless Transition: Panorama is the upgraded version of Room View.
- Easy Update: For devices currently using Room View, simply update the app instead of reinstalling it to enable auto-adoption.
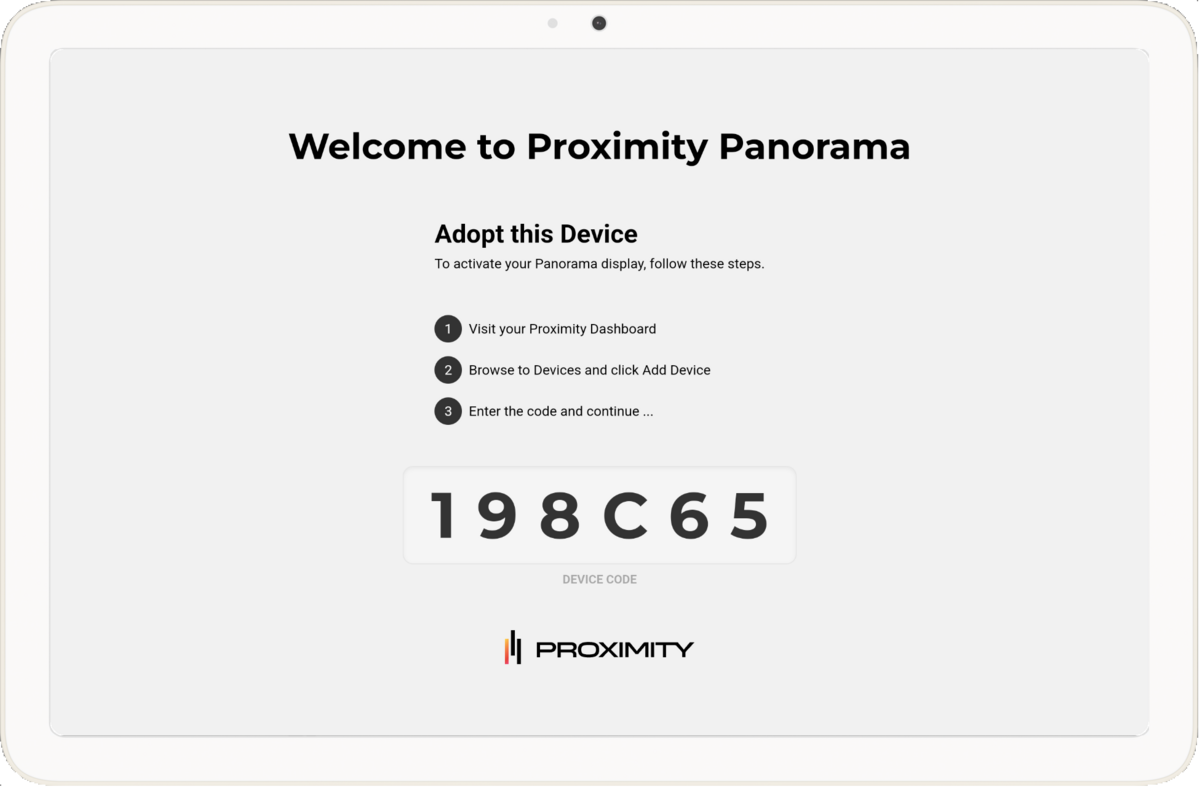
- Initial Setup: When launching the Panorama app for the first time, add your device through Proximity.
- Cross-Platform Compatibility:The Panorama app is designed to work seamlessly on Android, iPad, and All-In-One Kiosk devices.


Add Device
For existing Room View devices, the app should be updated, not reinstalled. This will allow for auto-adoption.
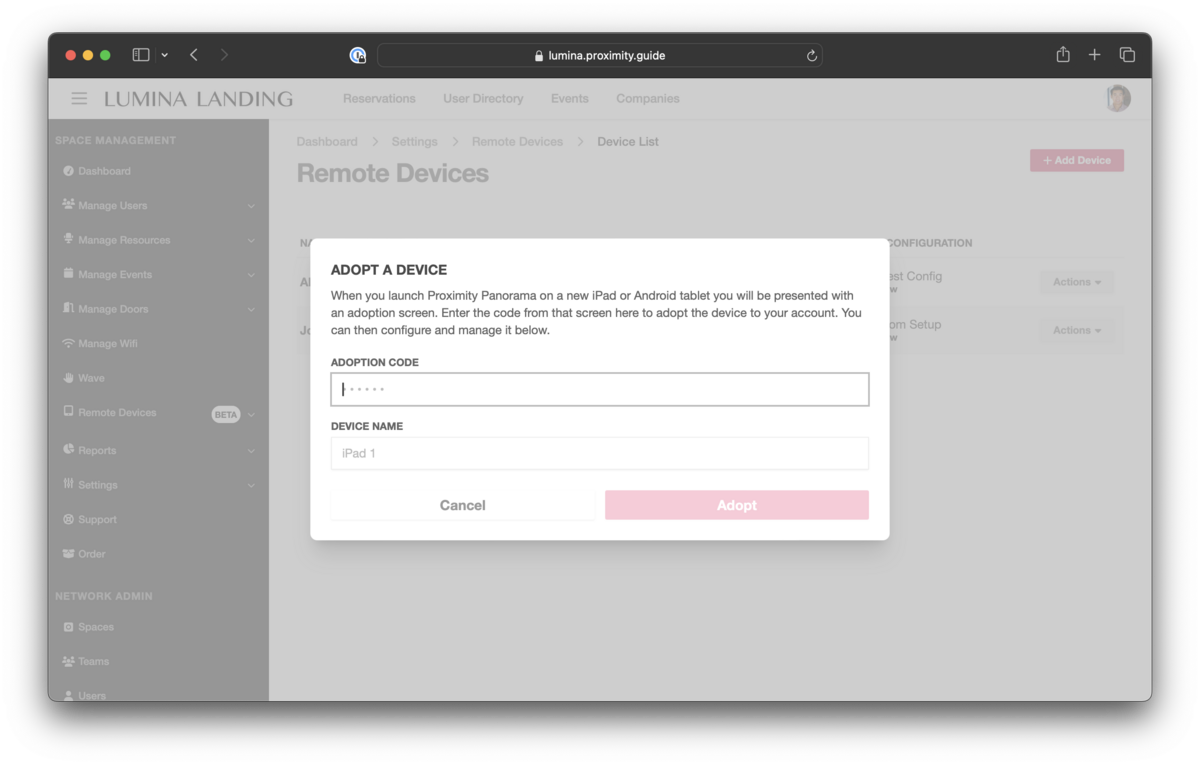
- From the dashboard, click on the Remote Devices tab, then select Devices.
- Towards the top-right, select the +Add Device button.
- When prompted, enter the Adoption Code displayed on the device you wish to adopt (visible by launching the Panorama app), followed by a name to make it easier to locate.
Configuration
With Panorama, you to remotely configure and manage all your devices from your Proximity dashboard. Choose form a range of option to build the perfect Panorama display.
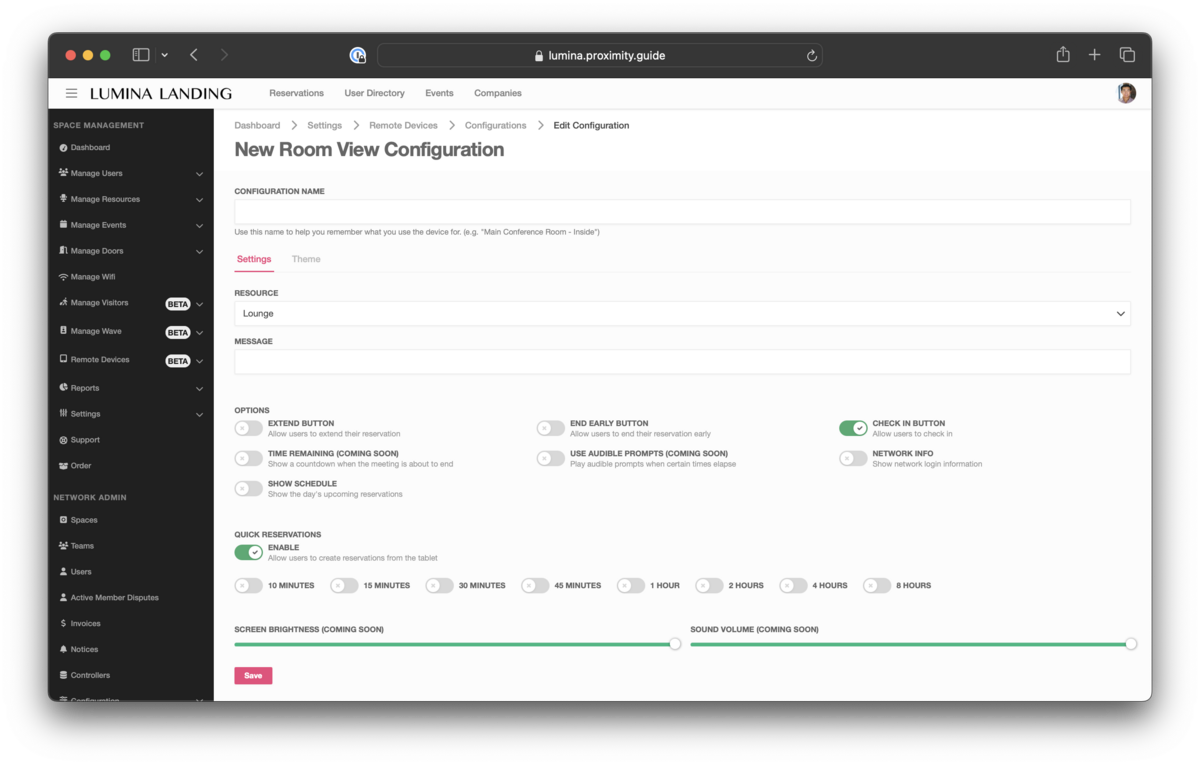
Select the items you wish to display on the adopted device. These configurations are be applied to your devices remotely:
- Extend Button - allow users to extend their reservation
- Time Remaining - show a countdown when the meeting is about to end
- Show Schedule - show the day's upcoming reservations
- End Early Button - allow users to end their reservation early
- Use Audible Prompts - play audible prompts when certain times elapse
- Check In Button - allow users to check in
- Networking Info- show network login information
- Quick Reservations has replaced Use Now from Room View, now offering more granular options.
To add or manage an existing configuration, go to the Remote Devices section from the dashboard and select Configurations.
Theme
Create the perfect theme for your brand or a special VIP guest. With Panorama, you can customize the logo, background images, and status colors to match your desired aesthetic.
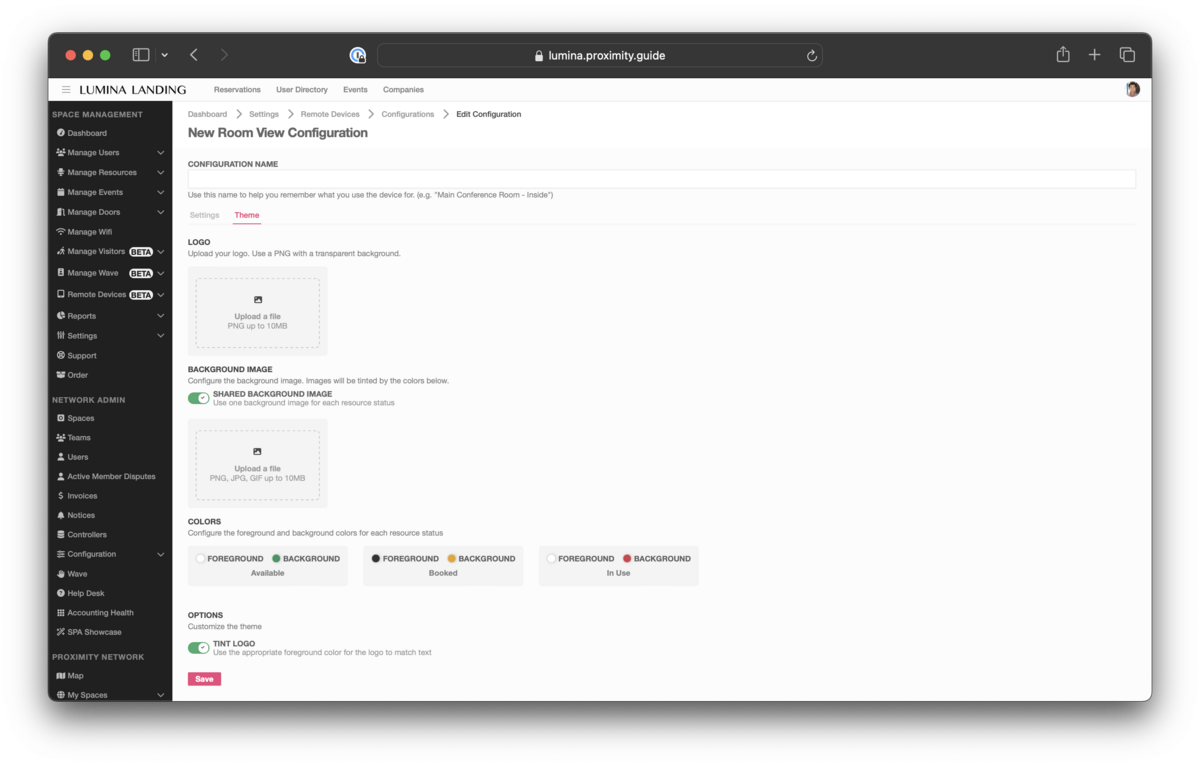
- Logo - use a PNG with a transparent background.
- Background Image- configure the background image. Images will be tinted by the colors selected.
- Shared Background Image
- Enabled - use one background image for each resource status
- Disabled - choose a background for each status - Available, Booked, In Use
- Shared Background Image
- Colors - Configure the foreground and background colors for each resource status
- Tint Logo - use the appropriate foreground color for the logo to match text
Example Configurations
This External View could be used on a device that is placed outside of the resource (example: mounted outside of the conference room door)
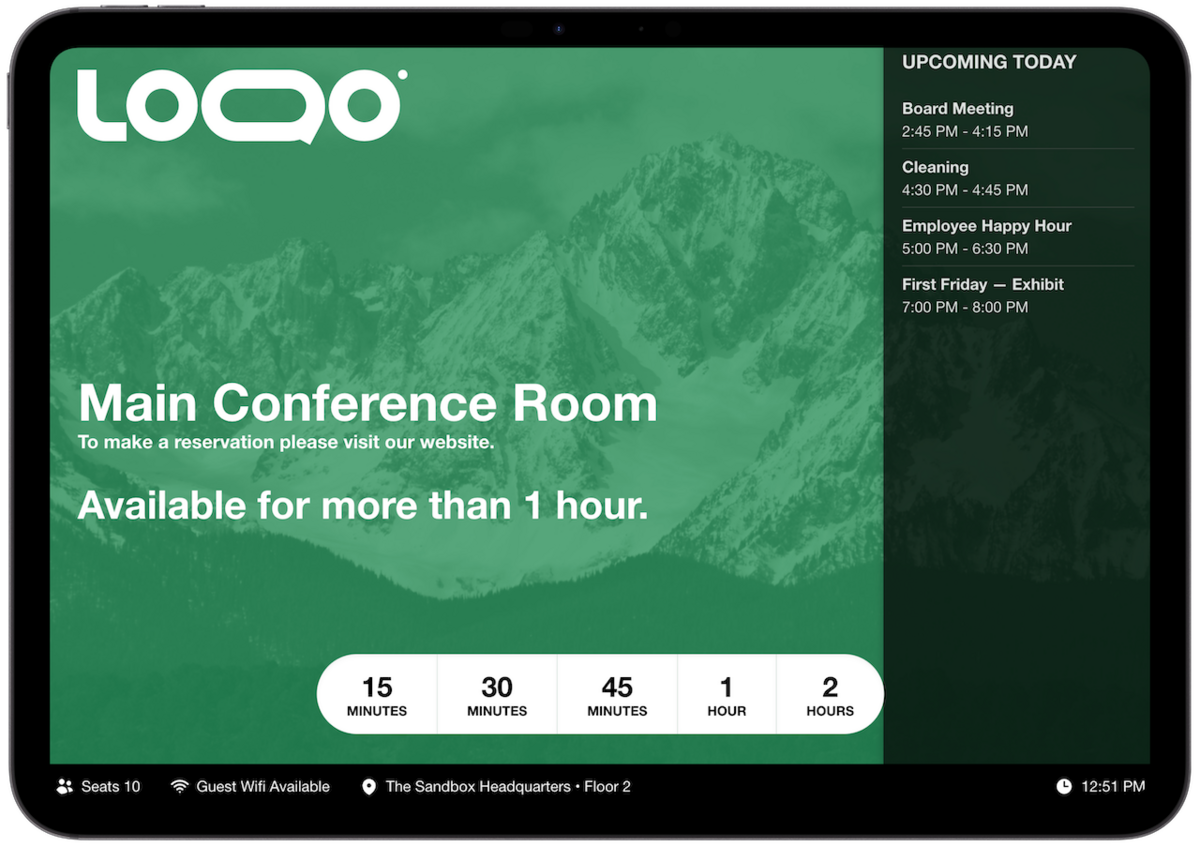
Configuration:
- Show Schedule
- Check In Button
- Quick Reservations - enabled
Theme:
- Logo
- Background Image
- Tint Logo
The Internal View would be used on a device that sits inside the resource (example: sitting on a conference room table)
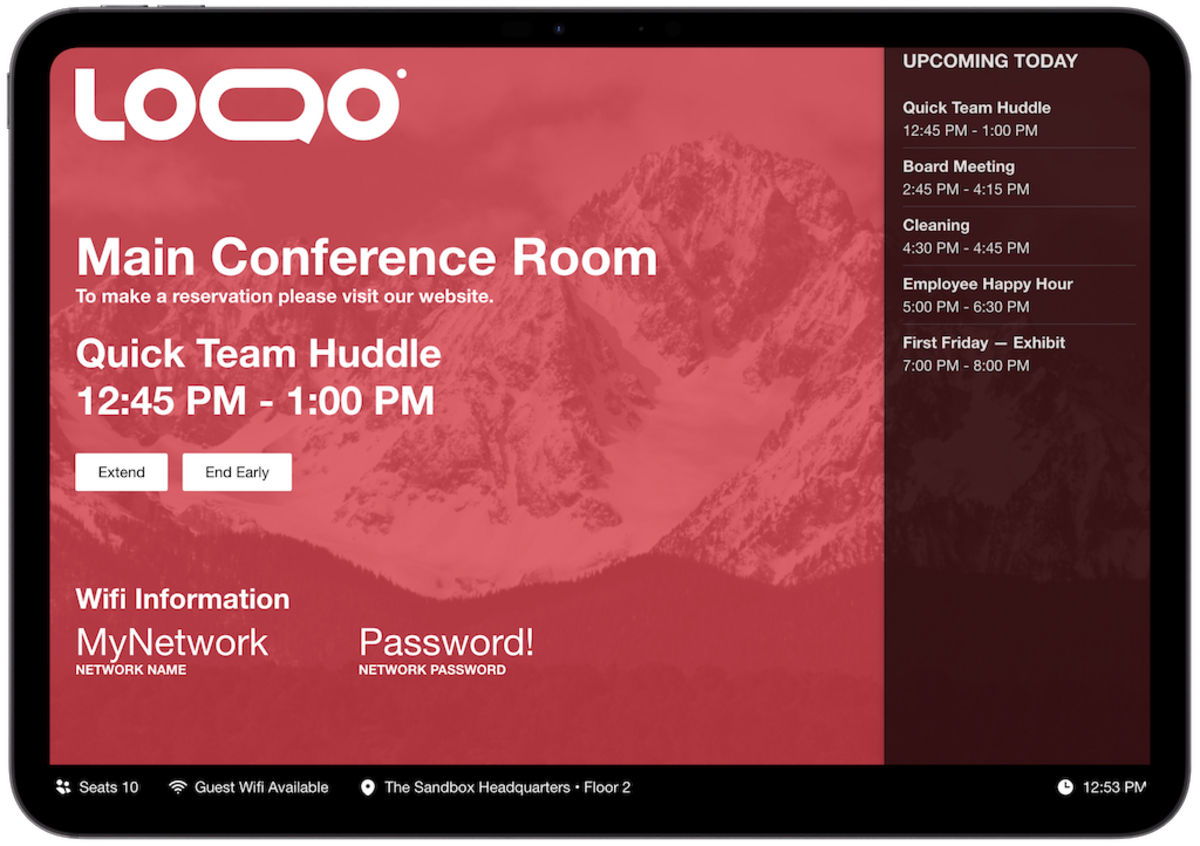
Configuration:
- Extend Button
- Time Remaining
- Show Schedule
- End Early Button
- Use Audible Prompts
- Check In Button
- Network Info
Theme:
- Logo
- Background Image
- Tint Logo
Update Note:
In a few instances of tablets behind in updates, you may experience a black screen once you update the app. If you are on an Andriod-based tablet, please take an extra step to update Google Chrome App. Once this app is updated, please close all apps and restart the Proximity Panorama App.
All-In-One Kiosk
AVAILABLE IN THE PROXIMITY STORE - visit the Order tab from the dashboard

A fresh take on integrated room scheduling systems, designed to meet the versatile needs of enterprise use. All-In-One Kiosk makes managing your spaces easy from installation to the user interface. The All-In-One Kiosk can be custom provisioned with Panorama pre-installed prior to shipment.
Features:
- Touch screen
- LED Visibility on Room Availability
- Integrated Power over Ethernet
- Quick & Easy Installation
- Enterprise-grade Security
- Wall & Glass Mounting Options
- PoE (Power over Ethernet) or 12v/1.5a Power Options
To purchase, navigate to the Order tab in your dashboard.
-
Updated by Alex Neil, May 06, 2025 at 12:55pm
Panorama (formerly Room View) is your window into Proximity. Enhance the convenience for your users and visitors by allowing them to see reservations at a glance, effortlessly check in to conference rooms, access guest WiFi details, and manage their reservations directly from the room. They can easily end or extend their reservations without any hassle. The Panorama app is included with every Proximity subscription.
Mount an display equipped with Panorama to the wall near your conference room or other resource and you're good to go.
Place a second display inside a conference room to remind your users to check in, find the wifi info, see how much time they have left and even allow them to book additional time.
About the Panorama App:
- Seamless Transition: Panorama is the upgraded version of Room View.
- Easy Update: For devices currently using Room View, simply update the app instead of reinstalling it to enable auto-adoption.
- Initial Setup: When launching the Panorama app for the first time, add your device through Proximity.
- Cross-Platform Compatibility:The Panorama app is designed to work seamlessly on Android, iPad, and All-In-One Kiosk devices.
Add Device
For existing Room View devices, the app should be updated, not reinstalled. This will allow for auto-adoption.
- From the dashboard, click on the Remote Devices tab, then select Devices.
- Towards the top-right, select the +Add Device button.
- When prompted, enter the Adoption Code displayed on the device you wish to adopt (visible by launching the Panorama app), followed by a name to make it easier to locate.
Configuration
With Panorama, you to remotely configure and manage all your devices from your Proximity dashboard. Choose form a range of option to build the perfect Panorama display.
Select the items you wish to display on the adopted device. These configurations are be applied to your devices remotely:
- Extend Button - allow users to extend their reservation
- Time Remaining - show a countdown when the meeting is about to end
- Show Schedule - show the day's upcoming reservations
- End Early Button - allow users to end their reservation early
- Use Audible Prompts - play audible prompts when certain times elapse
- Check In Button - allow users to check in
- Networking Info- show network login information
- Quick Reservations has replaced Use Now from Room View, now offering more granular options.
To add or manage an existing configuration, go to the Remote Devices section from the dashboard and select Configurations.
Theme
Create the perfect theme for your brand or a special VIP guest. With Panorama, you can customize the logo, background images, and status colors to match your desired aesthetic.
- Logo - use a PNG with a transparent background.
- Background Image- configure the background image. Images will be tinted by the colors selected.
- Shared Background Image
- Enabled - use one background image for each resource status
- Disabled - choose a background for each status - Available, Booked, In Use
- Shared Background Image
- Colors - Configure the foreground and background colors for each resource status
- Tint Logo - use the appropriate foreground color for the logo to match text
Example Configurations
This External View could be used on a device that is placed outside of the resource (example: mounted outside of the conference room door)
Configuration:
- Show Schedule
- Check In Button
- Quick Reservations - enabled
Theme:
- Logo
- Background Image
- Tint Logo
The Internal View would be used on a device that sits inside the resource (example: sitting on a conference room table)
Configuration:
- Extend Button
- Time Remaining
- Show Schedule
- End Early Button
- Use Audible Prompts
- Check In Button
- Network Info
Theme:
- Logo
- Background Image
- Tint Logo
Update Note:
In a few instances of tablets behind in updates, you may experience a black screen once you update the app. If you are on an Andriod-based tablet, please take an extra step to update Google Chrome App. Once this app is updated, please close all apps and restart the Proximity Panorama App.
All-In-One Kiosk
AVAILABLE IN THE PROXIMITY STORE - visit the Order tab from the dashboard

A fresh take on integrated room scheduling systems, designed to meet the versatile needs of enterprise use. All-In-One Kiosk makes managing your spaces easy from installation to the user interface. The All-In-One Kiosk can be custom provisioned with Panorama pre-installed prior to shipment.
Features:
- Touch screen
- LED Visibility on Room Availability
- Integrated Power over Ethernet
- Quick & Easy Installation
- Enterprise-grade Security
- Wall & Glass Mounting Options
- PoE (Power over Ethernet) or 12v/1.5a Power Options
To purchase, navigate to the Order tab in your dashboard.
-
Updated by Alex Neil, Apr 29, 2025 at 11:18am
Panorama (formerly Room View) is your window into Proximity. Enhance the convenience for your users and visitors by allowing them to see reservations at a glance, effortlessly check in to conference rooms, access guest WiFi details, and manage their reservations directly from the room. They can easily end or extend their reservations without any hassle. The Panorama app is included with every Proximity subscription.
Mount an display equipped with Panorama to the wall near your conference room or other resource and you're good to go.
Place a second display inside a conference room to remind your users to check in, find the wifi info, see how much time they have left and even allow them to book additional time.
About the Panorama App:
- Seamless Transition: Panorama is the upgraded version of Room View.
- Easy Update: For devices currently using Room View, simply update the app instead of reinstalling it to enable auto-adoption.
- Initial Setup: When launching the Panorama app for the first time, add your device through Proximity.
- Cross-Platform Compatibility:The Panorama app is designed to work seamlessly on Android, iPad, and All-In-One Kiosk devices.
Add Device
For existing Room View devices, the app should be updated, not reinstalled. This will allow for auto-adoption.
- From the dashboard, click on the Remote Devices tab, then select Devices.
- Towards the top-right, select the +Add Device button.
- When prompted, enter the Adoption Code displayed on the device you wish to adopt (visible by launching the Panorama app), followed by a name to make it easier to locate.
Configuration
With Panorama, you to remotely configure and manage all your devices from your Proximity dashboard. Choose form a range of option to build the perfect Panorama display.
Select the items you wish to display on the adopted device. These configurations are be applied to your devices remotely:
- Extend Button - allow users to extend their reservation
- Time Remaining - show a countdown when the meeting is about to end
- Show Schedule - show the day's upcoming reservations
- End Early Button - allow users to end their reservation early
- Use Audible Prompts - play audible prompts when certain times elapse
- Check In Button - allow users to check in
- Networking Info- show network login information
- Quick Reservations has replaced Use Now from Room View, now offering more granular options.
To add or manage an existing configuration, go to the Remote Devices section from the dashboard and select Configurations.
Theme
Create the perfect theme for your brand or a special VIP guest. With Panorama, you can customize the logo, background images, and status colors to match your desired aesthetic.
- Logo - use a PNG with a transparent background.
- Background Image- configure the background image. Images will be tinted by the colors selected.
- Shared Background Image
- Enabled - use one background image for each resource status
- Disabled - choose a background for each status - Available, Booked, In Use
- Shared Background Image
- Colors - Configure the foreground and background colors for each resource status
- Tint Logo - use the appropriate foreground color for the logo to match text
Example Configurations
This External View could be used on a device that is placed outside of the resource (example: mounted outside of the conference room door)
Configuration:
- Show Schedule
- Check In Button
- Quick Reservations - enabled
Theme:
- Logo
- Background Image
- Tint Logo
The Internal View would be used on a device that sits inside the resource (example: sitting on a conference room table)
Configuration:
- Extend Button
- Time Remaining
- Show Schedule
- End Early Button
- Use Audible Prompts
- Check In Button
- Network Info
Theme:
- Logo
- Background Image
- Tint Logo
Update Note:
In a few instances of tablets behind in updates, you may experience a black screen once you update the app. If you are on an Andriod-based tablet, please take an extra step to update Google Chrome App. Once this app is updated, please close all apps and restart the Proximity Panorama App.
All-In-One Kiosk
AVAILABLE IN THE PROXIMITY STORE - visit the Order tab from the dashboard
A fresh take on integrated room scheduling systems, designed to meet the versatile needs of enterprise use. All-In-One Kiosk makes managing your spaces easy from installation to the user interface. The All-In-One Kiosk can be custom provisioned with Panorama pre-installed prior to shipment.
Features:
- Touch screen
- LED Visibility on Room Availability
- Integrated Power over Ethernet
- Quick & Easy Installation
- Enterprise-grade Security
- Wall & Glass Mounting Options
- PoE (Power over Ethernet) or 12v/1.5a Power Options
To purchase, navigate to the Order tab in your dashboard.
-
Updated by Alex Neil, Apr 29, 2025 at 11:17am
Panorama (formerly Room View) is your window into Proximity. Enhance the convenience for your users and visitors by allowing them to see reservations at a glance, effortlessly check in to conference rooms, access guest WiFi details, and manage their reservations directly from the room. They can easily end or extend their reservations without any hassle. The Panorama app is included with every Proximity subscription.
Mount an display equipped with Panorama to the wall near your conference room or other resource and you're good to go.
Place a second display inside a conference room to remind your users to check in, find the wifi info, see how much time they have left and even allow them to book additional time.
About the Panorama App:
- Seamless Transition: Panorama is the upgraded version of Room View.
- Easy Update: For devices currently using Room View, simply update the app instead of reinstalling it to enable auto-adoption.
- Initial Setup: When launching the Panorama app for the first time, add your device through Proximity.
- Cross-Platform Compatibility:The Panorama app is designed to work seamlessly on Android, iPad, and All-In-One Kiosk devices.
Add Device
For existing Room View devices, the app should be updated, not reinstalled. This will allow for auto-adoption.
- From the dashboard, click on the Remote Devices tab, then select Devices.
- Towards the top-right, select the +Add Device button.
- When prompted, enter the Adoption Code displayed on the device you wish to adopt (visible by launching the Panorama app), followed by a name to make it easier to locate.
Configuration
With Panorama, you to remotely configure and manage all your devices from your Proximity dashboard. Choose form a range of option to build the perfect Panorama display.
Select the items you wish to display on the adopted device. These configurations are be applied to your devices remotely:
- Extend Button - allow users to extend their reservation
- Time Remaining - show a countdown when the meeting is about to end
- Show Schedule - show the day's upcoming reservations
- End Early Button - allow users to end their reservation early
- Use Audible Prompts - play audible prompts when certain times elapse
- Check In Button - allow users to check in
- Networking Info- show network login information
- Quick Reservations has replaced Use Now from Room View, now offering more granular options.
To add or manage an existing configuration, go to the Remote Devices section from the dashboard and select Configurations.
Theme
Create the perfect theme for your brand or a special VIP guest. With Panorama, you can customize the logo, background images, and status colors to match your desired aesthetic.
- Logo - use a PNG with a transparent background.
- Background Image- configure the background image. Images will be tinted by the colors selected.
- Shared Background Image
- Enabled - use one background image for each resource status
- Disabled - choose a background for each status - Available, Booked, In Use
- Shared Background Image
- Colors - Configure the foreground and background colors for each resource status
- Tint Logo - use the appropriate foreground color for the logo to match text
Example Configurations
This External View could be used on a device that is placed outside of the resource (example: mounted outside of the conference room door)
Configuration:
- Show Schedule
- Check In Button
- Quick Reservations - enabled
Theme:
- Logo
- Background Image
- Tint Logo
The Internal View would be used on a device that sits inside the resource (example: sitting on a conference room table)
Configuration:
- Extend Button
- Time Remaining
- Show Schedule
- End Early Button
- Use Audible Prompts
- Check In Button
- Network Info
Theme:
- Logo
- Background Image
- Tint Logo
Update Note:
In a few instances of tablets behind in updates, you may experience a black screen once you update the app. If you are on an Andriod-based tablet, please take an extra step to update Google Chrome App. Once this app is updated, please close all apps and restart the Proximity Panorama App.
All-In-One Kiosk
AVAILABLE IN THE
ProximityPROXIMITY STORE - visit the Order tab from the dashboardA fresh take on integrated room scheduling systems, designed to meet the versatile needs of enterprise use. All-In-One Kiosk makes managing your spaces easy from installation to the user interface. The All-In-One Kiosk can be custom provisioned with Panorama pre-installed prior to shipment.
Features:
- Touch screen
- LED Visibility on Room Availability
- Integrated Power over Ethernet
- Quick & Easy Installation
- Enterprise-grade Security
- Wall & Glass Mounting Options
- PoE (Power over Ethernet) or 12v/1.5a Power Options
To purchase, navigate to the Order tab in your dashboard.
-
Updated by Alex Neil, Jan 07, 2025 at 8:40am
Panorama (formerly Room View) is your window into Proximity. Enhance the convenience for your users and visitors by allowing them to see reservations at a glance, effortlessly check in to conference rooms, access guest WiFi details, and manage their reservations directly from the room. They can easily end or extend their reservations without any hassle. The Panorama app is included with every Proximity subscription.
Mount an display equipped with Panorama to the wall near your conference room or other resource and you're good to go.
Place a second display inside a conference room to remind your users to check in, find the wifi info, see how much time they have left and even allow them to book additional time.
About the Panorama App:
- Seamless Transition: Panorama is the upgraded version of Room View.
- Easy Update: For devices currently using Room View, simply update the app instead of reinstalling it to enable auto-adoption.
- Initial Setup: When launching the Panorama app for the first time, add your device through Proximity.
- Cross-Platform Compatibility:The Panorama app is designed to work seamlessly on Android, iPad, and
ASTRO AlO Room DisplayAll-In-One Kiosk devices.
Add Device
For existing Room View devices, the app should be updated, not reinstalled. This will allow for auto-adoption.
- From the dashboard, click on the Remote Devices tab, then select Devices.
- Towards the top-right, select the +Add Device button.
- When prompted, enter the Adoption Code displayed on the device you wish to adopt (visible by launching the Panorama app), followed by a name to make it easier to locate.
Configuration
With Panorama, you to remotely configure and manage all your devices from your Proximity dashboard. Choose form a range of option to build the perfect Panorama display.
Select the items you wish to display on the adopted device. These configurations are be applied to your devices remotely:
- Extend Button - allow users to extend their reservation
- Time Remaining - show a countdown when the meeting is about to end
- Show Schedule - show the day's upcoming reservations
- End Early Button - allow users to end their reservation early
- Use Audible Prompts - play audible prompts when certain times elapse
- Check In Button - allow users to check in
- Networking Info- show network login information
- Quick Reservations has replaced Use Now from Room View, now offering more granular options.
To add or manage an existing configuration, go to the Remote Devices section from the dashboard and select Configurations.
Theme
Create the perfect theme for your brand or a special VIP guest. With Panorama, you can customize the logo, background images, and status colors to match your desired aesthetic.
- Logo - use a PNG with a transparent background.
- Background Image- configure the background image. Images will be tinted by the colors selected.
- Shared Background Image
- Enabled - use one background image for each resource status
- Disabled - choose a background for each status - Available, Booked, In Use
- Shared Background Image
- Colors - Configure the foreground and background colors for each resource status
- Tint Logo - use the appropriate foreground color for the logo to match text
Example Configurations
This External View could be used on a device that is placed outside of the resource (example: mounted outside of the conference room door)
Configuration:
- Show Schedule
- Check In Button
- Quick Reservations - enabled
Theme:
- Logo
- Background Image
- Tint Logo
The Internal View would be used on a device that sits inside the resource (example: sitting on a conference room table)
Configuration:
- Extend Button
- Time Remaining
- Show Schedule
- End Early Button
- Use Audible Prompts
- Check In Button
- Network Info
Theme:
- Logo
- Background Image
- Tint Logo
Update Note:
In a few instances of tablets behind in updates, you may experience a black screen once you update the app. If you are on an Andriod-based tablet, please take an extra step to update Google Chrome App. Once this app is updated, please close all apps and restart the Proximity Panorama App.
PowerBX ASTROAll-In-OneRoom DisplayAll-In-One KioskAVAILABLE IN THE Proximity STORE - visit the Order tab from the dashboard
A fresh take on integrated room scheduling systems, designed to meet the versatile needs of enterprise use.
ASTROAll-In-One Kiosk makes managing your spaces easy from installation to the user interface. TheASTROAll-In-One Kiosk can be custom provisioned with Panorama pre-installed prior to shipment.Features:
- Touch screen
- LED Visibility on Room Availability
- Integrated Power over Ethernet
- Quick & Easy Installation
- Enterprise-grade Security
- Wall & Glass Mounting Options
- PoE (Power over Ethernet) or 12v/1.5a Power Options
To purchase, navigate to the Order tab in your dashboard.
-
Updated by Alex Neil, Sep 24, 2024 at 11:30am
Panorama (formerly Room View) is your window into Proximity. Enhance the convenience for your users and visitors by allowing them to see reservations at a glance, effortlessly check in to conference rooms, access guest WiFi details, and manage their reservations directly from the room. They can easily end or extend their reservations without any hassle. The Panorama app is included with every Proximity subscription.
Mount an display equipped with Panorama to the wall near your conference room or other resource and you're good to go.
Place a second display inside a conference room to remind your users to check in, find the wifi info, see how much time they have left and even allow them to book additional time.
About the Panorama App:
- Seamless Transition: Panorama is the upgraded version of Room View.
- Easy Update: For devices currently using Room View, simply update the app instead of reinstalling it to enable auto-adoption.
- Initial Setup: When launching the Panorama app for the first time, add your device through Proximity.
- Cross-Platform Compatibility:The Panorama app is designed to work seamlessly on Android, iPad, and ASTRO AlO Room Display devices.
Add Device
For existing Room View devices, the app should be updated, not reinstalled. This will allow for auto-adoption.
- From the dashboard, click on the Remote Devices tab, then select Devices.
- Towards the top-right, select the +Add Device button.
- When prompted, enter the Adoption Code displayed on the device you wish to adopt (visible by launching the Panorama app), followed by a name to make it easier to locate.
Configuration
With Panorama, you to remotely configure and manage all your devices from your Proximity dashboard. Choose form a range of option to build the perfect Panorama display.
Select the items you wish to display on the adopted device. These configurations are be applied to your devices remotely:
- Extend Button - allow users to extend their reservation
- Time Remaining - show a countdown when the meeting is about to end
- Show Schedule - show the day's upcoming reservations
- End Early Button - allow users to end their reservation early
- Use Audible Prompts - play audible prompts when certain times elapse
- Check In Button - allow users to check in
- Networking Info- show network login information
- Quick Reservations has replaced Use Now from Room View, now offering more granular options.
To add or manage an existing configuration, go to the Remote Devices section from the dashboard and select Configurations.
Theme
Create the perfect theme for your brand or a special VIP guest. With Panorama, you can customize the logo, background images, and status colors to match your desired aesthetic.
- Logo - use a PNG with a transparent background.
- Background Image- configure the background image. Images will be tinted by the colors selected.
- Shared Background Image
- Enabled - use one background image for each resource status
- Disabled - choose a background for each status - Available, Booked, In Use
- Shared Background Image
- Colors - Configure the foreground and background colors for each resource status
- Tint Logo - use the appropriate foreground color for the logo to match text
Example Configurations
This External View could be used on a device that is placed outside of the resource (example: mounted outside of the conference room door)
Configuration:
- Show Schedule
- Check In Button
- Quick Reservations - enabled
Theme:
- Logo
- Background Image
- Tint Logo
The Internal View would be used on a device that sits inside the resource (example: sitting on a conference room table)
Configuration:
- Extend Button
- Time Remaining
- Show Schedule
- End Early Button
- Use Audible Prompts
- Check In Button
- Network Info
Theme:
- Logo
- Background Image
- Tint Logo
Update Note:
In a few instances of tablets behind in updates, you may experience a black screen once you update the app. If you are on an Andriod-based tablet, please take an extra step to update Google Chrome App. Once this app is updated, please close all apps and restart the Proximity Panorama App.
PowerBX ASTRO All-In-One Room Display
AVAILABLE IN THE Proximity STORE - visit the Order tab from the dashboard
A fresh take on integrated room scheduling systems, designed to meet the versatile needs of enterprise use. ASTRO makes managing your spaces easy from installation to the user interface. The ASTRO All-In-One Kiosk can be custom provisioned with Panorama pre-installed prior to shipment.
Features:
- Touch screen
- LED Visibility on Room Availability
- Integrated Power over Ethernet
- Quick & Easy Installation
- Enterprise-grade Security
- Wall & Glass Mounting Options
- PoE (Power over Ethernet) or 12v/1.5a Power Options
To purchase, navigate to the Order tab in your dashboard.
-
Updated by Josh Freed, Aug 13, 2024 at 3:32pm
Panorama (formerly Room View) is your window into Proximity. Enhance the convenience for your users and visitors by allowing them to see reservations at a glance, effortlessly check in to conference rooms, access guest WiFi details, and manage their reservations directly from the room. They can easily end or extend their reservations without any hassle. The Panorama app is included with every Proximity subscription.
Mount an display equipped with Panorama to the wall near your conference room or other resource and you're good to go.
Place a second display inside a conference room to remind your users to check in, find the wifi info, see how much time they have left and even allow them to book additional time.
About the Panorama App:
- Seamless Transition: Panorama is the upgraded version of Room View.
- Easy Update: For devices currently using Room View, simply update the app instead of reinstalling it to enable auto-adoption.
- Initial Setup: When launching the Panorama app for the first time, add your device through Proximity.
- Cross-Platform Compatibility:The Panorama app is designed to work seamlessly on Android, iPad, and ASTRO AlO Room Display devices.
Add Device
For existing Room View devices, the app should be updated, not reinstalled. This will allow for auto-adoption.
- From the dashboard, click on the Remote Devices tab, then select Devices.
- Towards the top-right, select the +Add Device button.
- When prompted, enter the Adoption Code displayed on the device you wish to adopt (visible by launching the Panorama app), followed by a name to make it easier to locate.
Configuration
With Panorama, you to remotely configure and manage all your devices from your Proximity dashboard. Choose form a range of option to build the perfect Panorama display.
Select the items you wish to display on the adopted device. These configurations are be applied to your devices remotely:
- Extend Button - allow users to extend their reservation
- Time Remaining - show a countdown when the meeting is about to end
- Show Schedule - show the day's upcoming reservations
- End Early Button - allow users to end their reservation early
- Use Audible Prompts - play audible prompts when certain times elapse
- Check In Button - allow users to check in
- Networking Info- show network login information
- Quick Reservations has replaced Use Now from Room View, now offering more granular options.
To add or manage an existing configuration, go to the Remote Devices section from the dashboard and select Configurations.
Theme
Create the perfect theme for your brand or a special VIP guest. With Panorama, you can customize the logo, background images, and status colors to match your desired aesthetic.
- Logo - use a PNG with a transparent background.
- Background Image- configure the background image. Images will be tinted by the colors selected.
- Shared Background Image
- Enabled - use one background image for each resource status
- Disabled - choose a background for each status - Available, Booked, In Use
- Shared Background Image
- Colors - Configure the foreground and background colors for each resource status
- Tint Logo - use the appropriate foreground color for the logo to match text
Example Configurations
This External View could be used on a device that is placed outside of the resource (example: mounted outside of the conference room door)
Configuration:
- Show Schedule
- Check In Button
- Quick Reservations - enabled
Theme:
- Logo
- Background Image
- Tint Logo
The Internal View would be used on a device that sits inside the resource (example: sitting on a conference room table)
Configuration:
- Extend Button
- Time Remaining
- Show Schedule
- End Early Button
- Use Audible Prompts
- Check In Button
- Network Info
Theme:
- Logo
- Background Image
- Tint Logo
Update Note:
In a few instances of tablets behind in updates, you may experience a black screen once you update the app. If you are on an Andriod-based tablet, please take an extra step to update Google Chrome App. Once this app is updated, please close all apps and restart the Proximity Panorama App.
PowerBX ASTRO All-In-One Room Display
AVAILABLE IN THE Proximity STORE - visit the Order tab from the dashboard
A fresh take on integrated room scheduling systems, designed to meet the versatile needs of enterprise use. ASTRO makes managing your spaces easy from installation to the user interface. The ASTRO All-In-One Kiosk can be custom provisioned with Panorama pre-installed prior to shipment.
Features:
- Touch screen
- LED Visibility on Room Availability
- Integrated Power over Ethernet
- Quick & Easy Installation
- Enterprise-grade Security
- Wall & Glass Mounting Options
- PoE (Power over Ethernet) or 12v/1.5a Power Options
To purchase, navigate to the Order tab in your dashboard.
-
Updated by Alex Neil, Aug 06, 2024 at 12:07pm
Panorama (formerly Room View) is your window into Proximity. Enhance the convenience for your users and visitors by allowing them to see reservations at a glance, effortlessly check in to conference rooms, access guest WiFi details, and manage their reservations directly from the room. They can easily end or extend their reservations without any hassle. The Panorama app is included with every Proximity subscription.
Mount an display equipped with Panorama to the wall near your conference room or other resource and you're good to go.
Place a second display inside a conference room to remind your users to check in, find the wifi info, see how much time they have left and even allow them to book additional time.
About the Panorama App:
- Seamless Transition: Panorama is the upgraded version of Room View.
- Easy Update: For devices currently using Room View, simply update the app instead of reinstalling it to enable auto-adoption.
- Initial Setup: When launching the Panorama app for the first time, add your device through Proximity.
- Cross-Platform Compatibility:The Panorama app is designed to work seamlessly on Android, iPad, and ASTRO AlO Room Display devices.
Add Device
For existing Room View devices, the app should be updated, not reinstalled. This will allow for auto-adoption.
- From the dashboard, click on the Remote Devices tab, then select Devices.
- Towards the top-right, select the +Add Device button.
- When prompted, enter the Adoption Code displayed on the device you wish to adopt (visible by launching the Panorama app), followed by a name to make it easier to locate.
Configuration
With Panorama, you to remotely configure and manage all your devices from your Proximity dashboard. Choose form a range of option to build the perfect Panorama display.
Select the items you wish to display on the adopted device. These configurations are be applied to your devices remotely:
- Extend Button - allow users to extend their reservation
- Time Remaining - show a countdown when the meeting is about to end
- Show Schedule - show the day's upcoming reservations
- End Early Button - allow users to end their reservation early
- Use Audible Prompts - play audible prompts when certain times elapse
- Check In Button - allow users to check in
- Networking Info- show network login information
- Quick Reservations has replaced Use Now from Room View, now offering more granular options.
To add or manage an existing configuration, go to the Remote Devices section from the dashboard and select Configurations.
Theme
Create the perfect theme for your brand or a special VIP guest. With Panorama, you can customize the logo, background images, and status colors to match your desired aesthetic.
- Logo - use a PNG with a transparent background.
- Background Image- configure the background image. Images will be tinted by the colors selected.
- Shared Background Image
- Enabled - use one background image for each resource status
- Disabled - choose a background for each status - Available, Booked, In Use
- Shared Background Image
- Colors - Configure the foreground and background colors for each resource status
- Tint Logo - use the appropriate foreground color for the logo to match text
Example Configurations
This External View could be used on a device that is placed outside of the resource (example: mounted outside of the conference room door)
Configuration:
- Show Schedule
- Check In Button
- Quick Reservations - enabled
Theme:
- Logo
- Background Image
- Tint Logo
The Internal View would be used on a device that sits inside the resource (example: sitting on a conference room table)
Configuration:
- Extend Button
- Time Remaining
- Show Schedule
- End Early Button
- Use Audible Prompts
- Check In Button
- Network Info
Theme:
- Logo
- Background Image
- Tint Logo
PowerBX ASTRO All-In-One Room Display
AVAILABLE IN THE Proximity STORE - visit the Order tab from the dashboard
A fresh take on integrated room scheduling systems, designed to meet the versatile needs of enterprise use. ASTRO makes managing your spaces easy from installation to the user interface. The ASTRO All-In-One Kiosk can be custom provisioned with Panorama pre-installed prior to shipment.
Features:
- Touch screen
- LED Visibility on Room Availability
- Integrated Power over Ethernet
- Quick & Easy Installation
- Enterprise-grade Security
- Wall & Glass Mounting Options
- PoE (Power over Ethernet) or 12v/1.5a Power Options
To purchase, navigate to the Order tab in your dashboard.
-
Updated by Alex Neil, Aug 06, 2024 at 12:05pm
Panorama (formerly Room View) is your window into Proximity. Enhance the convenience for your users and visitors by allowing them to see reservations at a glance, effortlessly check in to conference rooms, access guest WiFi details, and manage their reservations directly from the room. They can easily end or extend their reservations without any hassle. The Panorama app is included with every Proximity subscription.
Mount an display equipped with Panorama to the wall near your conference room or other resource and you're good to go.
Place a second display inside a conference room to remind your users to check in, find the wifi info, see how much time they have left and even allow them to book additional time.
About the Panorama App:
- Seamless Transition: Panorama is the upgraded version of Room View.
- Easy Update: For devices currently using Room View, simply update the app instead of reinstalling it to enable auto-adoption.
- Initial Setup: When launching the Panorama app for the first time, add your device through Proximity.
- Cross-Platform Compatibility:The Panorama app is designed to work seamlessly on Android, iPad, and ASTRO AlO Room Display devices.
Add Device
For existing Room View devices, the app should be updated, not reinstalled. This will allow for auto-adoption.
- From the dashboard, click on the Remote Devices tab, then select Devices.
- Towards the top-right, select the +Add Device button.
- When prompted, enter the Adoption Code displayed on the device you wish to adopt (visible by launching the Panorama app), followed by a name to make it easier to locate.
Configuration
With Panorama, you to remotely configure and manage all your devices from your Proximity dashboard. Choose form a range of option to build the perfect Panorama display.
Select the items you wish to display on the adopted device. These configurations are be applied to your devices remotely:
- Extend Button - allow users to extend their reservation
- Time Remaining - show a countdown when the meeting is about to end
- Show Schedule - show the day's upcoming reservations
- End Early Button - allow users to end their reservation early
- Use Audible Prompts - play audible prompts when certain times elapse
- Check In Button - allow users to check in
- Networking Info- show network login information
- Quick Reservations has replaced Use Now from Room View, now offering more granular options.
To add or manage an existing configuration, go to the Remote Devices section from the dashboard and select Configurations.
Theme
Create the perfect theme for your brand or a special VIP guest. With Panorama, you can customize the logo, background images, and status colors to match your desired aesthetic.
- Logo - use a PNG with a transparent background.
- Background Image- configure the background image. Images will be tinted by the colors selected.
- Shared Background Image
- Enabled - use one background image for each resource status
- Disabled - choose a background for each status - Available, Booked, In Use
- Shared Background Image
- Colors - Configure the foreground and background colors for each resource status
- Tint Logo - use the appropriate foreground color for the logo to match text
Example Configurations
This External View could be used on a device that is placed outside of the resource (example: mounted outside of the conference room door)
Configuration:
- Show Schedule
- Check In Button
- Quick Reservations - enabled
Theme:
- Logo
- Background Image
- Tint Logo
The Internal View would be used on a device that sits inside the resource (example: sitting on a conference room table)
Configuration:
- Extend Button
- Time Remaining
- Show Schedule
- End Early Button
- Use Audible Prompts
- Check In Button
- Network Info
Theme:
- Logo
- Background Image
- Tint Logo
PowerBX ASTRO All-In-One Room Display
AVAILABLE IN THE Proximity STORE - visit the Order tab from the dashboard
A fresh take on integrated room scheduling systems, designed to meet the versatile needs of enterprise use. ASTRO makes managing your spaces easy from installation to the user interface. The ASTRO All-In-One Kiosk can be custom provisioned with Panorama pre-installed prior to shipment.
Features:
- Touch screen
- LED Visibility on Room Availability
- Integrated Power over Ethernet
- Quick & Easy Installation
- Enterprise-grade Security
- Wall & Glass Mounting Options
- PoE (Power over Ethernet) or 12v/1.5a Power Options
To purchase, navigate to the Order tab in your dashboard.
-
Updated by Alex Neil, Aug 06, 2024 at 11:59am
Panorama (formerly Room View) is your window into Proximity. Enhance the convenience for your users and visitors by allowing them to see reservations at a glance, effortlessly check in to conference rooms, access guest WiFi details, and manage their reservations directly from the room. They can easily end or extend their reservations without any hassle. The Panorama app is included with every Proximity subscription.
Mount an display equipped with Panorama to the wall near your conference room or other resource and you're good to go.
Place a second display inside a conference room to remind your users to check in, find the wifi info, see how much time they have left and even allow them to book additional time.
About the Panorama App:
- Seamless Transition: Panorama is the upgraded version of Room View.
- Easy Update: For devices currently using Room View, simply update the app instead of reinstalling it to enable auto-adoption.
- Initial Setup: When launching the Panorama app for the first time, add your device through Proximity.
- Cross-Platform Compatibility:The Panorama app is designed to work seamlessly on Android, iPad, and ASTRO AlO Room Display devices.
Add Device
For existing Room View devices, the app should be updated, not reinstalled. This will allow for auto-adoption.
- From the dashboard, click on the Remote Devices tab, then select Devices.
- Towards the top-right, select the +Add Device button.
- When prompted, enter the Adoption Code displayed on the device you wish to adopt (visible by launching the Panorama app), followed by a name to make it easier to locate.
Configuration
With Panorama, you to remotely configure and manage all your devices from your Proximity dashboard. Choose form a range of option to build the perfect Panorama display.
Select the items you wish to display on the adopted device. These configurations are be applied to your devices remotely:
- Extend Button - allow users to extend their reservation
- Time Remaining - show a countdown when the meeting is about to end
- Show Schedule - show the day's upcoming reservations
- End Early Button - allow users to end their reservation early
- Use Audible Prompts - play audible prompts when certain times elapse
- Check In Button - allow users to check in
- Networking Info- show network login information
- Quick Reservations has replaced Use Now from Room View, now offering more granular options.
To add or manage an existing configuration, go to the Remote Devices section from the dashboard and select Configurations.
Theme
Create the perfect theme for your brand or a special VIP guest. With Panorama, you can customize the logo, background images, and status colors to match your desired aesthetic.
- Logo - use a PNG with a transparent background.
- Background Image- configure the background image. Images will be tinted by the colors selected.
- Shared Background Image
- Enabled - use one background image for each resource status
- Disabled - choose a background for each status - Available, Booked, In Use
- Shared Background Image
- Colors - Configure the foreground and background colors for each resource status
- Tint Logo - use the appropriate foreground color for the logo to match text
Example Configurations
This External View could be used on a device that is placed outside of the resource (example: mounted outside of the conference room door)
Configuration:
- Show Schedule
- Check In Button
- Quick Reservations - enabled
Theme:
- Logo
- Background Image
- Tint Logo
The Internal View would be used on a device that sits inside the resource (example: sitting on a conference room table)
Configuration:
- Extend Button
- Time Remaining
- Show Schedule
- End Early Button
- Use Audible Prompts
- Check In Button
- Network Info
Theme:
- Logo
- Background Image
- Tint Logo
PowerBX ASTRO All-In-One Room Display
AVAILABLE IN THE Proximity STORE - visit the Order tab from the dashboard
A fresh take on integrated room scheduling systems, designed to meet the versatile needs of enterprise use. ASTRO makes managing your spaces easy from installation to the user interface. The ASTRO All-In-One Kiosk can be custom provisioned with Panorama pre-installed prior to shipment.
Features:
- Touch screen
- LED Visibility on Room Availability
- Integrated Power over Ethernet
- Quick & Easy Installation
- Enterprise-grade Security
- Wall & Glass Mounting Options
- PoE (Power over Ethernet) or 12v/1.5a Power Options
To purchase, navigate to the Order tab in your dashboard.
-
Updated by Alex Neil, Aug 06, 2024 at 9:33am
room view,panorama,display,ipad,tablet,conferenceroomroom,panorama -
Updated by Alex Neil, Aug 06, 2024 at 8:55am
Panorama (formerly Room View) is your window into Proximity. Enhance the convenience for your users and visitors by allowing them to see reservations at a glance, effortlessly check in to conference rooms, access guest WiFi details, and manage their reservations directly from the room. They can easily end or extend their reservations without any hassle. The Panorama app is included with every Proximity subscription.
Mount an display equipped with Panorama to the wall near your conference room or other resource and you're good to go.
Place a second display inside a conference room to remind your users to check in, find the wifi info, see how much time they have left and even allow them to book additional time.
About the Panorama App:
- Seamless Transition: Panorama is the upgraded version of Room View.
- Easy Update: For devices currently using Room View, simply update the app instead of reinstalling it to enable auto-adoption.
- Initial Setup: When launching the Panorama app for the first time, add your device through Proximity.
- Cross-Platform Compatibility:The Panorama app is designed to work seamlessly on Android, iPad, and ASTRO AlO Room Display devices.
Add Device
For existing Room View devices, the app should be updated, not reinstalled. This will allow for auto-adoption.
- From the dashboard, click on the Remote Devices tab, then select Devices.
- Towards the top-right, select the +Add Device button.
- When prompted, enter the Adoption Code displayed on the device you wish to adopt (visible by launching the Panorama app), followed by a name to make it easier to locate.
Configuration
With Panorama, you to remotely configure and manage all your devices from your Proximity dashboard. Choose form a range of option to build the perfect Panorama display.
Select the items you wish to display on the adopted device. These configurations are be applied to your devices remotely:
- Extend Button - allow users to extend their reservation
- Time Remaining - show a countdown when the meeting is about to end
- Show Schedule - show the day's upcoming reservations
- End Early Button - allow users to end their reservation early
- Use Audible Prompts - play audible prompts when certain times elapse
- Check In Button - allow users to check in
- Networking Info- show network login information
- Quick Reservations has replaced Use Now from Room View, now offering more granular options.
To add or manage an existing configuration, go to the Remote Devices section from the dashboard and select Configurations.
Theme
Create the perfect theme for your brand or a special VIP guest. With Panorama, you can customize the logo, background images, and status colors to match your desired aesthetic.
- Logo - use a PNG with a transparent background.
- Background Image- configure the background image. Images will be tinted by the colors selected.
- Shared Background Image
- Enabled - use one background image for each resource status
- Disabled - choose a background for each status - Available, Booked, In Use
- Shared Background Image
- Colors - Configure the foreground and background colors for each resource status
- Tint Logo - use the appropriate foreground color for the logo to match text
Example Configurations
This External View could be used on a device that is placed outside of the resource (example: mounted outside of the conference room door)
Configuration:
- Show Schedule
- Check In Button
- Quick Reservations - enabled
Theme:
- Logo
- Background Image
- Tint Logo
The Internal View would be used on a device that sits inside the resource (example: sitting on a conference room table)
Configuration:
- Extend Button
- Time Remaining
- Show Schedule
- End Early Button
- Use Audible Prompts
- Check In Button
- Network Info
Theme:
- Logo
- Background Image
- Tint Logo
PowerBX ASTRO All-In-One Room Display
AVAILABLE IN THE Proximity STORE - visit the Order tab from the dashboard
A fresh take on integrated room scheduling systems, designed to meet the versatile needs of enterprise use. ASTRO makes managing your spaces easy from installation to the user interface. The ASTRO All-In-One Kiosk can be custom provisioned with Panorama pre-installed prior to shipment.
Features:
- Touch screen
- LED Visibility on Room Availability
- Integrated Power over Ethernet
- Quick & Easy Installation
- Enterprise-grade Security
- Wall & Glass Mounting Options
- PoE (Power over Ethernet) or 12v/1.5a Power Options
To purchase, navigate to the Order tab in your dashboard.
-
Updated by Alex Neil, Aug 06, 2024 at 8:53am
Panorama (formerly Room View) is your window into Proximity. Enhance the convenience for your users and visitors by allowing them to see reservations at a glance, effortlessly check in to conference rooms, access guest WiFi details, and manage their reservations directly from the room. They can easily end or extend their reservations without any hassle. The Panorama app is included with every Proximity subscription.
Mount an display equipped with Panorama to the wall near your conference room or other resource and you're good to go.
Place a second display inside a conference room to remind your users to check in, find the wifi info, see how much time they have left and even allow them to book additional time.
About the Panorama App:
- Seamless Transition: Panorama is the upgraded version of Room View.
- Easy Update: For devices currently using Room View, simply update the app instead of reinstalling it to enable auto-adoption.
- Initial Setup: When launching the Panorama app for the first time, add your device through Proximity.
- Cross-Platform Compatibility:The Panorama app is designed to work seamlessly on Android, iPad, and ASTRO AlO Room Display devices.
Add Device
For existing Room View devices, the app should be updated, not reinstalled. This will allow for auto-adoption.
- From the dashboard, click on the Remote Devices tab, then select Devices.
- Towards the top-right, select the +Add Device button.
- When prompted, enter the Adoption Code displayed on the device you wish to adopt (visible by launching the Panorama app), followed by a name to make it easier to locate.
Configuration
With Panorama, you to remotely configure and manage all your devices from your Proximity dashboard. Choose form a range of option to build the perfect Panorama display.
Select the items you wish to display on the adopted device. These configurations
canare be applied tomultipleyour devices, making it easier to manage several devices at once, allremotely:- Extend Button - allow users to extend their reservation
- Time Remaining - show a countdown when the meeting is about to end
- Show Schedule - show the day's upcoming reservations
- End Early Button - allow users to end their reservation early
- Use Audible Prompts - play audible prompts when certain times elapse
- Check In Button - allow users to check in
- Networking Info- show network login information
- Quick Reservations has replaced Use Now from Room View, now offering more granular options.
To add or manage an existing configuration, go to the Remote Devices section from the dashboard and select Configurations.
Theme
Create the perfect theme for your brand or a special VIP guest. With Panorama, you can customize the logo, background images, and status colors to match your desired aesthetic.
- Logo - use a PNG with a transparent background.
- Background Image- configure the background image. Images will be tinted by the colors selected.
- Shared Background Image
- Enabled - use one background image for each resource status
- Disabled - choose a background for each status - Available, Booked, In Use
- Shared Background Image
- Colors - Configure the foreground and background colors for each resource status
- Tint Logo - use the appropriate foreground color for the logo to match text
Example Configurations
This External View could be used on a device that is placed outside of the resource (example: mounted outside of the conference room door)
Configuration:
- Show Schedule
- Check In Button
- Quick Reservations - enabled
Theme:
- Logo
- Background Image
- Tint Logo
The Internal View would be used on a device that sits inside the resource (example: sitting on a conference room table)
Configuration:
- Extend Button
- Time Remaining
- Show Schedule
- End Early Button
- Use Audible Prompts
- Check In Button
- Network Info
Theme:
- Logo
- Background Image
- Tint Logo
PowerBX ASTRO All-In-One Room Display
AVAILABLE IN THE Proximity STORE - visit the Order tab from the dashboard
A fresh take on integrated room scheduling systems, designed to meet the versatile needs of enterprise use. ASTRO makes managing your spaces easy from installation to the user interface. The ASTRO All-In-One Kiosk can be custom provisioned with Panorama pre-installed prior to shipment.
Features:
- Touch screen
- LED Visibility on Room Availability
- Integrated Power over Ethernet
- Quick & Easy Installation
- Enterprise-grade Security
- Wall & Glass Mounting Options
- PoE (Power over Ethernet) or 12v/1.5a Power Options
To purchase, navigate to the Order tab in your dashboard.
-
Updated by Alex Neil, Aug 06, 2024 at 8:48am
Panorama (formerly Room View) is your window into Proximity. Enhance the convenience for your users and visitors by allowing them to see reservations at a glance, effortlessly check in to conference rooms, access guest WiFi details, and manage their reservations directly from the room. They can easily end or extend their reservations without any hassle. The Panorama app is included with every Proximity subscription.
Mount an display equipped with Panorama to the wall near your conference room or other resource and you're good to go.
Place a second display inside a conference room to remind your users to check in, find the wifi info, see how much time they have left and even allow them to book additional time.
About the Panorama App:
- Seamless Transition: Panorama is the upgraded version of Room View.
- Easy Update: For devices currently using Room View, simply update the app instead of reinstalling it to enable auto-adoption.
- Initial Setup: When launching the Panorama app for the first time, add your device through Proximity.
- Cross-Platform Compatibility:The Panorama app is designed to work seamlessly on Android, iPad, and ASTRO AlO Room Display devices.
Add Device
For existing Room View devices, the app should be updated, not reinstalled. This will allow for auto-adoption.
- From the dashboard, click on the Remote Devices tab, then select Devices.
- Towards the top-right, select the +Add Device button.
- When prompted, enter the Adoption Code displayed on the device you wish to adopt (visible by launching the Panorama app), followed by a name to make it easier to locate.
Configuration
With Panorama, you to remotely configure and manage all your devices from your Proximity dashboard. Choose form a range of option to build the perfect Panorama display.
Select the items you wish to display on the adopted device. These configurations can be applied to multiple devices, making it easier to manage several devices at once, all remotely:
- Extend Button - allow users to extend their reservation
- Time Remaining - show a countdown when the meeting is about to end
- Show Schedule - show the day's upcoming reservations
- End Early Button - allow users to end their reservation early
- Use Audible Prompts - play audible prompts when certain times elapse
- Check In Button - allow users to check in
- Networking Info- show network login information
- Quick Reservations has replaced Use Now from Room View, now offering more granular options.
To add or manage an existing configuration, go to the Remote Devices section from the dashboard and select Configurations.
Theme
Create the perfect theme for your brand or a special VIP guest. With Panorama, you can customize the logo, background images, and status colors to match your desired aesthetic.
- Logo - use a PNG with a transparent background.
- Background Image- configure the background image. Images will be tinted by the colors selected.
- Shared Background Image
- Enabled - use one background image for each resource status
- Disabled - choose a background for each status - Available, Booked, In Use
- Shared Background Image
- Colors - Configure the foreground and background colors for each resource status
- Tint Logo - use the appropriate foreground color for the logo to match text
Example Configurations
This External View could be used on a device that is placed outside of the resource (example: mounted outside of the conference room door)
Configuration:
- Show Schedule
- Check In Button
- Quick Reservations - enabled
- Logo
- Background Image
- Tint Logo
The Internal View would be used on a device that sits inside the resource (example: sitting on a conference room table)
Configuration:
- Extend Button
- Time Remaining
- Show Schedule
- End Early Button
- Use Audible Prompts
- Check In Button
- Network Info
Theme:- Logo
- Background Image
- Tint Logo
PowerBX ASTRO All-In-One Room Display
AVAILABLE IN THE Proximity STORE - visit the Order tab from the dashboard
A fresh take on integrated room scheduling systems, designed to meet the versatile needs of enterprise use. ASTRO makes managing your spaces easy from installation to the user interface. The ASTRO All-In-One Kiosk can be custom provisioned with Panorama pre-installed prior to shipment.
Features:
- Touch screen
- LED Visibility on Room Availability
- Integrated Power over Ethernet
- Quick & Easy Installation
- Enterprise-grade Security
- Wall & Glass Mounting Options
- PoE (Power over Ethernet) or 12v/1.5a Power Options
To purchase, navigate to the Order tab in your dashboard.
-
Updated by Alex Neil, Aug 06, 2024 at 8:46am
Panorama (formerly Room View) is your window into Proximity. Enhance the convenience for your users and visitors by allowing them to see reservations at a glance, effortlessly check in to conference rooms, access guest WiFi details, and manage their reservations directly from the room. They can easily end or extend their reservations without any hassle. The Panorama app is included with every Proximity subscription.
Mount an display equipped with Panorama to the wall near your conference room or other resource and you're good to go.
Place a second display inside a conference room to remind your users to check in, find the wifi info, see how much time they have left and even allow them to book additional time.
About the Panorama App:
- Seamless Transition: Panorama is the upgraded version of Room View.
- Easy Update: For devices currently using Room View, simply update the app instead of reinstalling it to enable auto-adoption.
- Initial Setup: When launching the Panorama app for the first time, add your device through Proximity.
- Cross-Platform Compatibility:The Panorama app is designed to work seamlessly on Android, iPad, and ASTRO AlO Room Display devices.
Add Device
For existing Room View devices, the app should be updated, not reinstalled. This will allow for auto-adoption.
- From the dashboard, click on the Remote Devices tab, then select Devices.
- Towards the top-right, select the +Add Device button.
- When prompted, enter the Adoption Code displayed on the device you wish to adopt (visible by launching the Panorama app), followed by a name to make it easier to locate.
Configuration
With Panorama, you to remotely configure and manage all your devices from your Proximity dashboard. Choose form a range of option to build the perfect Panorama display.
Select the items you wish to display on the adopted device. These configurations can be applied to multiple devices, making it easier to manage several devices at once, all remotely:
- Extend Button - allow users to extend their reservation
- Time Remaining - show a countdown when the meeting is about to end
- Show Schedule - show the day's upcoming reservations
- End Early Button - allow users to end their reservation early
- Use Audible Prompts - play audible prompts when certain times elapse
- Check In Button - allow users to check in
- Networking Info- show network login information
- Quick Reservations has replaced Use Now from Room View, now offering more granular options.
To add or manage an existing configuration, go to the Remote Devices section from the dashboard and select Configurations.
Theme
Create the perfect theme for your brand or a special VIP guest. With Panorama, you can customize the logo, background images, and status colors to match your desired aesthetic.
- Logo - use a PNG with a transparent background.
- Background Image- configure the background image. Images will be tinted by the colors selected.
- Shared Background Image
- Enabled - use one background image for each resource status
- Disabled - choose a background for each status - Available, Booked, In Use
- Shared Background Image
- Colors - Configure the foreground and background colors for each resource status
- Tint Logo - use the appropriate foreground color for the logo to match text
Example Configurations
This External View could be used on a device that is placed outside of the resource (example: mounted outside of the conference room door)
Configuration:
- Show Schedule
- Check In Button
- Quick Reservations - enabled
The Internal View would be used on a device that sits inside the resource (example: sitting on a conference room table)
Configuration:
- Extend Button
- Time Remaining
- Show Schedule
- End Early Button
- Use Audible Prompts
- Check In Button
- Network Info
PowerBX ASTRO All-In-One Room Display
AVAILABLE IN THE Proximity STORE - visit the Order tab from the dashboard
A fresh take on integrated room scheduling systems, designed to meet the versatile needs of enterprise use. ASTRO makes managing your spaces easy from installation to the user interface. The ASTRO All-In-One Kiosk can be custom provisioned with Panorama pre-installed prior to shipment.
Features:
- Touch screen
- LED Visibility on Room Availability
- Integrated Power over Ethernet
- Quick & Easy Installation
- Enterprise-grade Security
- Wall & Glass Mounting Options
- PoE (Power over Ethernet) or 12v/1.5a Power Options
To purchase, navigate to the Order tab in your dashboard.
-
Updated by Alex Neil, Aug 06, 2024 at 8:35am
Panorama (formerly Room View) is your window into Proximity. Enhance the convenience for your users and visitors by allowing them to see reservations at a glance, effortlessly check in to conference rooms, access guest WiFi details, and manage their reservations directly from the room. They can easily end or extend their reservations without any hassle. The Panorama app is included with every Proximity subscription.
Mount an display equipped with Panorama to the wall near your conference room or other resource and you're good to go.
Place a second display inside a conference room to remind your users to check in, find the wifi info, see how much time they have left and even allow them to book additional time.
About the Panorama App:
- Seamless Transition: Panorama is the upgraded version of Room View.
- Easy Update: For devices currently using Room View, simply update the app instead of reinstalling it to enable auto-adoption.
- Initial Setup: When launching the Panorama app for the first time, add your device through Proximity.
- Cross-Platform Compatibility:The Panorama app is designed to work seamlessly on Android, iPad, and ASTRO AlO Room Display devices.
Add Device
For existing Room View devices, the app should be updated, not reinstalled. This will allow for auto-adoption.
- From the dashboard, click on the Remote Devices tab, then select Devices.
- Towards the top-right, select the +Add Device button.
- When prompted, enter the Adoption Code displayed on the device you wish to adopt (visible by launching the Panorama app), followed by a name to make it easier to locate.
Enter Adoption Code from DeviceAdoption Code on DeviceConfiguration
With Panorama, you to remotely configure and manage all your devices from your Proximity dashboard. Choose form a range of option to build the perfect Panorama display.
Select the items you wish to display on the adopted device. These configurations can be applied to multiple devices, making it easier to manage several devices at once, all remotely:
- Extend Button - allow users to extend their reservation
- Time Remaining - show a countdown when the meeting is about to end
- Show Schedule - show the day's upcoming reservations
- End Early Button - allow users to end their reservation early
- Use Audible Prompts - play audible prompts when certain times elapse
- Check In Button - allow users to check in
- Networking Info- show network login information
- Quick Reservations has replaced Use Now from Room View, now offering more granular options.
To add or manage an existing configuration, go to the Remote Devices section from the dashboard and select Configurations.
Theme
Create the perfect theme for your brand or a special VIP guest. With Panorama, you can customize the logo, background images, and status colors to match your desired aesthetic.
Example Configurations
This External View could be used on a device that is placed outside of the resource (example: mounted outside of the conference room door)
Configuration:
- Show Schedule
- Check In Button
- Quick Reservations - enabled
The Internal View would be used on a device that sits inside the resource (example: sitting on a conference room table)
Configuration:
- Extend Button
- Time Remaining
- Show Schedule
- End Early Button
- Use Audible Prompts
- Check In Button
- Network Info
PowerBX ASTRO All-In-One Room Display
AVAILABLE IN THE Proximity STORE - visit the Order tab from the dashboard
A fresh take on integrated room scheduling systems, designed to meet the versatile needs of enterprise use. ASTRO makes managing your spaces easy from installation to the user interface. The ASTRO All-In-One Kiosk can be custom provisioned with Panorama pre-installed prior to shipment.
Features:
- Touch screen
- LED Visibility on Room Availability
- Integrated Power over Ethernet
- Quick & Easy Installation
- Enterprise-grade Security
- Wall & Glass Mounting Options
- PoE (Power over Ethernet) or 12v/1.5a Power Options
To purchase, navigate to the Order tab in your dashboard.
-
Updated by Alex Neil, Aug 06, 2024 at 8:33am
room view,panorama,display,ipad,tablet,conference room -
Updated by Alex Neil, Aug 06, 2024 at 8:33am
ThePanoramaapp enhances(formerly Room View) is your window into Proximity Enhance the convenience for yourmembersusers and visitors by allowing them to see reservations at a glance, effortlessly check in to conference rooms, access guest WiFi details, and manage their reservations directly from the room. They can easily end or extend their reservations without any hassle. The Panorama app is included with every Proximity subscription.Mount an display equipped with Panorama to the wall near your conference room or other resource and you're good to go.
Place a second display inside a conference room to remind your users to check in, find the wifi info, see how much time they have left and even allow them to book additional time.
About the Panorama App:
- Seamless Transition: Panorama is the upgraded version of Room View.
- Easy Update: For devices currently using Room View, simply update the app instead of reinstalling it to enable auto-adoption.
- Initial Setup: When launching the Panorama app for the first time, add your device through Proximity.
- Cross-Platform Compatibility:The Panorama app is designed to work seamlessly on Android, iPad, and ASTRO AlO Room Display devices.
Add Device
For existing Room View devices, the app should be updated, not reinstalled. This will allow for auto-adoption.
- From the dashboard, click on the Remote Devices tab, then select Devices.
- Towards the top-right, select the +Add Device button
- When prompted, enter the Adoption Code displayed on the device you wish to adopt (visible by launching the Panorama app), followed by a name to make it easier to locate.
Enter Adoption Code from DeviceAdoption Code on DeviceConfiguration
With Panorama, you to remotely configure and manage all your devices from your Proximity dashboard. Choose form a range of option to build the perfect Panorama display.
Select the items you wish to display on the adopted device. These configurations can be applied to multiple devices, making it easier to manage several devices at once, all remotely:
- Extend Button - allow users to extend their reservation
- Time Remaining - show a countdown when the meeting is about to end
- Show Schedule - show the day's upcoming reservations
- End Early Button - allow users to end their reservation early
- Use Audible Prompts - play audible prompts when certain times elapse
- Check In Button - allow users to check in
- Networking Info- show network login information
- Quick Reservations has replaced Use Now from Room View, now offering more granular options.
To add or manage an existing configuration, go to the Remote Devices section from the dashboard and select Configurations.
Theme
Create the perfect theme for your brand or a special VIP guest. With Panorama, you can customize the logo, background images, and status colors to match your desired aesthetic.
Example Configurations
This External View could be used on a device that is placed outside of the resource (example: mounted outside of the conference room door)
Configuration:
- Show Schedule
- Check In Button
- Quick Reservations - enabled
The Internal View would be used on a device that sits inside the resource (example: sitting on a conference room table)
Configuration:
- Extend Button
- Time Remaining
- Show Schedule
- End Early Button
- Use Audible Prompts
- Check In Button
- Network Info
PowerBX ASTRO All-In-One Room Display
AVAILABLE IN THE Proximity STORE - visit the Order tab from the dashboard
A fresh take on integrated room scheduling systems, designed to meet the versatile needs of enterprise use. ASTRO makes managing your spaces easy from installation to the user interface. The ASTRO All-In-One Kiosk can be custom provisioned with Panorama pre-installed prior to shipment.
Features:
- Touch screen
- LED Visibility on Room Availability
- Integrated Power over Ethernet
- Quick & Easy Installation
- Enterprise-grade Security
- Wall & Glass Mounting Options
- PoE (Power over Ethernet) or 12v/1.5a Power Options
To purchase, navigate to the Order tab in your dashboard.
-
Updated by Alex Neil, Aug 06, 2024 at 8:26am
The Panorama app enhances convenience for your members and visitors by allowing them to effortlessly check in to conference rooms, access guest WiFi details, and manage their reservations directly from the room. They can easily end or extend their reservations without any hassle. The Panorama app is included with every Proximity subscription.
About the Panorama App:
- Seamless Transition: Panorama is the upgraded version of Room View.
- Easy Update: For devices currently using Room View, simply update the app instead of reinstalling it to enable auto-adoption.
- Initial Setup: When launching the Panorama app for the first time, add your device through Proximity.
- Cross-Platform Compatibility:The Panorama app is designed to work seamlessly on Android, iPad, and ASTRO AlO Room Display devices.
Add Device
For existing Room View devices, the app should be updated, not reinstalled. This will allow for auto-adoption.
- From the dashboard, click on the Remote Devices tab, then select Devices.
- Towards the top-right, select the +Add Device button
- When prompted, enter the Adoption Code displayed on the device you wish to adopt (visible by launching the Panorama app), followed by a name to make it easier to locate.
Enter Adoption Code from DeviceAdoption Code on DeviceConfiguration
With Panorama, you to remotely configure and manage all your devices from your Proximity dashboard. Choose form a range of option to build the perfect Panorama display.
Select the items you wish to display on the adopted device. These configurations can be applied to multiple devices, making it easier to manage several devices at once, all remotely:
- Extend Button - allow users to extend their reservation
- Time Remaining - show a countdown when the meeting is about to end
- Show Schedule - show the day's upcoming reservations
- End Early Button - allow users to end their reservation early
- Use Audible Prompts - play audible prompts when certain times elapse
- Check In Button - allow users to check in
- Networking Info- show network login information
- Quick Reservations has replaced Use Now from Room View, now offering more granular options.
To add or manage an existing configuration, go to the Remote Devices section from the dashboard and select Configurations.
Theme
Create the perfect theme for your brand or a special VIP guest. With Panorama, you can customize the logo, background images, and status colors to match your desired aesthetic.
Example Configurations
This External View could be used on a device that is placed outside of the resource (example: mounted outside of the conference room door)
Configuration:
- Show Schedule
- Check In Button
- Quick Reservations - enabled
This is the view showing theReservable Resource scheduleand room availability:The Internal View would be used on a device that sits inside the resource (example: sitting on a conference room table)
This is the view showing themeeting details and guest wifiinformation(helpful for members to verify they are in the correct room)Configuration:- Extend Button
- Time Remaining
- Show Schedule
- End Early Button
- Use Audible Prompts
- Check In Button
- Network Info
PowerBX ASTRO All-In-One Room Display
AVAILABLE IN THE Proximity STORE - visit the Order tab from the dashboard
A fresh take on integrated room scheduling systems, designed to meet the versatile needs of enterprise use. ASTRO makes managing your spaces easy from installation to the user interface. The ASTRO All-In-One Kiosk can be custom provisioned with Panorama pre-installed prior to shipment.
Features:
- Touch screen
- LED Visibility on Room Availability
- Integrated Power over Ethernet
- Quick & Easy Installation
- Enterprise-grade Security
- Wall & Glass Mounting Options
- PoE (Power over Ethernet) or 12v/1.5a Power Options
To purchase, navigate to the Order tab in your dashboard.
-
Updated by Alex Neil, Aug 06, 2024 at 8:19am
The Panorama app enhances convenience for your members and visitors by allowing them to effortlessly check in to conference rooms, access guest WiFi details, and manage their reservations directly from the room. They can easily end or extend their reservations without any hassle. The Panorama app is included with every Proximity subscription.
About the Panorama App:
- Seamless Transition: Panorama is the upgraded version of Room View.
- Easy Update: For devices currently using Room View, simply update the app instead of reinstalling it to enable auto-adoption.
- Initial Setup: When launching the Panorama app for the first time, add your device through Proximity.
- Cross-Platform Compatibility:The Panorama app is designed to work seamlessly on Android, iPad, and ASTRO AlO Room Display devices.
Add Device
For existing Room View devices, the app should be updated, not reinstalled. This will allow for auto-adoption.
- From the dashboard, click on the Remote Devices tab, then select Devices.
- Towards the top-right, select the +Add Device button
- When prompted, enter the Adoption Code displayed on the device you wish to adopt (visible by launching the Panorama app), followed by a name to make it easier to locate.
Enter Adoption Code from DeviceAdoption Code on DeviceConfiguration
With Panorama, you to remotely configure and manage all your devices from your Proximity dashboard. Choose form a range of option to build the perfect Panorama display.
Select the items you wish to display on the adopted device. These configurations can be applied to multiple devices, making it easier to manage several devices at once, all remotely:
- Extend Button - allow users to extend their reservation
- Time Remaining - show a countdown when the meeting is about to end
- Show Schedule - show the day's upcoming reservations
- End Early Button - allow users to end their reservation early
- Use Audible Prompts - play audible prompts when certain times elapse
- Check In Button - allow users to check in
- Networking Info- show network login information
- Quick Reservations has replaced Use Now from Room View, now offering more granular options.
To add or manage an existing configuration, go to the Remote Devices section from the dashboard and select Configurations.
Theme
Create the perfect theme for your brand or a special VIP guest. With Panorama, you can customize the logo, background images, and status colors to match your desired aesthetic.
Example Configurations
This External View could be used on a device that is placed outside of the resource (example: mounted outside of the conference room door)
Configuration:
- Show Schedule
- Check In Button
This is the view showing the Reservable Resource schedule and room availability:
The Internal View would be used on a device that sits inside the resource (example: sitting on a conference room table)
This is the view showing the meeting details and guest wifi information (helpful for members to verify they are in the correct room):
PowerBX ASTRO All-In-One Room Display
AVAILABLE IN THE Proximity STORE - visit the Order tab from the dashboard
A fresh take on integrated room scheduling systems, designed to meet the versatile needs of enterprise use. ASTRO makes managing your spaces easy from installation to the user interface. The ASTRO All-In-One Kiosk can be custom provisioned with Panorama pre-installed prior to shipment.
Features:
- Touch screen
- LED Visibility on Room Availability
- Integrated Power over Ethernet
- Quick & Easy Installation
- Enterprise-grade Security
- Wall & Glass Mounting Options
- PoE (Power over Ethernet) or 12v/1.5a Power Options
To purchase, navigate to the Order tab in your dashboard.
-
Updated by Alex Neil, Aug 06, 2024 at 8:17am
The Panorama app
letsenhances convenience for your members and visitorseasilyby allowing them to effortlessly check in to conference rooms,seeaccess guest WiFiinformationdetails,endand manage theirreservation early,reservations directly from the room. They can easily end or extend theirreservationreservations withoutleaving the roomany hassle. The Panorama app is included withthe price ofevery Proximity subscription.About the Panorama App:
Panorama replaces Room ViewWhen you first launch the Panorama app you will need to Add Device from ProximityClick here to assign the SSID for your resources - None, Static, RADIUS, or Meraki- Seamless Transition: Panorama is the upgraded version of Room View.
- Easy Update: For devices currently using Room View, simply update the app instead of reinstalling it to enable auto-adoption.
- Initial Setup: When launching the Panorama app for the first time, add your device through Proximity.
- Cross-Platform Compatibility:The Panorama app is designed to work seamlessly on Android, iPad, and ASTRO AlO Display devices.
Add Device
For existing Room View devices, the app should be updated, not reinstalled. This will allow for auto-adoption.
- From the dashboard,
start by clickingclick on the Remote Devicestab, then select Devices. - Towards the top-right, select the +Add Device button
- When prompted,
enteredenter the Adoption Codedisplayed on the device you wish to adopt-(visible by launching the Panorama app-), followed by a name to make it easier to locate.
Enter Adoption Code from DeviceAdoption Code on DeviceConfiguration
With Panorama, you to remotely configure and manage all your devices from your Proximity dashboard. Choose form a range of option to build the perfect Panorama display.
Select
from the following options,the items you wish to display on the adopted device. These configurations can beused on multi-applied to multiple devices, making it easier to manage several devices at once, all remotely.:- Extend Button - allow users to extend their reservation
- Time Remaining - show a countdown when the meeting is about to end
- Show Schedule - show the day's upcoming reservations
- End Early Button - allow users to end their reservation early
- Use Audible Prompts - play audible prompts when certain times elapse
- Check In Button - allow users to check in
- Networking Info- show network login information
- Quick Reservations has replaced Use Now from Room View, now offering more granular options.
To add or manage an existing configuration, go to the Remote Devices section from the dashboard and select Configurations.
Theme
Create the perfect theme for your brand or a special VIP guest. With Panorama, you can customize the logo, background images, and status colors to match your desired aesthetic.
Example Configurations
This External View could be used on a device that is placed outside of the resource (example: mounted outside of the conference room door)
Configuration:
- Show Schedule
- Check In Button
This is the view showing the Reservable Resource schedule and room availability:
The Internal View would be used on a device that sits inside the resource (example: sitting on a conference room table)
This is the view showing the meeting details and guest wifi information (helpful for members to verify they are in the correct room):
PowerBX ASTRO All-In-One Room Display
AVAILABLE IN THE Proximity STORE - visit the Order tab from the dashboard
A fresh take on integrated room scheduling systems, designed to meet the versatile needs of enterprise use. ASTRO makes managing your spaces easy from installation to the user interface. The ASTRO All-In-One Kiosk can be custom provisioned with Panorama pre-installed prior to shipment.
Features:
- Touch screen
- LED Visibility on Room Availability
- Integrated Power over Ethernet
- Quick & Easy Installation
- Enterprise-grade Security
- Wall & Glass Mounting Options
- PoE (Power over Ethernet) or 12v/1.5a Power Options
To purchase, navigate to the Order tab in your dashboard.
-
Updated by Alex Neil, Aug 05, 2024 at 6:51pm
The Panorama app lets your members and visitors easily check in to conference rooms, see guest WiFi information, end their reservation early, or extend their reservation without leaving the room. Panorama is included with the price of every Proximity subscription.
About the Panorama App:
- Panorama replaces Room View
- When you first launch the Panorama app you will need to Add Device from Proximity
- Click here to assign the SSID for your resources - None, Static, RADIUS, or Meraki
Add Device
- From the dashboard, start by clicking the Remote Devices tab, then Devices
- Towards the top-right, select the +Add Device button
- When prompted, entered the Adoption Code displayed on the device you wish to adopt - by launching the Panorama app - followed by a name to make it easier to locate.
Configuration
Select from the following options, the items you wish to display on the adopted device. These configurations can be used on multi-devices, making it easier to manage several devices at once, all remotely.
- Extend Button - allow users to extend their reservation
- Time Remaining - show a countdown when the meeting is about to end
- Show Schedule - show the day's upcoming reservations
- End Early Button - allow users to end their reservation early
- Use Audible Prompts - play audible prompts when certain times elapse
- Check In Button - allow users to check in
- Networking Info- show network login information
- Quick Reservations has replaced Use Now from Room View, now offering more granular options.
Theme
Example Configurations
This External View could be used on a device that is placed outside of the resource (example: mounted outside of the conference room door)
Configuration:
- Show Schedule
- Check In Button
This is the view showing the Reservable Resource schedule and room availability:
The Internal View would be used on a device that sits inside the resource (example: sitting on a conference room table)
This is the view showing the meeting details and guest wifi information (helpful for members to verify they are in the correct room):
PowerBX ASTRO All-In-One Room Display
AVAILABLE IN THE Proximity STORE - visit the Order tab from the dashboard
A fresh take on integrated room scheduling systems, designed to meet the versatile needs of enterprise use. ASTRO makes managing your spaces easy from installation to the user interface. The ASTRO All-In-One Kiosk can be custom provisioned with Panorama pre-installed prior to shipment.
Features:
- Touch screen
- LED Visibility on Room Availability
- Integrated Power over Ethernet
- Quick & Easy Installation
- Enterprise-grade Security
- Wall & Glass Mounting Options
- PoE (Power over Ethernet) or 12v/1.5a Power Options
To purchase, navigate to the Order tab in your dashboard.
-
Updated by Alex Neil, Aug 05, 2024 at 6:50pm
The Panorama app lets your members and visitors easily check in to conference rooms, see guest WiFi information, end their reservation early, or extend their reservation without leaving the room. Panorama is included with the price of every Proximity subscription.
Panorama for iPadOSPanorama can be used with iOS devices that run on iOS 12 or later.Click hereto find Panorama
Panorama for AndroidPanorama can be used with Android devices that run on 7.0 and up.Click hereto find Panorama for Android in the Google Play Store.
About the Panorama App:
- Panorama replaces Room View
- When you first launch the Panorama app you will need to Add Device from Proximity
- Click here to assign the SSID for your resources - None, Static, RADIUS, or Meraki
Add Device
- From the dashboard, start by clicking the Remote Devices tab, then Devices
- Towards the top-right, select the +Add Device button
- When prompted, entered the Adoption Code displayed on the device you wish to adopt - by launching the Panorama app - followed by a name to make it easier to locate.
Configuration
Select from the following options, the items you wish to display on the adopted device. These configurations can be used on multi-devices, making it easier to manage several devices at once, all remotely.
- Extend Button - allow users to extend their reservation
- Time Remaining - show a countdown when the meeting is about to end
- Show Schedule - show the day's upcoming reservations
- End Early Button - allow users to end their reservation early
- Use Audible Prompts - play audible prompts when certain times elapse
- Check In Button - allow users to check in
- Networking Info- show network login information
- Quick Reservations has replaced Use Now from Room View, now offering more granular options.
Theme
Example Configurations
This External View could be used on a device that is placed outside of the resource (example: mounted outside of the conference room door)
Configuration:
- Show Schedule
- Check In Button
This is the view showing the Reservable Resource schedule and room availability:
The Internal View would be used on a device that sits inside the resource (example: sitting on a conference room table)
This is the view showing the meeting details and guest wifi information (helpful for members to verify they are in the correct room):
PowerBX ASTRO All-In-One Room Display
AVAILABLE IN THE Proximity STORE - visit the Order tab from the dashboard
A fresh take on integrated room scheduling systems, designed to meet the versatile needs of enterprise use. ASTRO makes managing your spaces easy from installation to the user interface. The ASTRO All-In-One Kiosk can be custom provisioned with Panorama pre-installed prior to shipment.
Features:
- Touch screen
- LED Visibility on Room Availability
- Integrated Power over Ethernet
- Quick & Easy Installation
- Enterprise-grade Security
- Wall & Glass Mounting Options
- PoE (Power over Ethernet) or 12v/1.5a Power Options
To purchase, navigate to the Order tab in your dashboard.
-
Updated by Alex Neil, Aug 05, 2024 at 6:48pm
Panorama App (formerly Room View) -
Updated by Alex Neil, Aug 05, 2024 at 6:48pm
The Panorama app lets your members and visitors easily check in to conference rooms, see guest WiFi information, end their reservation early, or extend their reservation without leaving the room. Panorama is included with the price of every Proximity subscription.
Panorama for
iOSiPadOS- Panorama can be used with iOS devices that run on iOS 12 or later.
- Click here to find Panorama
Panorama for Android
- Panorama can be used with Android devices that run on 7.0 and up.
- Click here to find Panorama for Android in the Google Play Store.
About the Panorama App:
- Panorama replaces Room View
- When you first launch the Panorama app
login with your owner or manager email and password foryou will need to Add Device from Proximity There are two different views on the Panorama app -- internal and external; each view serves a unique purpose.As a manager, you can switch the view (internal/external) by tapping once on the screen and clicking the gear icon in the lower right-hand corner.Remember to set your passcode on your Panorama settings screen. This will help you prevent members from changing things they shouldn’t have access to.- Click here to assign the SSID for your resources - None, Static, RADIUS, or Meraki
Internal ViewAdd Device- From the dashboard, start by clicking the Remote Devices tab, then Devices
- Towards the top-right, select the +Add Device button
- When prompted, entered the Adoption Code displayed on the device you wish to adopt - by launching the Panorama app - followed by a name to make it easier to locate.
Configuration
Select from the following options, the items you wish to display on the adopted device. These configurations can be used on multi-devices, making it easier to manage several devices at once, all remotely.
- Extend Button - allow users to extend their reservation
- Time Remaining - show a countdown when the meeting is about to end
- Show Schedule - show the day's upcoming reservations
- End Early Button - allow users to end their reservation early
- Use Audible Prompts - play audible prompts when certain times elapse
- Check In Button - allow users to check in
- Networking Info- show network login information
- Quick Reservations has replaced Use Now from Room View, now offering more granular options.
Theme
Example Configurations
This External View could be used on a device that is placed outside of the resource (example: mounted outside of the conference room door)
Configuration:
- Show Schedule
- Check In Button
This is the view showing the Reservable Resource schedule and room availability:
The Internal View would be used on a device that sits inside the resource (example: sitting on a conference room table)
This is the view showing the meeting details and guest wifi information (helpful for members to verify they are in the correct room):
By viewing meeting details, your members will be able to see:Which conference room they are in(more useful than you think)When their reservation begins and when it endsThe WiFi network name and passwordThe time!(also more useful than you may think)Perhaps most importantly, attendees will receive verbal reminders to check in and when their reservation is ending
This is the view toRequire member check-in: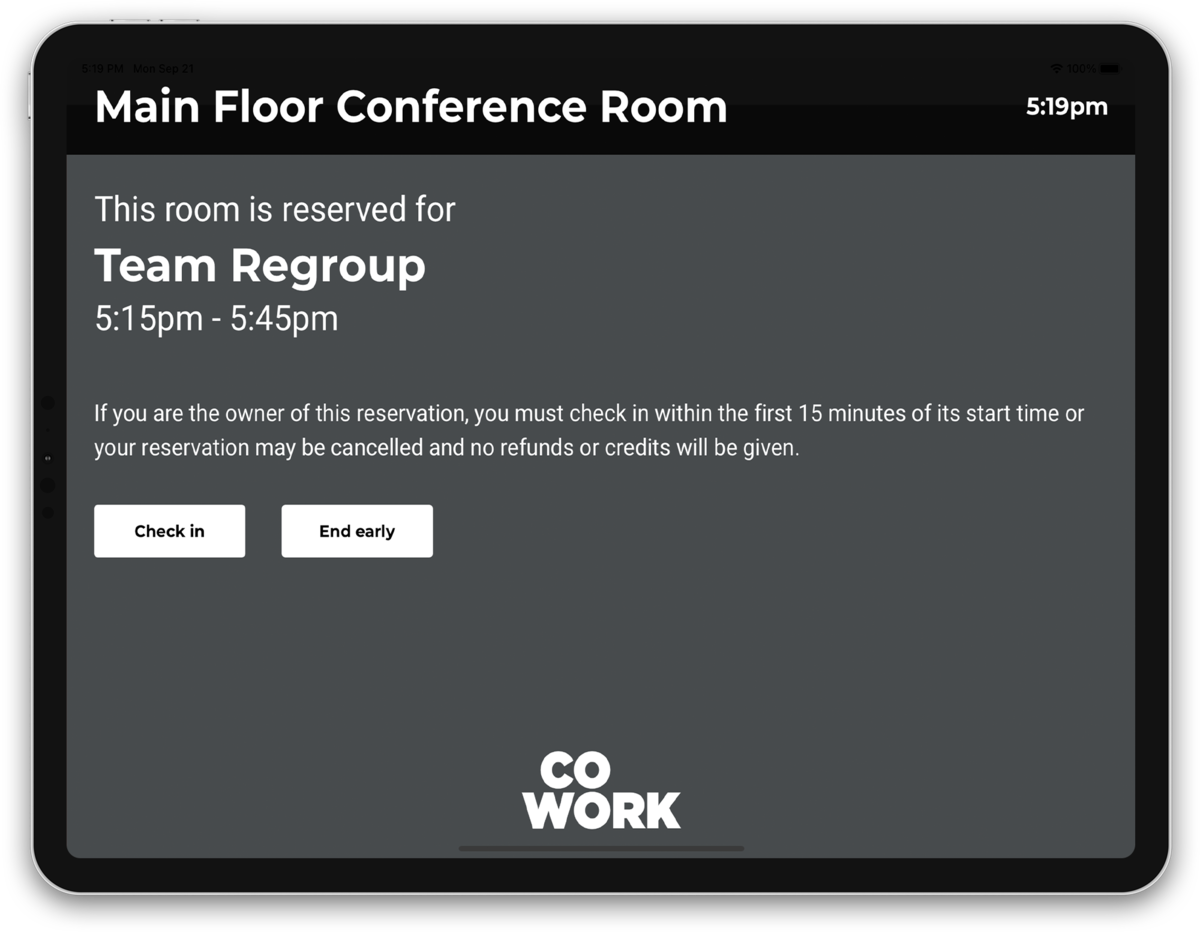
The check-in process allows members to indicate that they are actually present for their reservation. This can be helpful to make sure that your resources don’t appear empty and unavailable.You can set your Reservable Resources to require Check-In.This is optional, and if you activate this setting, reservations will be canceled automaticallyif they have not checked in within the first 15 minutes of the scheduled reservation.To enable this option inWorkplace, go to your dashboard and navigate toManage Resources > Workspacesand edit the appropriate resource by clicking on its name or "Edit" next to the resource name. Tab over to "Settings" and toggle "Abandoned Reservation Protection"
This is the view showing the5-minute countdown(helpful to keep things on track)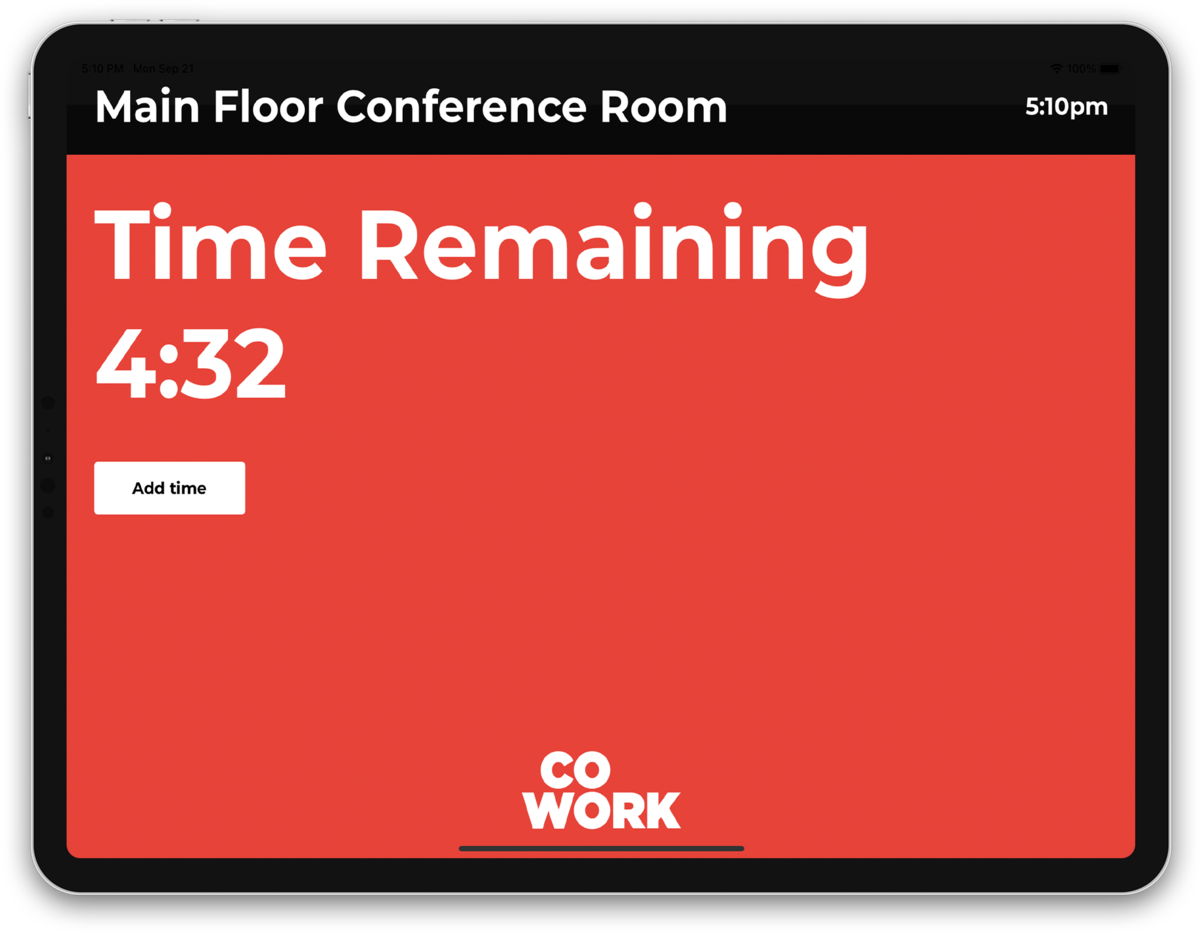
This is the view showing that the Reservable Resource is free to "use now"(helpful for squatters to reserve the room on demand):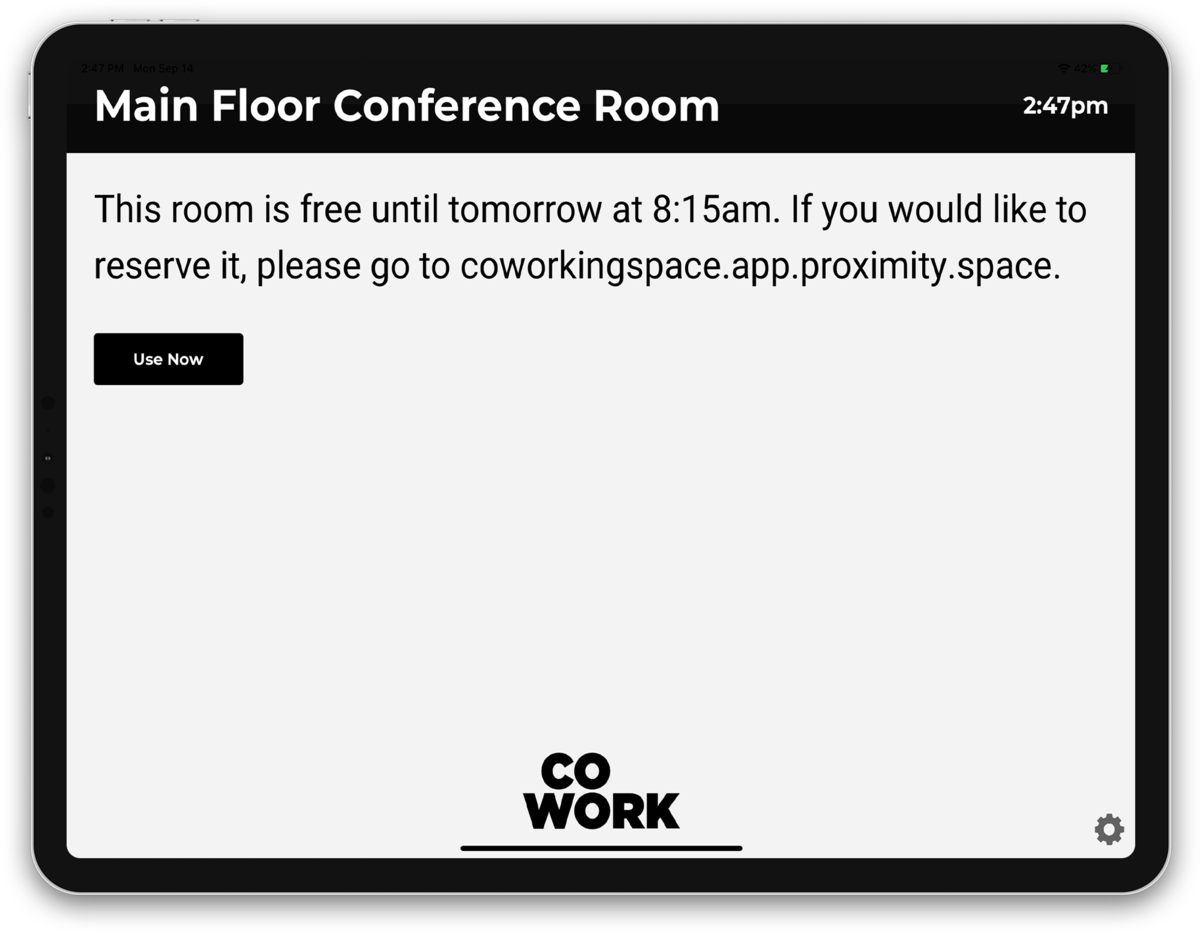
The view showingEnd Meeting Earlyallows members to cancel their event early if they are finished with the conference room. Members do not get a refund or free time back for ending early. The system will bring up a warning making this clear.The view showingExtend meeting timeallows members to extend their reservation "in the moment" and will bill them appropriately (as long as there are no existing reservations immediately after).External ViewTheExternal Viewwould be used on a device that is placed outside of the resource(example: mounted outside of the conference room door)This is the view showing theReservable Resource scheduleand room availability:By viewing the Reservable Resource schedule, members can also make local reservations "on demand"Members can press the “use now” button to make a free 15, 30 or 60-minute reservation - say if they need to pop in to make a phone call.It will show up on the reservation calendar as a “Local Reservation” while the reservation is active. The Use Now reservation does disappear after the reservation is over. The manager can view the calendar on the dashboard and check a box to view previous local reservations.This can be edited or turned off in Settings > General.
This is the view showing ameeting is in progress: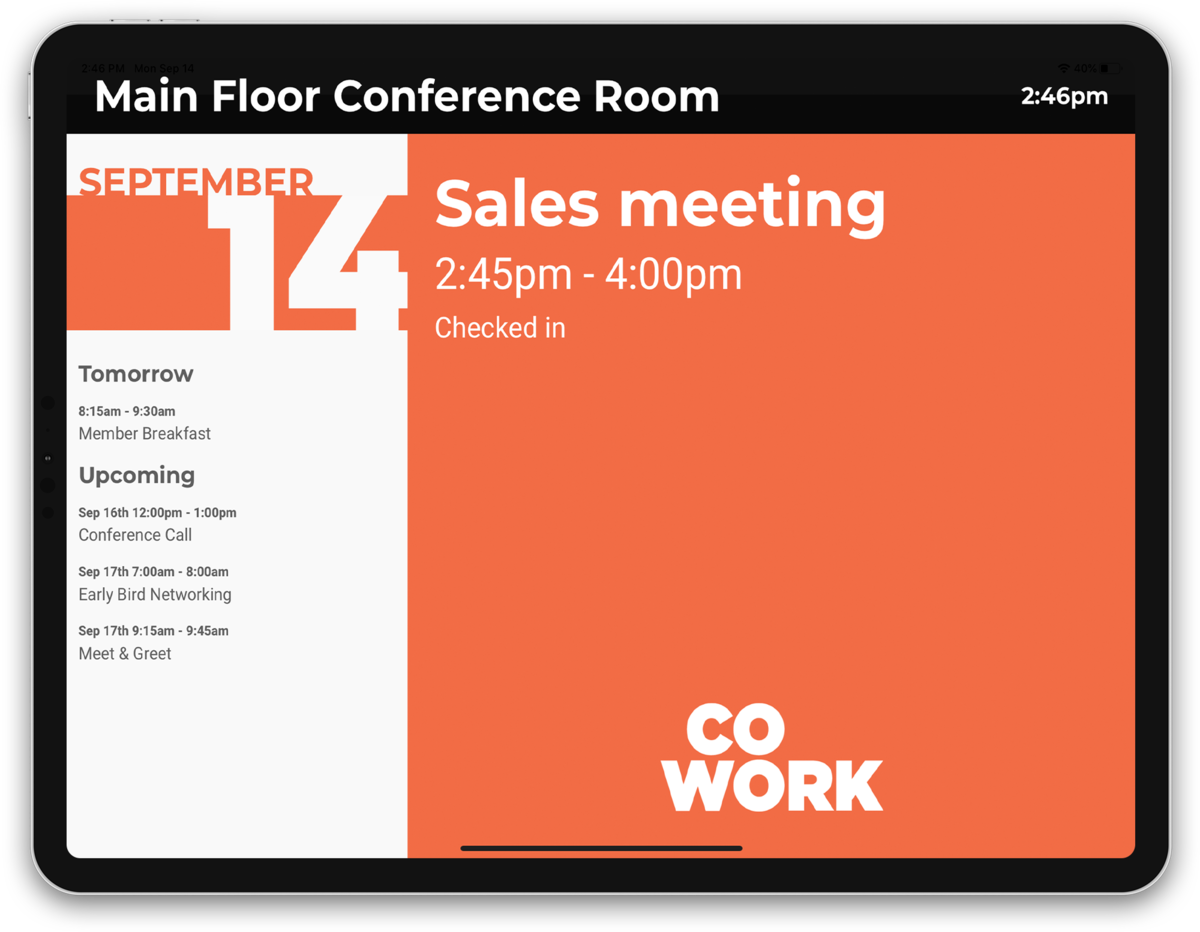
PowerBX ASTRO All-In-One Room Display
NOWAVAILABLE IN THE Proximity STORE - visit the Order tab from the dashboardCreate Smart Spaces to Support Hybrid Work with the ASTRO All-In-One Room DisplayA fresh take on integrated room scheduling systems, designed to meet the versatile needs of enterprise use. ASTRO makes managing your spaces easy from installation to the user interface. The ASTRO All-In-One Kiosk can be custom provisioned with Panorama pre-installed prior to shipment.
Features:
- Touch screen
- LED Visibility on Room Availability
- Integrated Power over Ethernet
- Quick & Easy Installation
- Enterprise-grade Security
- Wall & Glass Mounting Options
- PoE (Power over Ethernet) or 12v/1.5a Power Options
To purchase, navigate to the Order tab in your dashboard.
Help! Panorama is no longer workingEarlier versions of Panorama have reached End Of Life and will no longer communicate with the server. Please be sure you are running the latest version by checking for updates inGoogle PlayorApple App Store -
Updated by Tim Brown, Nov 07, 2023 at 8:44am
The Panorama app lets your members and visitors easily check in to conference rooms, see guest WiFi information, end their reservation early, or extend their reservation without leaving the room. Panorama is included with the price of every Proximity subscription.
Panorama for iOS
- Panorama can be used with iOS devices that run on iOS 12 or later.
- Click here to find Panorama
Panorama for Android
- Panorama can be used with Android devices that run on 7.0 and up.
- Click here to find Panorama for Android in the Google Play Store.
About the Panorama App:
- When you first launch the Panorama app login with your owner or manager email and password for Proximity
- There are two different views on the Panorama app -- internal and external; each view serves a unique purpose.
- As a manager, you can switch the view (internal/external) by tapping once on the screen and clicking the gear icon in the lower right-hand corner.
- Remember to set your passcode on your Panorama settings screen. This will help you prevent members from changing things they shouldn’t have access to.
- Click here to assign the SSID for your resources - None, Static, RADIUS, or Meraki
Internal View
The Internal View would be used on a device that sits inside the resource (example: sitting on a conference room table)
This is the view showing the meeting details and guest wifi information (helpful for members to verify they are in the correct room):
- By viewing meeting details, your members will be able to see:
- Which conference room they are in (more useful than you think)
- When their reservation begins and when it ends
- The WiFi network name and password
- The time! (also more useful than you may think)
- Perhaps most importantly, attendees will receive verbal reminders to check in and when their reservation is ending
This is the view to Require member check-in:
- The check-in process allows members to indicate that they are actually present for their reservation. This can be helpful to make sure that your resources don’t appear empty and unavailable.
- You can set your Reservable Resources to require Check-In.
- This is optional, and if you activate this setting, reservations will be canceled automatically if they have not checked in within the first 15 minutes of the scheduled reservation.
- To enable this option in Workplace, go to your dashboard and navigate to Manage Resources > Workspaces and edit the appropriate resource by clicking on its name or "Edit" next to the resource name. Tab over to "Settings" and toggle "Abandoned Reservation Protection"
This is the view showing the 5-minute countdown (helpful to keep things on track)
This is the view showing that the Reservable Resource is free to "use now" (helpful for squatters to reserve the room on demand):
The view showing End Meeting Early allows members to cancel their event early if they are finished with the conference room. Members do not get a refund or free time back for ending early. The system will bring up a warning making this clear.
The view showing Extend meeting time allows members to extend their reservation "in the moment" and will bill them appropriately (as long as there are no existing reservations immediately after).
External View
The External View would be used on a device that is placed outside of the resource (example: mounted outside of the conference room door)
This is the view showing the Reservable Resource schedule and room availability:
- By viewing the Reservable Resource schedule, members can also make local reservations "on demand"
- Members can press the “use now” button to make a free 15, 30 or 60-minute reservation - say if they need to pop in to make a phone call.
- It will show up on the reservation calendar as a “Local Reservation” while the reservation is active. The Use Now reservation does disappear after the reservation is over. The manager can view the calendar on the dashboard and check a box to view previous local reservations.
- This can be edited or turned off in Settings > General.
This is the view showing a meeting is in progress:
PowerBX ASTRO Display
NOW AVAILABLE IN THE Proximity STORE
Create Smart Spaces to Support Hybrid Work with the ASTRO All-In-One Room Display
A fresh take on integrated room scheduling systems, designed to meet the versatile needs of enterprise use. ASTRO makes managing your spaces easy from installation to the user interface. The ASTRO All-In-One Kiosk can be custom provisioned with Panorama pre-installed prior to shipment.
Features:
- Touch screen
- LED Visibility on Room Availability
- Integrated Power over Ethernet
- Quick & Easy Installation
- Enterprise-grade Security
- Wall & Glass Mounting Options
- PoE (Power over Ethernet) or 12v/1.5a Power Options
To purchase, navigate to the Order tab in your dashboard.
Help! Panorama is no longer working
Earlier versions of Panorama have reached End Of Life and will no longer communicate with the server. Please be sure you are running the latest version by checking for updates in Google Play or Apple App Store
-
Updated by Layla, Sep 12, 2023 at 3:27pm
The Panorama app lets your members and visitors easily check in to conference rooms, see guest WiFi information, end their reservation early, or extend their reservation without leaving the room. Panorama is included with the price of every Proximity subscription.
Panorama for iOS
- Panorama can be used with iOS devices that run on iOS 12 or later.
- Click here to find Panorama
Panorama for Android
- Panorama can be used with Android devices that run on 7.0 and up.
- Click here to find Panorama for Android in the Google Play Store.
About the Panorama App:
- There are two different views on the Panorama app -- internal and external; each view serves a unique purpose.
- As a manager, you can switch the view (internal/external) by tapping once on the screen and clicking the gear icon in the lower right-hand corner.
- Remember to set your passcode on your Panorama settings screen. This will help you prevent members from changing things they shouldn’t have access to.
- Click here to assign the SSID for your resources - None, Static, RADIUS, or Meraki
Internal View
The Internal View would be used on a device that sits inside the resource (example: sitting on a conference room table)
This is the view showing the meeting details and guest wifi information (helpful for members to verify they are in the correct room):
- By viewing meeting details, your members will be able to see:
- Which conference room they are in (more useful than you think)
- When their reservation begins and when it ends
- The WiFi network name and password
- The time! (also more useful than you may think)
- Perhaps most importantly, attendees will receive verbal reminders to check in and when their reservation is ending
This is the view to Require member check-in:
- The check-in process allows members to indicate that they are actually present for their reservation. This can be helpful to make sure that your resources don’t appear empty and unavailable.
- You can set your Reservable Resources to require Check-In.
- This is optional, and if you activate this setting, reservations will be canceled automatically if they have not checked in within the first 15 minutes of the scheduled reservation.
To enable this option in Cowoking, go to your dashboard and navigate to Manage Resources > Reservable Resources and edit the appropriate resource by clicking on its name or "Edit" next to the resource name. Scroll down and check "Require Check In"- To enable this option in Workplace, go to your dashboard and navigate to Manage Resources > Workspaces and edit the appropriate resource by clicking on its name or "Edit" next to the resource name. Tab over to "Settings" and toggle "Abandoned Reservation Protection"
This is the view showing the 5-minute countdown (helpful to keep things on track)
This is the view showing that the Reservable Resource is free to "use now" (helpful for squatters to reserve the room on demand):
The view showing End Meeting Early allows members to cancel their event early if they are finished with the conference room. Members do not get a refund or free time back for ending early. The system will bring up a warning making this clear.
The view showing Extend meeting time allows members to extend their reservation "in the moment" and will bill them appropriately (as long as there are no existing reservations immediately after).
External View
The External View would be used on a device that is placed outside of the resource (example: mounted outside of the conference room door)
This is the view showing the Reservable Resource schedule and room availability:
- By viewing the Reservable Resource schedule, members can also make local reservations "on demand"
- Members can press the “use now” button to make a free 15, 30 or 60-minute reservation - say if they need to pop in to make a phone call.
- It will show up on the reservation calendar as a “Local Reservation” while the reservation is active. The Use Now reservation does disappear after the reservation is over. The manager can view the calendar on the dashboard and check a box to view previous local reservations.
- This can be edited or turned off in Settings > General.
This is the view showing a meeting is in progress:
PowerBX ASTRO Display
NOW AVAILABLE IN THE Proximity STORE
Create Smart Spaces to Support Hybrid Work with the ASTRO All-In-One Room Display
A fresh take on integrated room scheduling systems, designed to meet the versatile needs of enterprise use. ASTRO makes managing your spaces easy from installation to the user interface. The ASTRO All-In-One Kiosk can be custom provisioned with Panorama pre-installed prior to shipment.
Features:
- Touch screen
- LED Visibility on Room Availability
- Integrated Power over Ethernet
- Quick & Easy Installation
- Enterprise-grade Security
- Wall & Glass Mounting Options
- PoE (Power over Ethernet) or 12v/1.5a Power Options
To purchase, navigate to the Order tab in your dashboard.
Help! Panorama is no longer working
Earlier versions of Panorama have reached End Of Life and will no longer communicate with the server. Please be sure you are running the latest version by checking for updates in Google Play or Apple App Store
-
Updated by Megan Pastor, Aug 11, 2023 at 10:11am
APPLIES TO:Coworking, WorkplaceThe Panorama app lets your members and visitors easily check in to conference rooms, see guest WiFi information, end their reservation early, or extend their reservation without leaving the room. Panorama is included with the price of every Proximity subscription.
Panorama for iOS
- Panorama can be used with iOS devices that run on iOS 12 or later.
- Click here to find Panorama
Panorama for Android
- Panorama can be used with Android devices that run on 7.0 and up.
- Click here to find Panorama for Android in the Google Play Store.
About the Panorama App:
- There are two different views on the Panorama app -- internal and external; each view serves a unique purpose.
- As a manager, you can switch the view (internal/external) by tapping once on the screen and clicking the gear icon in the lower right-hand corner.
- Remember to set your passcode on your Panorama settings screen. This will help you prevent members from changing things they shouldn’t have access to.
- Click here to assign the SSID for your resources - None, Static, RADIUS, or Meraki
Internal View
The Internal View would be used on a device that sits inside the resource (example: sitting on a conference room table)
This is the view showing the meeting details and guest wifi information (helpful for members to verify they are in the correct room):
- By viewing meeting details, your members will be able to see:
- Which conference room they are in (more useful than you think)
- When their reservation begins and when it ends
- The WiFi network name and password
- The time! (also more useful than you may think)
- Perhaps most importantly, attendees will receive verbal reminders to check
-in and when their reservation is ending
This is the view to Require member check-in:
- The check-in process allows members to indicate that they are actually present for their reservation. This can be helpful to make sure that your resources don’t appear empty and unavailable.
- You can set your Reservable Resources to require Check-In.
- This is optional, and if you activate this setting, reservations will be canceled automatically if they have not checked in within the first 15 minutes of the scheduled reservation.
- To enable this option in Cowoking, go to your dashboard and navigate to Manage Resources > Reservable Resources and edit the appropriate resource by clicking on its name or "Edit" next to the resource name. Scroll
-down and check "Require Check In" - To enable this option in Workplace, go to your dashboard and navigate to Manage Resources > Workspaces and edit the appropriate resource by clicking on its name or "Edit" next to the resource name. Tab over to "Settings" and toggle "Abandoned Reservation Protection"
This is the view showing the 5-minute countdown (helpful to keep things on track)
This is the view showing that the Reservable Resource is free to "use now" (helpful for squatters to reserve the room on demand):
The view showing End Meeting Early allows members to cancel their event early if they are finished with the conference room. Members do not get a refund or free time back for ending early. The system will bring up a warning making this clear.
The view showing Extend meeting time allows members to extend their reservation "in the moment" and will bill them appropriately (as long as there are no existing reservations immediately after).
External View
The External View would be used on a device that is placed outside of the resource (example: mounted outside of the conference room door)
This is the view showing the Reservable Resource schedule and room availability:
- By viewing the Reservable Resource schedule, members can also make local reservations "on
-demand"- Members can press the “use now” button to make a free 15, 30 or 60-minute reservation - say if they need to pop in to make a phone call.
- It will show up on the reservation calendar as a “Local Reservation” while the reservation is active. The Use Now reservation does disappear after the reservation is over. The manager can view the calendar on the dashboard and check a box to view previous local reservations.
- This can be edited or turned off in Settings > General.
This is the view showing a meeting is in progress:
PowerBX ASTRO Display
NOW AVAILABLE IN THE Proximity STORE
Create Smart Spaces to Support Hybrid Work with the ASTRO All-In-One Room Display
A fresh take on integrated room scheduling systems, designed to meet the versatile needs of enterprise use. ASTRO makes managing your spaces easy from installation to the user interface. The ASTRO All-In-One Kiosk can be custom provisioned with Panorama pre-installed prior to shipment.
Features:
- Touch screen
- LED Visibility on Room Availability
- Integrated Power over Ethernet
- Quick & Easy Installation
- Enterprise-grade Security
- Wall & Glass Mounting Options
- PoE (Power over Ethernet) or 12v/1.5a Power Options
To purchase, navigate to the Order tab in your dashboard.
Help! Panorama is no longer working
Earlier versions of Panorama have reached End Of Life and will no longer communicate with the server. Please be sure you are running the latest version by checking for updates in Google Play or Apple App Store
-
Updated by Alex Neil, Aug 07, 2023 at 9:02am
APPLIES TO: Coworking, Workplace
The Panorama app lets your members and visitors easily check in to conference rooms, see guest WiFi information, end their reservation early, or extend their reservation without leaving the room. Panorama is included with the price of every Proximity subscription.
Panorama for iOS
- Panorama can be used with iOS devices that run on iOS 12 or later.
- Click here to find Panorama
Panorama for Android
- Panorama can be used with Android devices that run on 7.0 and up.
- Click here to find Panorama for Android in the Google Play Store.
About the Panorama App:
- There are two different views on the Panorama app -- internal and external; each view serves a unique purpose.
- As a manager, you can switch the view (internal/external) by tapping once on the screen and clicking the gear icon in the lower right-hand corner.
- Remember to set your passcode on your Panorama settings screen. This will help you prevent members from changing things they shouldn’t have access to.
- Click here to assign the SSID for your resources - None, Static, RADIUS, or Meraki
Internal View
The Internal View would be used on a device that sits inside the resource (example: sitting on a conference room table)
This is the view showing the meeting details and guest wifi information (helpful for members to verify they are in the correct room):
- By viewing meeting details, your members will be able to see:
- Which conference room they are in (more useful than you think)
- When their reservation begins and when it ends
- The WiFi network name and password
- The time! (also more useful than you may think)
- Perhaps most importantly, attendees will receive verbal reminders to check-in and when their reservation is ending
This is the view to Require member check-in:
- The check-in process allows members to indicate that they are actually present for their reservation. This can be helpful to make sure that your resources don’t appear empty and unavailable.
- You can set your Reservable Resources to require Check-In.
- This is optional, and if you activate this setting, reservations will be canceled automatically if they have not checked in within the first 15 minutes of the scheduled reservation.
- To enable this option in Cowoking, go to your dashboard and navigate to Manage Resources > Reservable Resources and edit the appropriate resource by clicking on its name or "Edit" next to the resource name. Scroll-down and check "Require Check In"
- To enable this option in Workplace, go to your dashboard and navigate to Manage Resources > Workspaces and edit the appropriate resource by clicking on its name or "Edit" next to the resource name. Tab over to "Settings" and toggle "Abandoned Reservation Protection"
This is the view showing the 5-minute countdown (helpful to keep things on track)
This is the view showing that the Reservable Resource is free to "use now" (helpful for squatters to reserve the room on demand):
The view showing End Meeting Early allows members to cancel their event early if they are finished with the conference room. Members do not get a refund or free time back for ending early. The system will bring up a warning making this clear.
The view showing Extend meeting time allows members to extend their reservation "in the moment" and will bill them appropriately (as long as there are no existing reservations immediately after).
External View
The External View would be used on a device that is placed outside of the resource (example: mounted outside of the conference room door)
This is the view showing the Reservable Resource schedule and room availability:
- By viewing the Reservable Resource schedule, members can also make local reservations "on-demand"
- Members can press the “use now” button to make a free 15, 30 or 60-minute reservation - say if they need to pop in to make a phone call.
- It will show up on the reservation calendar as a “Local Reservation” while the reservation is active. The Use Now reservation does disappear after the reservation is over. The manager can view the calendar on the dashboard and check a box to view previous local reservations.
- This can be edited or turned off in Settings > General.
This is the view showing a meeting is in progress:
PowerBX ASTRO Display
NOW AVAILABLE IN THE Proximity STORE
Create Smart Spaces to Support Hybrid Work with the ASTRO All-In-One Room Display
A fresh take on integrated room scheduling systems, designed to meet the versatile needs of enterprise use. ASTRO makes managing your spaces easy from installation to the user interface. The ASTRO All-In-One Kiosk can be custom provisioned with Panorama pre-installed prior to shipment.
Features:
- Touch screen
- LED Visibility on Room Availability
- Integrated Power over Ethernet
- Quick & Easy Installation
- Enterprise-grade Security
- Wall & Glass Mounting Options
- PoE (Power over Ethernet) or 12v/1.5a Power Options
To purchase, navigate to the Order tab in your dashboard.
Help! Panorama is no longer working
Earlier versions of Panorama have reached End Of Life and will no longer communicate with the server. Please be sure you are running the latest version by checking for updates in Google Play or Apple App Store
-
Updated by Alex Neil, Aug 07, 2023 at 8:56am
APPLIES TO: Coworking, Workplace
The Panorama app lets your members and visitors easily check in to conference rooms, see guest WiFi information, end their reservation early, or extend their reservation without leaving the room. Panorama is included with the price of every Proximity subscription.
Panorama for iOS
- Panorama can be used with iOS devices that run on iOS 12 or later.
- Click here to find Panorama
Panorama for Android
- Panorama can be used with Android devices that run on 7.0 and up.
- Click here to find Panorama for Android in the Google Play Store.
About the Panorama App:
- There are two different views on the Panorama app -- internal and external; each view serves a unique purpose.
- As a manager, you can switch the view (internal/external) by tapping once on the screen and clicking the gear icon in the lower right-hand corner.
- Remember to set your passcode on your Panorama settings screen. This will help you prevent members from changing things they shouldn’t have access to.
- Click here to assign the SSID for your resources - None, Static, RADIUS, or Meraki
Internal View
The Internal View would be used on a device that sits inside the resource (example: sitting on a conference room table)
This is the view showing the meeting details and guest wifi information (helpful for members to verify they are in the correct room):
- By viewing meeting details, your members will be able to see:
- Which conference room they are in (more useful than you think)
- When their reservation begins and when it ends
- The WiFi network name and password
- The time! (also more useful than you may think)
- Perhaps most importantly, attendees will receive verbal reminders to check-in and when their reservation is ending
This is the view to Require member check-in:
- The check-in process allows members to indicate that they are actually present for their reservation. This can be helpful to make sure that your resources don’t appear empty and unavailable.
- You can set your Reservable Resources to require Check-In.
- This is optional, and if you activate this setting, reservations will be canceled automatically if they have not checked in within the first 15 minutes of the scheduled reservation.
- To enable this option in Cowoking, go to your dashboard and navigate to Manage Resources > Reservable Resources and edit the appropriate resource by clicking on its name or "Edit" next to the resource name. Scroll-down and check "Require Check In"
- To enable this option in Workplace, go to your dashboard and navigate to Manage Resources > Workspaces and edit the appropriate resource by clicking on its name or "Edit" next to the resource name. Tab over to "Settings" and toggle "Abandoned Reservation Protection"
This is the view showing the 5-minute countdown (helpful to keep things on track)
This is the view showing that the Reservable Resource is free to "use now" (helpful for squatters to reserve the room on demand):
The view showing End Meeting Early allows members to cancel their event early if they are finished with the conference room. Members do not get a refund or free time back for ending early. The system will bring up a warning making this clear.
The view showing Extend meeting time allows members to extend their reservation "in the moment" and will bill them appropriately (as long as there are no existing reservations immediately after).
External View
The External View would be used on a device that is placed outside of the resource (example: mounted outside of the conference room door)
This is the view showing the Reservable Resource schedule and room availability:
- By viewing the Reservable Resource schedule, members can also make local reservations "on-demand"
- Members can press the “use now” button to make a free 15, 30 or 60-minute reservation - say if they need to pop in to make a phone call.
- It will show up on the reservation calendar as a “Local Reservation” while the reservation is active. The Use Now reservation does disappear after the reservation is over. The manager can view the calendar on the dashboard and check a box to view previous local reservations.
- This can be edited or turned off in Settings > General.
This is the view showing a meeting is in progress:
PowerBX
Astro TabletASTRO DisplayNOW AVAILABLE IN THE Proximity STORE
Create Smart Spaces to Support Hybrid Work with the ASTRO All-In-One Room Display
A fresh take on integrated room scheduling systems, designed to meet the versatile needs of enterprise use. ASTRO makes managing your spaces easy from installation to the user interface. The ASTRO All-In-One Kiosk can be custom provisioned with Panorama pre-installed prior to shipment.
Features:
- Touch screen
- LED Visibility on Room Availability
- Integrated Power over Ethernet
- Quick & Easy Installation
- Enterprise-grade Security
- Wall & Glass Mounting Options
To purchase, navigate to the Order tab in your dashboard.
Help! Panorama is no longer working
Earlier versions of Panorama have reached End Of Life and will no longer communicate with the server. Please be sure you are running the latest version by checking for updates in Google Play or Apple App Store
-
Updated by Megan Pastor, Jul 20, 2023 at 1:36pm
APPLIES TO: Coworking, Workplace
TheThe Panoramaapplets your members and visitors easily check in to conference rooms, see guest WiFi information, end their reservation early, or extend their reservation without leaving the room.applets your members and visitors easily check in to conference rooms, see guest WiFi information, end their reservation early, or extend their reservation without leaving the room. Panoramais included with the price of every Proximity subscription.is included with the price of every Proximity subscription.Panorama for iOS
- Panorama can be used with iOS devices that run on iOS 12 or later.
- Click here to find Panorama
Panorama for Android
- Panorama can be used with Android devices that run on 7.0 and up.
- Click here to find Panorama for Android in the Google Play Store.
About the Panorama App:
- There are two different views on the Panorama app -- internal and external; each view serves a unique purpose.
- As a manager, you can switch the view (internal/external) by tapping once on the screen and clicking the gear icon in the lower right-hand corner.
- Remember to set your passcode on your Panorama settings screen. This will help you prevent members from changing things they shouldn’t have access to.
- Click here to assign the SSID for your resources - None, Static, RADIUS, or Meraki
Internal View
The Internal View would be used on a device that sits inside the resource (example: sitting on a conference room table)
This is the view showing the meeting details and guest wifi information (helpful for members to verify they are in the correct room):
- By viewing meeting details, your members will be able to see:
- Which conference room they are in (more useful than you think)
- When their reservation begins and when it ends
- The WiFi network name and password
- The time! (also more useful than you may think)
- Perhaps most importantly, attendees will receive verbal reminders to check-in and when their reservation is ending
This is the view to Require member check-in:
- The check-in process allows members to indicate that they are actually present for their reservation. This can be helpful to make sure that your resources don’t appear empty and unavailable.
- You can set your Reservable Resources to require Check-In.
- This is optional, and if you activate this setting, reservations will be canceled automatically if they have not checked in within the first 15 minutes of the scheduled reservation.
- To enable this option in Cowoking, go to your dashboard and navigate to Manage Resources > Reservable Resources and edit the appropriate resource by clicking on its name or "Edit" next to the resource name. Scroll-down and check "Require Check In"
- To enable this option in Workplace, go to your dashboard and navigate to Manage Resources > Workspaces and edit the appropriate resource by clicking on its name or "Edit" next to the resource name. Tab over to "Settings" and toggle "Abandoned Reservation Protection"
This is the view showing the 5-minute countdown (helpful to keep things on track)
This is the view showing that the Reservable Resource is free to "use now" (helpful for squatters to reserve the room on demand):
The view showing End Meeting Early allows members to cancel their event early if they are finished with the conference room. Members do not get a refund or free time back for ending early. The system will bring up a warning making this clear.
The view showing Extend meeting time allows members to extend their reservation "in the moment" and will bill them appropriately (as long as there are no existing reservations immediately after).
External View
The External View would be used on a device that is placed outside of the resource (example: mounted outside of the conference room door)
This is the view showing the Reservable Resource schedule and room availability:
- By viewing the Reservable Resource schedule, members can also make local reservations "on-demand"
- Members can press the “use now” button to make a free 15, 30 or 60-minute reservation - say if they need to pop in to make a phone call.
- It will show up on the reservation calendar as a “Local Reservation” while the reservation is active. The Use Now reservation does disappear after the reservation is over. The manager can view the calendar on the dashboard and check a box to view previous local reservations.
- This can be edited or turned off in Settings > General.
This is the view showing a meeting is in progress:
PowerBX Astro Tablet
NOW AVAILABLE IN THE Proximity STORE
Create Smart Spaces to Support Hybrid Work with the ASTRO All-In-One Room Display
A fresh take on integrated room scheduling systems, designed to meet the versatile needs of enterprise use. ASTRO makes managing your spaces easy from installation to the user interface. The ASTRO All-In-One Kiosk can be custom provisioned with Panorama pre-installed prior to shipment.
Features:
- Touch screen
- LED Visibility on Room Availability
- Integrated Power over Ethernet
- Quick & Easy Installation
- Enterprise-grade Security
- Wall & Glass Mounting Options
To purchase, navigate to the Order tab in your dashboard.
Help! Panorama is no longer working
Earlier versions of Panorama have reached End Of Life and will no longer communicate with the server. Please be sure you are running the latest version by checking for updates in Google Play or Apple App Store
-
Updated by Megan Pastor, Jul 20, 2023 at 1:35pm
APPLIES TO: Coworking, Workplace
The
ThePanorama app lets your members and visitors easily check in to conference rooms, see guest WiFi information, end their reservation early, or extend their reservation without leaving the room. Panorama is included with the price of every Proximity subscription.Panorama for iOS
- Panorama can be used with iOS devices that run on iOS 12 or later.
- Click here to find Panorama
Panorama for Android
- Panorama can be used with Android devices that run on 7.0 and up.
- Click here to find Panorama for Android in the Google Play Store.
About the Panorama App:
- There are two different views on the Panorama app -- internal and external; each view serves a unique purpose.
- As a manager, you can switch the view (internal/external) by tapping once on the screen and clicking the gear icon in the lower right-hand corner.
- Remember to set your passcode on your Panorama settings screen. This will help you prevent members from changing things they shouldn’t have access to.
Click here to assign the SSID for your resources - None, Static, RADIUS, or Meraki
- Click here to assign the SSID for your resources - None, Static, RADIUS, or Meraki
Internal View
The Internal View would be used on a device that sits inside the resource (example: sitting on a conference room table)
This is the view showing the meeting details and guest wifi information (helpful for members to verify they are in the correct room):
- By viewing meeting details, your members will be able to see:
- Which conference room they are in (more useful than you think)
- When their reservation begins and when it ends
- The WiFi network name and password
- The time! (also more useful than you may think)
- Perhaps most importantly, attendees will receive verbal reminders to check-in and when their reservation is ending
This is the view to Require member check-in:
- The check-in process allows members to indicate that they are actually present for their reservation. This can be helpful to make sure that your resources don’t appear empty and unavailable.
- You can set your Reservable Resources to require Check-In.
- This is optional, and if you activate this setting, reservations will be canceled automatically if they have not checked in within the first 15 minutes of the scheduled reservation.
- To enable this option in Cowoking, go to your dashboard and navigate to Manage Resources > Reservable Resources and edit the appropriate resource by clicking on its name or "Edit" next to the resource name. Scroll-down and check "Require Check In"
- To enable this option in Workplace, go to your dashboard and navigate to Manage Resources > Workspaces and edit the appropriate resource by clicking on its name or "Edit" next to the resource name. Tab over to "Settings" and toggle "Abandoned Reservation Protection"
This is the view showing the 5-minute countdown (helpful to keep things on track)
This is the view showing that the Reservable Resource is free to "use now" (helpful for squatters to reserve the room on demand):
The view showing End Meeting Early allows members to cancel their event early if they are finished with the conference room. Members do not get a refund or free time back for ending early. The system will bring up a warning making this clear.
The view showing Extend meeting time allows members to extend their reservation "in the moment" and will bill them appropriately (as long as there are no existing reservations immediately after).
External View
The External View would be used on a device that is placed outside of the resource (example: mounted outside of the conference room door)
This is the view showing the Reservable Resource schedule and room availability:
- By viewing the Reservable Resource schedule, members can also make local reservations "on-demand"
- Members can press the “use now” button to make a free 15, 30 or 60-minute reservation - say if they need to pop in to make a phone call.
- It will show up on the reservation calendar as a “Local Reservation” while the reservation is active. The Use Now reservation does disappear after the reservation is over. The manager can view the calendar on the dashboard and check a box to view previous local reservations.
- This can be edited or turned off in Settings > General.
This is the view showing a meeting is in progress:
PowerBX Astro Tablet
NOW AVAILABLE IN THE Proximity STORE
Create Smart Spaces to Support Hybrid Work with the ASTRO All-In-One Room Display
A fresh take on integrated room scheduling systems, designed to meet the versatile needs of enterprise use. ASTRO makes managing your spaces easy from installation to the user interface. The ASTRO All-In-One Kiosk can be custom provisioned with Panorama pre-installed prior to shipment.
Features:
- Touch screen
- LED Visibility on Room Availability
- Integrated Power over Ethernet
- Quick & Easy Installation
- Enterprise-grade Security
- Wall & Glass Mounting Options
To purchase, navigate to the Order tab in your dashboard.
Help! Panorama is no longer working
Earlier versions of Panorama have reached End Of Life and will no longer communicate with the server. Please be sure you are running the latest version by checking for updates in Google Play or Apple App Store
-
Updated by Josh Hudnall, Jul 20, 2023 at 10:16am
APPLIES TO: Coworking, Workplace
The Panorama app lets your members and visitors easily check in to conference rooms, see guest WiFi information, end their reservation early, or extend their reservation without leaving the room. Panorama is included with the price of every Proximity subscription.
Panorama for iOS
- Panorama can be used with iOS devices that run on iOS 12 or later.
- Click here to find Panorama
Panorama for Android
- Panorama can be used with Android devices that run on 7.0 and up.
- Click here to find Panorama for Android in the Google Play Store.
About the Panorama App:
- There are two different views on the Panorama app -- internal and external; each view serves a unique purpose.
- As a manager, you can switch the view (internal/external) by tapping once on the screen and clicking the gear icon in the lower right-hand corner.
- Remember to set your passcode on your Panorama settings screen. This will help you prevent members from changing things they shouldn’t have access to.
Click here to assign the SSID for your resources - None, Static, RADIUS, or Meraki
Click here to assign the SSID for your resources - None, Static, RADIUS, or Meraki
Internal View
The Internal View would be used on a device that sits inside the resource (example: sitting on a conference room table)
This is the view showing the meeting details and guest wifi information (helpful for members to verify they are in the correct room):
- By viewing meeting details, your members will be able to see:
- Which conference room they are in (more useful than you think)
- When their reservation begins and when it ends
- The WiFi network name and password
- The time! (also more useful than you may think)
- Perhaps most importantly, attendees will receive verbal reminders to check-in and when their reservation is ending
This is the view to Require member check-in:
- The check-in process allows members to indicate that they are actually present for their reservation. This can be helpful to make sure that your resources don’t appear empty and unavailable.
- You can set your Reservable Resources to require Check-In.
- This is optional, and if you activate this setting, reservations will be canceled automatically if they have not checked in within the first 15 minutes of the scheduled reservation.
- To enable this option in Cowoking, go to your dashboard and navigate to Manage Resources > Reservable Resources and edit the appropriate resource by clicking on its name or "Edit" next to the resource name. Scroll-down and check "Require Check In"
- To enable this option in Workplace, go to your dashboard and navigate to Manage Resources > Workspaces and edit the appropriate resource by clicking on its name or "Edit" next to the resource name. Tab over to "Settings" and toggle "Abandoned Reservation Protection"
This is the view showing the 5-minute countdown (helpful to keep things on track)
This is the view showing that the Reservable Resource is free to "use now" (helpful for squatters to reserve the room on demand):
The view showing End Meeting Early allows members to cancel their event early if they are finished with the conference room. Members do not get a refund or free time back for ending early. The system will bring up a warning making this clear.
The view showing Extend meeting time allows members to extend their reservation "in the moment" and will bill them appropriately (as long as there are no existing reservations immediately after).
External View
The External View would be used on a device that is placed outside of the resource (example: mounted outside of the conference room door)
This is the view showing the Reservable Resource schedule and room availability:
- By viewing the Reservable Resource schedule, members can also make local reservations "on-demand"
- Members can press the “use now” button to make a free 15, 30 or 60-minute reservation - say if they need to pop in to make a phone call.
- It will show up on the reservation calendar as a “Local Reservation” while the reservation is active. The Use Now reservation does disappear after the reservation is over. The manager can view the calendar on the dashboard and check a box to view previous local reservations.
- This can be edited or turned off in Settings > General.
This is the view showing a meeting is in progress:
PowerBX Astro Tablet
NOW AVAILABLE IN THE Proximity STORE
Create Smart Spaces to Support Hybrid Work with the ASTRO All-In-One Room Display
A fresh take on integrated room scheduling systems, designed to meet the versatile needs of enterprise use. ASTRO makes managing your spaces easy from installation to the user interface. The ASTRO All-In-One Kiosk can be custom provisioned with Panorama pre-installed prior to shipment.
Features:
- Touch screen
- LED Visibility on Room Availability
- Integrated Power over Ethernet
- Quick & Easy Installation
- Enterprise-grade Security
- Wall & Glass Mounting Options
To purchase, navigate to the Order tab in your dashboard.
Help! Panorama is no longer working
Earlier versions of Panorama have reached End Of Life and will no longer communicate with the server. Please be sure you are running the latest version by checking for updates in Google Play or Apple App Store
-
Updated by Josh Hudnall, Jul 20, 2023 at 10:16am
APPLIES TO: Coworking, Workplace
The Panorama app lets your members and visitors easily check in to conference rooms, see guest WiFi information, end their reservation early, or extend their reservation without leaving the room. Panorama is included with the price of every Proximity subscription.
Panorama for iOS
- Panorama can be used with iOS devices that run on iOS 12 or later.
Click here to find Panoramafor iPadOS in the App Store.
Panorama for Android
- Panorama can be used with Android devices that run on 7.0 and up.
- Click here to find Panorama for Android in the Google Play Store.
About the Panorama App:
- There are two different views on the Panorama app -- internal and external; each view serves a unique purpose.
- As a manager, you can switch the view (internal/external) by tapping once on the screen and clicking the gear icon in the lower right-hand corner.
- Remember to set your passcode on your Panorama settings screen. This will help you prevent members from changing things they shouldn’t have access to.
Click here to assign the SSID for your resources - None, Static, RADIUS, or Meraki
Click here to assign the SSID for your resources - None, Static, RADIUS, or Meraki
Internal View
The Internal View would be used on a device that sits inside the resource (example: sitting on a conference room table)
This is the view showing the meeting details and guest wifi information (helpful for members to verify they are in the correct room):
- By viewing meeting details, your members will be able to see:
- Which conference room they are in (more useful than you think)
- When their reservation begins and when it ends
- The WiFi network name and password
- The time! (also more useful than you may think)
- Perhaps most importantly, attendees will receive verbal reminders to check-in and when their reservation is ending
This is the view to Require member check-in:
- The check-in process allows members to indicate that they are actually present for their reservation. This can be helpful to make sure that your resources don’t appear empty and unavailable.
- You can set your Reservable Resources to require Check-In.
- This is optional, and if you activate this setting, reservations will be canceled automatically if they have not checked in within the first 15 minutes of the scheduled reservation.
- To enable this option in Cowoking, go to your dashboard and navigate to Manage Resources > Reservable Resources and edit the appropriate resource by clicking on its name or "Edit" next to the resource name. Scroll-down and check "Require Check In"
- To enable this option in Workplace, go to your dashboard and navigate to Manage Resources > Workspaces and edit the appropriate resource by clicking on its name or "Edit" next to the resource name. Tab over to "Settings" and toggle "Abandoned Reservation Protection"
This is the view showing the 5-minute countdown (helpful to keep things on track)
This is the view showing that the Reservable Resource is free to "use now" (helpful for squatters to reserve the room on demand):
The view showing End Meeting Early allows members to cancel their event early if they are finished with the conference room. Members do not get a refund or free time back for ending early. The system will bring up a warning making this clear.
The view showing Extend meeting time allows members to extend their reservation "in the moment" and will bill them appropriately (as long as there are no existing reservations immediately after).
External View
The External View would be used on a device that is placed outside of the resource (example: mounted outside of the conference room door)
This is the view showing the Reservable Resource schedule and room availability:
- By viewing the Reservable Resource schedule, members can also make local reservations "on-demand"
- Members can press the “use now” button to make a free 15, 30 or 60-minute reservation - say if they need to pop in to make a phone call.
- It will show up on the reservation calendar as a “Local Reservation” while the reservation is active. The Use Now reservation does disappear after the reservation is over. The manager can view the calendar on the dashboard and check a box to view previous local reservations.
- This can be edited or turned off in Settings > General.
This is the view showing a meeting is in progress:
PowerBX Astro Tablet
NOW AVAILABLE IN THE Proximity STORE
Create Smart Spaces to Support Hybrid Work with the ASTRO All-In-One Room Display
A fresh take on integrated room scheduling systems, designed to meet the versatile needs of enterprise use. ASTRO makes managing your spaces easy from installation to the user interface. The ASTRO All-In-One Kiosk can be custom provisioned with Panorama pre-installed prior to shipment.
Features:
- Touch screen
- LED Visibility on Room Availability
- Integrated Power over Ethernet
- Quick & Easy Installation
- Enterprise-grade Security
- Wall & Glass Mounting Options
To purchase, navigate to the Order tab in your dashboard.
Help! Panorama is no longer working
Earlier versions of Panorama have reached End Of Life and will no longer communicate with the server. Please be sure you are running the latest version by checking for updates in Google Play or Apple App Store
-
Updated by allison blevins, Jul 19, 2023 at 4:15pm
Brivo RoomPanorama App -
Updated by Josh Hudnall, Jul 19, 2023 at 12:50pm
APPLIES TO: Coworking, Workplace
The Panorama app lets your members and visitors easily check in to conference rooms, see guest WiFi information, end their reservation early, or extend their reservation without leaving the room. Panorama is included with the price of every Proximity subscription.
Panorama for iOS
- Panorama can be used with iOS devices that run on iOS 12 or later.
- Click here to find Panorama
- for iPadOS in the App Store.
Panorama for Android
- Panorama can be used with Android devices that run on 7.0 and up.
- Click here to find Panorama for Android in the Google Play Store.
About the Panorama App:
- There are two different views on the Panorama app -- internal and external; each view serves a unique purpose.
- As a manager, you can switch the view (internal/external) by tapping once on the screen and clicking the gear icon in the lower right-hand corner.
- Remember to set your passcode on your Panorama settings screen. This will help you prevent members from changing things they shouldn’t have access to.
Click here to assign the SSID for your resources - None, Static, RADIUS, or Meraki
Click here to assign the SSID for your resources - None, Static, RADIUS, or Meraki
Internal View
The Internal View would be used on a device that sits inside the resource (example: sitting on a conference room table)
This is the view showing the meeting details and guest wifi information (helpful for members to verify they are in the correct room):
- By viewing meeting details, your members will be able to see:
- Which conference room they are in (more useful than you think)
- When their reservation begins and when it ends
- The WiFi network name and password
- The time! (also more useful than you may think)
- Perhaps most importantly, attendees will receive verbal reminders to check-in and when their reservation is ending
This is the view to Require member check-in:
- The check-in process allows members to indicate that they are actually present for their reservation. This can be helpful to make sure that your resources don’t appear empty and unavailable.
- You can set your Reservable Resources to require Check-In.
- This is optional, and if you activate this setting, reservations will be canceled automatically if they have not checked in within the first 15 minutes of the scheduled reservation.
- To enable this option in Cowoking, go to your dashboard and navigate to Manage Resources > Reservable Resources and edit the appropriate resource by clicking on its name or "Edit" next to the resource name. Scroll-down and check "Require Check In"
- To enable this option in Workplace, go to your dashboard and navigate to Manage Resources > Workspaces and edit the appropriate resource by clicking on its name or "Edit" next to the resource name. Tab over to "Settings" and toggle "Abandoned Reservation Protection"
This is the view showing the 5-minute countdown (helpful to keep things on track)
This is the view showing that the Reservable Resource is free to "use now" (helpful for squatters to reserve the room on demand):
The view showing End Meeting Early allows members to cancel their event early if they are finished with the conference room. Members do not get a refund or free time back for ending early. The system will bring up a warning making this clear.
The view showing Extend meeting time allows members to extend their reservation "in the moment" and will bill them appropriately (as long as there are no existing reservations immediately after).
External View
The External View would be used on a device that is placed outside of the resource (example: mounted outside of the conference room door)
This is the view showing the Reservable Resource schedule and room availability:
- By viewing the Reservable Resource schedule, members can also make local reservations "on-demand"
- Members can press the “use now” button to make a free 15, 30 or 60-minute reservation - say if they need to pop in to make a phone call.
- It will show up on the reservation calendar as a “Local Reservation” while the reservation is active. The Use Now reservation does disappear after the reservation is over. The manager can view the calendar on the dashboard and check a box to view previous local reservations.
- This can be edited or turned off in Settings > General.
This is the view showing a meeting is in progress:
PowerBX Astro Tablet
NOW AVAILABLE IN THE Proximity STORE
Create Smart Spaces to Support Hybrid Work with the ASTRO All-In-One Room Display
A fresh take on integrated room scheduling systems, designed to meet the versatile needs of enterprise use. ASTRO makes managing your spaces easy from installation to the user interface. The ASTRO All-In-One Kiosk can be custom provisioned with Panorama pre-installed prior to shipment.
Features:
- Touch screen
- LED Visibility on Room Availability
- Integrated Power over Ethernet
- Quick & Easy Installation
- Enterprise-grade Security
- Wall & Glass Mounting Options
To purchase, navigate to the Order tab in your dashboard.
Help! Panorama is no longer working
Earlier versions of Panorama have reached End Of Life and will no longer communicate with the server. Please be sure you are running the latest version by checking for updates in Google Play or Apple App Store
-
Updated by Josh Hudnall, Jul 19, 2023 at 12:50pm
PanoramaBrivo Room App -
Updated by Josh Hudnall, Jul 19, 2023 at 12:50pm
APPLIES TO: Coworking, Workplace
The Panorama app lets your members and visitors easily check in to conference rooms, see guest WiFi information, end their reservation early, or extend their reservation without leaving the room. Panorama is included with the price of every Proximity subscription.
Panorama for iOS
- Panorama can be used with iOS devices that run on iOS 12 or later.
- Click here to find Panorama
- for iPadOS in the App Store.
Panorama for Android
- Panorama can be used with Android devices that run on 7.0 and up.
- Click here to find Panorama for Android in the Google Play Store.
About the Panorama App:
- There are two different views on the Panorama app -- internal and external; each view serves a unique purpose.
- As a manager, you can switch the view (internal/external) by tapping once on the screen and clicking the gear icon in the lower right-hand corner.
- Remember to set your passcode on your Panorama settings screen. This will help you prevent members from changing things they shouldn’t have access to.
Click here to assign the SSID for your resources - None, Static, RADIUS, or Meraki
Click here to assign the SSID for your resources - None, Static, RADIUS, or Meraki
Internal View
The Internal View would be used on a device that sits inside the resource (example: sitting on a conference room table)
This is the view showing the meeting details and guest wifi information (helpful for members to verify they are in the correct room):
- By viewing meeting details, your members will be able to see:
- Which conference room they are in (more useful than you think)
- When their reservation begins and when it ends
- The WiFi network name and password
- The time! (also more useful than you may think)
- Perhaps most importantly, attendees will receive verbal reminders to check-in and when their reservation is ending
This is the view to Require member check-in:
- The check-in process allows members to indicate that they are actually present for their reservation. This can be helpful to make sure that your resources don’t appear empty and unavailable.
- You can set your Reservable Resources to require Check-In.
- This is optional, and if you activate this setting, reservations will be canceled automatically if they have not checked in within the first 15 minutes of the scheduled reservation.
- To enable this option in Cowoking, go to your dashboard and navigate to Manage Resources > Reservable Resources and edit the appropriate resource by clicking on its name or "Edit" next to the resource name. Scroll-down and check "Require Check In"
- To enable this option in Workplace, go to your dashboard and navigate to Manage Resources > Workspaces and edit the appropriate resource by clicking on its name or "Edit" next to the resource name. Tab over to "Settings" and toggle "Abandoned Reservation Protection"
This is the view showing the 5-minute countdown (helpful to keep things on track)
This is the view showing that the Reservable Resource is free to "use now" (helpful for squatters to reserve the room on demand):
The view showing End Meeting Early allows members to cancel their event early if they are finished with the conference room. Members do not get a refund or free time back for ending early. The system will bring up a warning making this clear.
The view showing Extend meeting time allows members to extend their reservation "in the moment" and will bill them appropriately (as long as there are no existing reservations immediately after).
External View
The External View would be used on a device that is placed outside of the resource (example: mounted outside of the conference room door)
This is the view showing the Reservable Resource schedule and room availability:
- By viewing the Reservable Resource schedule, members can also make local reservations "on-demand"
- Members can press the “use now” button to make a free 15, 30 or 60-minute reservation - say if they need to pop in to make a phone call.
- It will show up on the reservation calendar as a “Local Reservation” while the reservation is active. The Use Now reservation does disappear after the reservation is over. The manager can view the calendar on the dashboard and check a box to view previous local reservations.
- This can be edited or turned off in Settings > General.
This is the view showing a meeting is in progress:
PowerBX Astro Tablet
NOW AVAILABLE IN THE Proximity STORE
Create Smart Spaces to Support Hybrid Work with the ASTRO All-In-One Room Display
A fresh take on integrated room scheduling systems, designed to meet the versatile needs of enterprise use. ASTRO makes managing your spaces easy from installation to the user interface. The ASTRO All-In-One Kiosk can be custom provisioned with Panorama pre-installed prior to shipment.
Features:
- Touch screen
- LED Visibility on Room Availability
- Integrated Power over Ethernet
- Quick & Easy Installation
- Enterprise-grade Security
- Wall & Glass Mounting Options
To purchase, navigate to the Order tab in your dashboard.
Help! Panorama is no longer working
Earlier versions of Panorama have reached End Of Life and will no longer communicate with the server. Please be sure you are running the latest version by checking for updates in Google Play or Apple App Store
-
Updated by allison blevins, Jul 09, 2023 at 4:19pm
Room ViewPanorama App -
Updated by allison blevins, Jul 09, 2023 at 4:18pm
PanoramaRoom View App -
Updated by allison blevins, Jul 09, 2023 at 4:16pm
Proximity Room ViewPanorama App -
Updated by allison blevins, Jul 09, 2023 at 4:16pm
APPLIES TO: Coworking, Workplace
The
Proximity Room View applets your members and visitors easily check in to conference rooms, see guest WiFi information, end their reservation early, or extend their reservation without leaving the room. Proximity Room View is included with the price of every Proximity subscription.Panorama applets your members and visitors easily check in to conference rooms, see guest WiFi information, end their reservation early, or extend their reservation without leaving the room. Panorama is included with the price of every Proximity subscription.Room ViewPanorama foriPadOSiOSRoom View can be used with iOS devices that run on iOS 10.3 or later, however iOS 11+ is highly suggested.- Panorama can be used with iOS devices that run on iOS 12 or later.
- Click here to find Panorama
Click hereto find Proximity Room Viewfor iPadOS in the App Store.
Room ViewPanorama for AndroidRoom ViewPanorama can be used with Android devices that run on 7.0 and up.Click hereClick here to findProximity Room ViewPanorama for Android in the Google Play Store.
About the
Room ViewPanorama App:- There are two different views on the
Room ViewPanorama app -- internal and external; each view serves a unique purpose. - As a manager, you can switch the view (internal/external) by tapping once on the screen and clicking the gear icon in the lower right-hand corner.
- Remember to set your passcode on your
Room ViewPanorama settings screen. This will help you prevent members from changing things they shouldn’t have access to. Click here to assign the SSID for your resources - None, Static, RADIUS, or Meraki
Click here to assign the SSID for your resources - None, Static, RADIUS, or Meraki
Internal View
The Internal View would be used on a device that sits inside the resource (example: sitting on a conference room table)
This is the view showing the meeting details and guest wifi information (helpful for members to verify they are in the correct room):
- By viewing meeting details, your members will be able to see:
- Which conference room they are in (more useful than you think)
- When their reservation begins and when it ends
- The WiFi network name and password
- The time! (also more useful than you may think)
- Perhaps most importantly, attendees will receive verbal reminders to check-in and when their reservation is ending
This is the view to Require member check-in:
- The check-in process allows members to indicate that they are actually present for their reservation. This can be helpful to make sure that your resources don’t appear empty and unavailable.
- You can set your Reservable Resources to require Check-In.
- This is optional, and if you activate this setting, reservations will be canceled automatically if they have not checked in within the first 15 minutes of the scheduled reservation.
- To enable this option in
Proximity for CowokingCowoking, go to yourProximitydashboard and navigate to Manage Resources > Reservable Resources and edit the appropriate resource by clicking on its name or "Edit" next to the resource name. Scroll-down and check "Require Check In" - To enable this option in
Proximity for WorkplaceWorkplace, go to yourProximitydashboard and navigate to Manage Resources > Workspaces and edit the appropriate resource by clicking on its name or "Edit" next to the resource name. Tab over to "Settings" and toggle "Abandoned Reservation Protection"
This is the view showing the 5-minute countdown (helpful to keep things on track)
This is the view showing that the Reservable Resource is free to "use now" (helpful for squatters to reserve the room on demand):
The view showing End Meeting Early allows members to cancel their event early if they are finished with the conference room. Members do not get a refund or free time back for ending early. The system will bring up a warning making this clear.
The view showing Extend meeting time allows members to extend their reservation "in the moment" and will bill them appropriately (as long as there are no existing reservations immediately after).
External View
The External View would be used on a device that is placed outside of the resource (example: mounted outside of the conference room door)
This is the view showing the Reservable Resource schedule and room availability:
- By viewing the Reservable Resource schedule, members can also make local reservations "on-demand"
- Members can press the “use now” button to make a free 15, 30 or 60-minute reservation - say if they need to pop in to make a phone call.
- It will show up on the reservation calendar as a “Local Reservation” while the reservation is active. The Use Now reservation does disappear after the reservation is over. The manager can view the calendar on the dashboard and check a box to view previous local reservations.
- This can be edited or turned off in Settings > General.
This is the view showing a meeting is in progress:
PowerBX Astro Tablet
NOW AVAILABLE IN THE
PROXIMITYProximity STORECreate Smart Spaces to Support Hybrid Work with the ASTRO All-In-One Room Display
A fresh take on integrated room scheduling systems, designed to meet the versatile needs of enterprise use. ASTRO makes managing your spaces easy from installation to the user interface. The ASTRO All-In-One Kiosk can be custom provisioned with
Proximity Room ViewPanorama pre-installed prior to shipment.Features:
- Touch screen
- LED Visibility on Room Availability
- Integrated Power over Ethernet
- Quick & Easy Installation
- Enterprise-grade Security
- Wall & Glass Mounting Options
To purchase, navigate to the Order tab in your dashboard.
Help!
Room ViewPanorama is no longer workingEarlier versions of
Room ViewPanorama have reached End Of Life and will no longer communicate with the server. Please be sure you are running the latest version by checking for updates inGoogle PlayGoogle Play or Apple App Store -
Updated by Alex Neil, Jun 15, 2023 at 12:40pm
APPLIES TO: Coworking, Workplace
The Proximity Room View app lets your members and visitors easily check in to conference rooms, see guest WiFi information, end their reservation early, or extend their reservation without leaving the room. Proximity Room View is included with the price of every Proximity subscription.
Room View for
iOSiPadOS- Room View can be used with iOS devices that run on iOS 10.3 or later, however iOS 11+ is highly suggested.
- Click here to find Proximity Room View for
iOSiPadOS in the App Store.
Room View for Android
- Room View can be used with Android devices that run on 7.0 and up.
- Click here to find Proximity Room View for Android in the Google Play Store.
About the Room View App:
- There are two different views on the Room View app -- internal and external; each view serves a unique purpose.
- As a manager, you can switch the view (internal/external) by tapping once on the screen and clicking the gear icon in the lower right-hand corner.
- Remember to set your passcode on your Room View settings screen. This will help you prevent members from changing things they shouldn’t have access to.
Click here to assign the SSID for your resources - None, Static, RADIUS, or Meraki
Click here to assign the SSID for your resources - None, Static, RADIUS, or Meraki
Internal View
The Internal View would be used on a device that sits inside the resource (example: sitting on a conference room table)
This is the view showing the meeting details and guest wifi information (helpful for members to verify they are in the correct room):

- By viewing meeting details, your members will be able to see:
- Which conference room they are in (more useful than you think)
- When their reservation begins and when it ends
- The WiFi network name and password
- The time! (also more useful than you may think)
- Perhaps most importantly, attendees will receive verbal reminders to check-in and when their reservation is ending
This is the view to Require member check-in:

- The check-in process allows members to indicate that they are actually present for their reservation. This can be helpful to make sure that your resources don’t appear empty and unavailable.
- You can set your Reservable Resources to require Check-In.
- This is optional, and if you activate this setting, reservations will be canceled automatically if they have not checked in within the first 15 minutes of the scheduled reservation.
- To enable this option in Proximity for Cowoking, go to your Proximity dashboard and navigate to Manage Resources > Reservable Resources and edit the appropriate resource by clicking on its name or "Edit" next to the resource name. Scroll-down and check "Require Check In"
- To enable this option in Proximity for Workplace, go to your Proximity dashboard and navigate to Manage Resources > Workspaces and edit the appropriate resource by clicking on its name or "Edit" next to the resource name. Tab over to "Settings" and toggle "Abandoned Reservation Protection"
This is the view showing the 5-minute countdown (helpful to keep things on track)

This is the view showing that the Reservable Resource is free to "use now" (helpful for squatters to reserve the room on demand):

The view showing End Meeting Early allows members to cancel their event early if they are finished with the conference room. Members do not get a refund or free time back for ending early. The system will bring up a warning making this clear.
The view showing Extend meeting time allows members to extend their reservation "in the moment" and will bill them appropriately (as long as there are no existing reservations immediately after).
External View
The External View would be used on a device that is placed outside of the resource (example: mounted outside of the conference room door)
This is the view showing the Reservable Resource schedule and room availability:

- By viewing the Reservable Resource schedule, members can also make local reservations "on-demand"
- Members can press the “use now” button to make a free 15, 30 or 60-minute reservation - say if they need to pop in to make a phone call.
- It will show up on the reservation calendar as a “Local Reservation” while the reservation is active. The Use Now reservation does disappear after the reservation is over. The manager can view the calendar on the dashboard and check a box to view previous local reservations.
- This can be edited or turned off in Settings > General.
This is the view showing a meeting is in progress:

PowerBX Astro Tablet
NOW AVAILABLE IN THE PROXIMITY STORE
Create Smart Spaces to Support Hybrid Work with the ASTRO All-In-One Room Display
A fresh take on integrated room scheduling systems, designed to meet the versatile needs of enterprise use. ASTRO makes managing your spaces easy from installation to the user interface. The ASTRO All-In-One Kiosk can be custom provisioned with Proximity Room View pre-installed prior to shipment.
Features:
- Touch screen
- LED Visibility on Room Availability
- Integrated Power over Ethernet
- Quick & Easy Installation
- Enterprise-grade Security
- Wall & Glass Mounting Options
To purchase, navigate to the Order tab in your dashboard.
Help! Room View is no longer working
Earlier versions of Room View have reached End Of Life and will no longer communicate with the server. Please be sure you are running the latest version by checking for updates in Google Play or Apple App Store
-
Updated by allison blevins, Apr 27, 2023 at 12:31pm
APPLIES TO: Coworking, Workplace
The Proximity Room View app lets your members and visitors easily check in to conference rooms, see guest WiFi information, end their reservation early, or extend their reservation without leaving the room. Proximity Room View is included with the price of every Proximity subscription.
Room View for iOS
- Room View can be used with iOS devices that run on iOS 10.3 or later, however iOS 11+ is highly suggested.
- Click here to find Proximity Room View for iOS in the App Store.
Room View for Android
- Room View can be used with Android devices that run on 7.0 and up.
- Click here to find Proximity Room View for Android in the Google Play Store.
About the Room View App:
- There are two different views on the Room View app -- internal and external; each view serves a unique purpose.
- As a manager, you can switch the view (internal/external) by tapping once on the screen and clicking the gear icon in the lower right-hand corner.
- Remember to set your passcode on your Room View settings screen. This will help you prevent members from changing things they shouldn’t have access to.
Click here to assign the SSID for your resources - None, Static, RADIUS, or Meraki
Click here to assign the SSID for your resources - None, Static, RADIUS, or Meraki
Internal View
The Internal View would be used on a device that sits inside the resource (example: sitting on a conference room table)
This is the view showing the meeting details and guest wifi information (helpful for members to verify they are in the correct room):
- By viewing meeting details, your members will be able to see:
- Which conference room they are in (more useful than you think)
- When their reservation begins and when it ends
- The WiFi network name and password
- The time! (also more useful than you may think)
- Perhaps most importantly, attendees will receive verbal reminders to check-in and when their reservation is ending
This is the view to Require member check-in:
- The check-in process allows members to indicate that they are actually present for their reservation. This can be helpful to make sure that your resources don’t appear empty and unavailable.
- You can set your Reservable Resources to require Check-In.
- This is optional, and if you activate this setting, reservations will be canceled automatically if they have not checked in within the first 15 minutes of the scheduled reservation.
- To enable this option in Proximity for Cowoking, go to your Proximity dashboard and navigate to Manage Resources > Reservable Resources and edit the appropriate resource by clicking on its name or "Edit" next to the resource name. Scroll-down and check "Require Check In"
- To enable this option in Proximity for Workplace, go to your Proximity dashboard and navigate to Manage Resources > Workspaces and edit the appropriate resource by clicking on its name or "Edit" next to the resource name. Tab over to "Settings" and toggle "Abandoned Reservation Protection"
This is the view showing the 5-minute countdown (helpful to keep things on track)
This is the view showing that the Reservable Resource is free to "use now" (helpful for squatters to reserve the room on demand):
The view showing End Meeting Early allows members to cancel their event early if they are finished with the conference room. Members do not get a refund or free time back for ending early. The system will bring up a warning making this clear.
The view showing Extend meeting time allows members to extend their reservation "in the moment" and will bill them appropriately (as long as there are no existing reservations immediately after).
External View
The External View would be used on a device that is placed outside of the resource (example: mounted outside of the conference room door)
This is the view showing the Reservable Resource schedule and room availability:
- By viewing the Reservable Resource schedule, members can also make local reservations "on-demand"
- Members can press the “use now” button to make a free 15, 30 or 60-minute reservation - say if they need to pop in to make a phone call.
- It will show up on the reservation calendar as a “Local Reservation” while the reservation is active. The Use Now reservation does disappear after the reservation is over. The manager can view the calendar on the dashboard and check a box to view previous local reservations.
This can be turned off in Settings.- This can be edited or turned off in Settings > General.
This is the view showing a meeting is in progress:
PowerBX Astro Tablet
NOW AVAILABLE IN THE PROXIMITY STORE
Create Smart Spaces to Support Hybrid Work with the ASTRO All-In-One Room Display
A fresh take on integrated room scheduling systems, designed to meet the versatile needs of enterprise use. ASTRO makes managing your spaces easy from installation to the user interface. The ASTRO All-In-One Kiosk can be custom provisioned with Proximity Room View pre-installed prior to shipment.
Features:
- Touch screen
- LED Visibility on Room Availability
- Integrated Power over Ethernet
- Quick & Easy Installation
- Enterprise-grade Security
- Wall & Glass Mounting Options
To purchase, navigate to the Order tab in your dashboard.
Help! Room View is no longer working
Earlier versions of Room View have reached End Of Life and will no longer communicate with the server. Please be sure you are running the latest version by checking for updates in Google Play or Apple App Store
-
Updated by Alex Neil, Apr 27, 2023 at 11:47am
APPLIES TO: Coworking, Workplace
The Proximity Room View app lets your members and visitors easily check in to conference rooms, see guest WiFi information, end their reservation early, or extend their reservation without leaving the room. Proximity Room View is included with the price of every Proximity subscription.
Room View for iOS
- Room View can be used with iOS devices that run on iOS 10.3 or later, however iOS 11+ is highly suggested.
- Click here to find Proximity Room View for iOS in the App Store.
Room View for Android
- Room View can be used with Android devices that run on 7.0 and up.
- Click here to find Proximity Room View for Android in the Google Play Store.
About the Room View App:
- There are two different views on the Room View app -- internal and external; each view serves a unique purpose.
- As a manager, you can switch the view (internal/external) by tapping once on the screen and clicking the gear icon in the lower right-hand corner.
- Remember to set your passcode on your Room View settings screen. This will help you prevent members from changing things they shouldn’t have access to.
Click here to assign the SSID for your resources - None, Static, RADIUS, or Meraki
Internal View
The Internal View would be used on a device that sits inside the resource (example: sitting on a conference room table)
This is the view showing the meeting details and guest wifi information (helpful for members to verify they are in the correct room):
- By viewing meeting details, your members will be able to see:
- Which conference room they are in (more useful than you think)
- When their reservation begins and when it ends
- The WiFi network name and password
- The time! (also more useful than you may think)
- Perhaps most importantly, attendees will receive verbal reminders to check-in and when their reservation is ending
This is the view to Require member check-in:
- The check-in process allows members to indicate that they are actually present for their reservation. This can be helpful to make sure that your resources don’t appear empty and unavailable.
- You can set your Reservable Resources to require Check-In.
- This is optional, and if you activate this setting, reservations will be canceled automatically if they have not checked in within the first 15 minutes of the scheduled reservation.
- To enable this option in Proximity for Cowoking, go to your Proximity dashboard and navigate to Manage Resources > Reservable Resources and edit the appropriate resource by clicking on its name or "Edit" next to the resource name. Scroll-down and check "Require Check In"
- To enable this option in Proximity for Workplace, go to your Proximity dashboard and navigate to Manage Resources > Workspaces and edit the appropriate resource by clicking on its name or "Edit" next to the resource name. Tab over to "Settings" and toggle "Abandoned Reservation Protection"
This is the view showing the 5-minute countdown (helpful to keep things on track)
This is the view showing that the Reservable Resource is free to "use now" (helpful for squatters to reserve the room on demand):
The view showing End Meeting Early allows members to cancel their event early if they are finished with the conference room. Members do not get a refund or free time back for ending early. The system will bring up a warning making this clear.
The view showing Extend meeting time allows members to extend their reservation "in the moment" and will bill them appropriately (as long as there are no existing reservations immediately after).
External View
The External View would be used on a device that is placed outside of the resource (example: mounted outside of the conference room door)
This is the view showing the Reservable Resource schedule and room availability:
- By viewing the Reservable Resource schedule, members can also make local reservations "on-demand"
- Members can press the “use now” button to make a free 15-minute reservation - say if they need to pop in to make a phone call.
- It will show up on the reservation calendar as a “Local Reservation” while the reservation is active. The Use Now reservation does disappear after the reservation is over. The manager can view the calendar on the dashboard and check a box to view previous local reservations.
- This can be turned off in Settings.
This is the view showing a meeting is in progress:
PowerBX Astro Tablet
NOW AVAILABLE IN THE PROXIMITY STORE
Create Smart Spaces to Support Hybrid Work with the ASTRO All-In-One Room Display
A fresh take on integrated room scheduling systems, designed to meet the versatile needs of enterprise use. ASTRO makes managing your spaces easy from installation to the user interface. The ASTRO All-In-One Kiosk can be custom provisioned with Proximity Room View pre-installed prior to shipment.
Features:
- Touch screen
- LED Visibility on Room Availability
- Integrated Power over Ethernet
- Quick & Easy Installation
- Enterprise-grade Security
- Wall & Glass Mounting Options
To purchase, navigate to the Order tab in your dashboard.
Help! Room View is no longer working
Earlier versions of Room View have reached End Of Life and will no longer communicate with the server. Please be sure you are running the latest version by checking for updates in Google Play or Apple App Store
-
Updated by Alex Neil, Feb 24, 2023 at 11:57am
APPLIES TO: Coworking, Workplace
The Proximity Room View app lets your members and visitors easily check in to conference rooms, see guest WiFi information, end their reservation early, or extend their reservation without leaving the room. Proximity Room View is included with the price of every Proximity subscription.
Room View for iOS
- Room View can be used with iOS devices that run on iOS 10.3 or later, however iOS 11+ is highly suggested.
- Click here to find Proximity Room View for iOS in the App Store.
Room View for Android
- Room View can be used with Android devices that run on 7.0 and up.
- Click here to find Proximity Room View for Android in the Google Play Store.
About the Room View App:
- There are two different views on the Room View app -- internal and external; each view serves a unique purpose.
- As a manager, you can switch the view (internal/external) by tapping once on the screen and clicking the gear icon in the lower right-hand corner.
- Remember to set your passcode on your Room View settings screen. This will help you prevent members from changing things they shouldn’t have access to.
Click here to assign the SSID for your resources - None, Static, RADIUS, or Meraki
Click here to assign the SSID for your resources - None, Static, RADIUS, or Meraki
Internal View
The Internal View would be used on a device that sits inside the resource (example: sitting on a conference room table)
This is the view showing the meeting details and guest wifi information (helpful for members to verify they are in the correct room):
- By viewing meeting details, your members will be able to see:
- Which conference room they are in (more useful than you think)
- When their reservation begins and when it ends
- The WiFi network name and password
- The time! (also more useful than you may think)
- Perhaps most importantly, attendees will receive verbal reminders to check-in and when their reservation is ending
This is the view to Require member check-in:
- The check-in process allows members to indicate that they are actually present for their reservation. This can be helpful to make sure that your resources don’t appear empty and unavailable.
- You can set your Reservable Resources to require Check-In.
- This is optional, and if you activate this setting, reservations will be canceled automatically if they have not checked in within the first 15 minutes of the scheduled reservation.
- To enable this option in Proximity for Cowoking, go to your Proximity dashboard and navigate to Manage Resources > Reservable Resources and edit the appropriate resource by clicking on its name or "Edit" next to the resource name. Scroll-down and check "Require Check In"
- To enable this option in Proximity for Workplace, go to your Proximity dashboard and navigate to Manage Resources > Workspaces and edit the appropriate resource by clicking on its name or "Edit" next to the resource name. Tab over to "Settings" and toggle "Abandoned Reservation Protection"
This is the view showing the 5-minute countdown (helpful to keep things on track)
This is the view showing that the Reservable Resource is free to "use now" (helpful for squatters to reserve the room on demand):
The view showing End Meeting Early allows members to cancel their event early if they are finished with the conference room. Members do not get a refund or free time back for ending early. The system will bring up a warning making this clear.
The view showing Extend meeting time allows members to extend their reservation "in the moment" and will bill them appropriately (as long as there are no existing reservations immediately after).
External View
The External View would be used on a device that is placed outside of the resource (example: mounted outside of the conference room door)
This is the view showing the Reservable Resource schedule and room availability:
- By viewing the Reservable Resource schedule, members can also make local reservations "on-demand"
- Members can press the “use now” button to make a free 15-minute reservation - say if they need to pop in to make a phone call.
- It will show up on the reservation calendar as a “Local Reservation” while the reservation is active. The Use Now reservation does disappear after the reservation is over. The manager can view the calendar on the dashboard and check a box to view previous local reservations.
- This can be turned off in Settings.
This is the view showing a meeting is in progress:
PowerBX Astro Tablet
NOW AVAILABLE IN THE PROXIMITY STORE
Create Smart Spaces to Support Hybrid Work with the ASTRO All-In-One Room Display
A fresh take on integrated room scheduling systems, designed to meet the versatile needs of enterprise use. ASTRO makes managing your spaces easy from installation to the user interface. The ASTRO All-In-One Kiosk can be custom provisioned with Proximity Room View pre-installed prior to shipment.
Features:
- Touch screen
- LED Visibility on Room Availability
- Integrated Power over Ethernet
- Quick & Easy Installation
- Enterprise-grade Security
- Wall & Glass Mounting Options
To purchase, navigate to the Order tab in your dashboard.
Help! Room View is no longer working
Earlier versions of Room View have reached End Of Life and will no longer communicate with the server. Please be sure you are running the latest version by checking for updates in Google Play or Apple App Store
-
Updated by Alex Neil, Feb 01, 2023 at 2:42pm
APPLIES TO: Coworking, Workplace
The Proximity Room View app lets your members and visitors easily check in to conference rooms, see guest WiFi information, end their reservation early, or extend their reservation without leaving the room. Proximity Room View is included with the price of every Proximity subscription.
Room View for iOS
- Room View can be used with iOS devices that run on iOS 10.3 or later, however iOS 11 is highly suggested.
- Click here to find Proximity Room View for iOS in the App Store.
Room View for Android
- Room View can be used with Android devices that run on 7.0 and up.
- Click here to find Proximity Room View for Android in the Google Play Store.
About the Room View App:
- There are two different views on the Room View app -- internal and external; each view serves a unique purpose.
- As a manager, you can switch the view (internal/external) by tapping once on the screen and clicking the gear icon in the lower right-hand corner.
- Remember to set your passcode on your Room View settings screen. This will help you prevent members from changing things they shouldn’t have access to.
Click here to assign the SSID for your resources - None, Static, RADIUS, or Meraki
Click here to assign the SSID for your resources - None, Static, RADIUS, or Meraki
Internal View
The Internal View would be used on a device that sits inside the resource (example: sitting on a conference room table)
This is the view showing the meeting details and guest wifi information (helpful for members to verify they are in the correct room):
- By viewing meeting details, your members will be able to see:
- Which conference room they are in (more useful than you think)
- When their reservation begins and when it ends
- The WiFi network name and password
- The time! (also more useful than you may think)
- Perhaps most importantly, attendees will receive verbal reminders to check-in and when their reservation is ending
This is the view to Require member check-in:
- The check-in process allows members to indicate that they are actually present for their reservation. This can be helpful to make sure that your resources don’t appear empty and unavailable.
- You can set your Reservable Resources to require Check-In.
- This is optional, and if you activate this setting, reservations will be canceled automatically if they have not checked in within the first 15 minutes of the scheduled reservation.
- To enable this option in Proximity for Cowoking, go to your Proximity dashboard and navigate to Manage Resources > Reservable Resources and edit the appropriate resource by clicking on its name or "Edit" next to the resource name. Scroll-down and check "Require Check In"
- To enable this option in Proximity for Workplace, go to your Proximity dashboard and navigate to Manage Resources > Workspaces and edit the appropriate resource by clicking on its name or "Edit" next to the resource name. Tab over to "Settings" and toggle "Abandoned Reservation Protection"
This is the view showing the 5-minute countdown (helpful to keep things on track)
This is the view showing that the Reservable Resource is free to "use now" (helpful for squatters to reserve the room on demand):
The view showing End Meeting Early allows members to cancel their event early if they are finished with the conference room. Members do not get a refund or free time back for ending early. The system will bring up a warning making this clear.
The view showing Extend meeting time allows members to extend their reservation "in the moment" and will bill them appropriately (as long as there are no existing reservations immediately after).
External View
The External View would be used on a device that is placed outside of the resource (example: mounted outside of the conference room door)
This is the view showing the Reservable Resource schedule and room availability:
- By viewing the Reservable Resource schedule, members can also make local reservations "on-demand"
- Members can press the “use now” button to make a free 15-minute reservation - say if they need to pop in to make a phone call.
- It will show up on the reservation calendar as a “Local Reservation” while the reservation is active. The Use Now reservation does disappear after the reservation is over. The manager can view the calendar on the dashboard and check a box to view previous local reservations.
- This can be turned off in Settings.
This is the view showing a meeting is in progress:
PowerBX Astro Tablet
NOW AVAILABLE IN THE PROXIMITY STORE
Create Smart Spaces to Support Hybrid Work with the ASTRO All-In-One Room Display
A fresh take on integrated room scheduling systems, designed to meet the versatile needs of enterprise use. ASTRO makes managing your spaces easy from installation to the user interface. The ASTRO All-In-One Kiosk can be custom provisioned with Proximity Room View pre-installed prior to shipment.
Features:
- Touch screen
- LED Visibility on Room Availability
- Integrated Power over Ethernet
- Quick & Easy Installation
- Enterprise-grade Security
- Wall & Glass Mounting Options
To purchase, navigate to the Order tab in your dashboard.
Help! Room View is no longer working
Earlier versions of Room View have reached End Of Life and will no longer communicate with the server. Please be sure you are running the latest version by checking for updates in Google Play or Apple App Store
-
Updated by Alex Neil, Feb 01, 2023 at 2:40pm
APPLIES TO: Coworking, Workplace
The Proximity Room View app lets your members and visitors easily check in to conference rooms, see guest WiFi information, end their reservation early, or extend their reservation without leaving the room. Proximity Room View is included with the price of every Proximity subscription.
Room View for iOS
- Room View can be used with iOS devices that run on iOS 10.3 or later, however iOS 11 is highly suggested.
- Click here to find Proximity Room View for iOS in the App Store.
Room View for Android
- Room View can be used with Android devices that run on 7.0 and up.
- Click here to find Proximity Room View for Android in the Google Play Store.

About the Room View App:
- There are two different views on the Room View app -- internal and external; each view serves a unique purpose.
- As a manager, you can switch the view (internal/external) by tapping once on the screen and clicking the gear icon in the lower right-hand corner.
- Remember to set your passcode on your Room View settings screen. This will help you prevent members from changing things they shouldn’t have access to.
Click here to assign the SSID for your resources - None, Static, RADIUS, or Meraki
Click here to assign the SSID for your resources - None, Static, RADIUS, or Meraki
Internal View
The Internal View would be used on a device that sits inside the resource (example: sitting on a conference room table)
This is the view showing the meeting details and guest wifi information (helpful for members to verify they are in the correct room):
- By viewing meeting details, your members will be able to see:
- Which conference room they are in (more useful than you think)
- When their reservation begins and when it ends
- The WiFi network name and password
- The time! (also more useful than you may think)
- Perhaps most importantly, attendees will receive verbal reminders to check-in and when their reservation is ending
This is the view to Require member check-in:
- The check-in process allows members to indicate that they are actually present for their reservation. This can be helpful to make sure that your resources don’t appear empty and unavailable.
- You can set your Reservable Resources to require Check-In.
- This is optional, and if you activate this setting, reservations will be canceled automatically if they have not checked in within the first 15 minutes of the scheduled reservation.
- To enable this option in Proximity for Cowoking, go to your Proximity dashboard and navigate to Manage Resources > Reservable Resources and edit the appropriate resource by clicking on its name or "Edit" next to the resource name. Scroll-down and check "Require Check In"
- To enable this option in Proximity for Workplace, go to your Proximity dashboard and navigate to Manage Resources > Workspaces and edit the appropriate resource by clicking on its name or "Edit" next to the resource name. Tab over to "Settings" and toggle "Abandoned Reservation Protection"
This is the view showing the 5-minute countdown (helpful to keep things on track)
This is the view showing that the Reservable Resource is free to "use now" (helpful for squatters to reserve the room on demand):
The view showing End Meeting Early allows members to cancel their event early if they are finished with the conference room. Members do not get a refund or free time back for ending early. The system will bring up a warning making this clear.
The view showing Extend meeting time allows members to extend their reservation "in the moment" and will bill them appropriately (as long as there are no existing reservations immediately after).
External View
The External View would be used on a device that is placed outside of the resource (example: mounted outside of the conference room door)
This is the view showing the Reservable Resource schedule and room availability:
- By viewing the Reservable Resource schedule, members can also make local reservations "on-demand"
- Members can press the “use now” button to make a free 15-minute reservation - say if they need to pop in to make a phone call.
- It will show up on the reservation calendar as a “Local Reservation” while the reservation is active. The Use Now reservation does disappear after the reservation is over. The manager can view the calendar on the dashboard and check a box to view previous local reservations.
- This can be turned off in Settings.
This is the view showing a meeting is in progress:
PowerBX Astro Tablet
NOW AVAILABLE IN THE PROXIMITY STORE
Create Smart Spaces to Support Hybrid Work with the ASTRO All-In-One Room Display
A fresh take on integrated room scheduling systems, designed to meet the versatile needs of enterprise use. ASTRO makes managing your spaces easy from installation to the user interface. The ASTRO All-In-One Kiosk can be custom provisioned with Proximity Room View pre-installed prior to shipment.
Features:
- Touch screen
- LED Visibility on Room Availability
- Integrated Power over Ethernet
- Quick & Easy Installation
- Enterprise-grade Security
- Wall & Glass Mounting Options
To purchase, navigate to the Order tab in your dashboard.
Help! Room View is no longer working
Earlier versions of Room View have reached End Of Life and will no longer communicate with the server. Please be sure you are running the latest version by checking for updates in Google Play or Apple App Store
-
Updated by Alex Neil, Feb 01, 2023 at 2:00pm
APPLIES TO: Coworking, Workplace
The Proximity Room View app lets your members and visitors easily check in to conference rooms, see guest WiFi information, end their reservation early, or extend their reservation without leaving the room. Proximity Room View is included with the price of every Proximity subscription.
Room View for iOS
- Room View can be used with iOS devices that run on iOS 10.3 or later, however iOS 11 is highly suggested.
- Click here to find Proximity Room View for iOS in the App Store.
Room View for Android
- Room View can be used with Android devices that run on 7.0 and up.
- Click here to find Proximity Room View for Android in the Google Play Store.
About the Room View App:
- There are two different views on the Room View app -- internal and external; each view serves a unique purpose.
- As a manager, you can switch the view (internal/external) by tapping once on the screen and clicking the gear icon in the lower right-hand corner.
- Remember to set your passcode on your Room View settings screen. This will help you prevent members from changing things they shouldn’t have access to.
Click here to assign the SSID for your resources - None, Static, RADIUS, or Meraki
Click here to assign the SSID for your resources - None, Static, RADIUS, or Meraki
Internal View
The Internal View would be used on a device that sits inside the resource (example: sitting on a conference room table)
This is the view showing the meeting details and guest wifi information (helpful for members to verify they are in the correct room):
- By viewing meeting details, your members will be able to see:
- Which conference room they are in (more useful than you think)
- When their reservation begins and when it ends
- The WiFi network name and password
- The time! (also more useful than you may think)
- Perhaps most importantly, attendees will receive verbal reminders to check-in and when their reservation is ending
This is the view to Require member check-in:
- The check-in process allows members to indicate that they are actually present for their reservation. This can be helpful to make sure that your resources don’t appear empty and unavailable.
- You can set your Reservable Resources to require Check-In.
- This is optional, and if you activate this setting, reservations will be canceled automatically if they have not checked in within the first 15 minutes of the scheduled reservation.
- To enable this option in Proximity for Cowoking, go to your Proximity dashboard and navigate to Manage Resources > Reservable Resources and edit the appropriate resource by clicking on its name or "Edit" next to the resource name. Scroll-down and check "Require Check In"
- To enable this option in Proximity for Workplace, go to your Proximity dashboard and navigate to Manage Resources > Workspaces and edit the appropriate resource by clicking on its name or "Edit" next to the resource name. Tab over to "Settings" and toggle "Abandoned Reservation Protection"
This is the view showing the 5-minute countdown (helpful to keep things on track)
This is the view showing that the Reservable Resource is free to "use now" (helpful for squatters to reserve the room on demand):
The view showing End Meeting Early allows members to cancel their event early if they are finished with the conference room. Members do not get a refund or free time back for ending early. The system will bring up a warning making this clear.
The view showing Extend meeting time allows members to extend their reservation "in the moment" and will bill them appropriately (as long as there are no existing reservations immediately after).
External View
The External View would be used on a device that is placed outside of the resource (example: mounted outside of the conference room door)
This is the view showing the Reservable Resource schedule and room availability:
- By viewing the Reservable Resource schedule, members can also make local reservations "on-demand"
- Members can press the “use now” button to make a free 15-minute reservation - say if they need to pop in to make a phone call.
- It will show up on the reservation calendar as a “Local Reservation” while the reservation is active. The Use Now reservation does disappear after the reservation is over. The manager can view the calendar on the dashboard and check a box to view previous local reservations.
- This can be turned off in Settings.
This is the view showing a meeting is in progress:
PowerBX Astro Tablet
NOW AVAILABLE IN THE PROXIMITY STORE
Create Smart Spaces to Support Hybrid Work with the ASTRO All-In-One Room Display
A fresh take on integrated room scheduling systems, designed to meet the versatile needs of enterprise use. ASTRO makes managing your spaces easy from installation to the user interface. The ASTRO All-In-One Kiosk can be custom provisioned with Proximity Room View pre-installed prior to shipment.
Features:
- Touch screen
- LED Visibility on Room Availability
- Integrated Power over Ethernet
- Quick & Easy Installation
- Enterprise-grade Security
- Wall & Glass Mounting Options
To purchase, navigate to the Order tab in your dashboard.
Help! Room View is no longer working
Earlier versions of Room View have reached End Of Life and will no longer communicate with the server. Please be sure you are running the latest version by checking for updates in Google Play or Apple App Store
-
Updated by Alex Neil, Feb 01, 2023 at 2:00pm
APPLIES TO: Workplace
The Proximity Room View app lets your members and visitors easily check in to conference rooms, see guest WiFi information, end their reservation early, or extend their reservation without leaving the room. Proximity Room View is included with the price of every Proximity subscription.
Room View for iOS
- Room View can be used with iOS devices that run on iOS 10.3 or later, however iOS 11 is highly suggested.
- Click here to find Proximity Room View for iOS in the App Store.
Room View for Android
- Room View can be used with Android devices that run on 7.0 and up.
- Click here to find Proximity Room View for Android in the Google Play Store.
About the Room View App:
- There are two different views on the Room View app -- internal and external; each view serves a unique purpose.
- As a manager, you can switch the view (internal/external) by tapping once on the screen and clicking the gear icon in the lower right-hand corner.
- Remember to set your passcode on your Room View settings screen. This will help you prevent members from changing things they shouldn’t have access to.
Click here to assign the SSID for your resources - None, Static, RADIUS, or Meraki
Click here to assign the SSID for your resources - None, Static, RADIUS, or Meraki
Internal View
The Internal View would be used on a device that sits inside the resource (example: sitting on a conference room table)
This is the view showing the meeting details and guest wifi information (helpful for members to verify they are in the correct room):
- By viewing meeting details, your members will be able to see:
- Which conference room they are in (more useful than you think)
- When their reservation begins and when it ends
- The WiFi network name and password
- The time! (also more useful than you may think)
- Perhaps most importantly, attendees will receive verbal reminders to check-in and when their reservation is ending
This is the view to Require member check-in:
- The check-in process allows members to indicate that they are actually present for their reservation. This can be helpful to make sure that your resources don’t appear empty and unavailable.
- You can set your Reservable Resources to require Check-In.
- This is optional, and if you activate this setting, reservations will be canceled automatically if they have not checked in within the first 15 minutes of the scheduled reservation.
- To enable this option in Proximity for Cowoking, go to your Proximity dashboard and navigate to Manage Resources > Reservable Resources and edit the appropriate resource by clicking on its name or "Edit" next to the resource name. Scroll-down and check "Require Check In"
- To enable this option in Proximity for Workplace, go to your Proximity dashboard and navigate to Manage Resources > Workspaces and edit the appropriate resource by clicking on its name or "Edit" next to the resource name. Tab over to "Settings" and toggle "Abandoned Reservation Protection"
This is the view showing the 5-minute countdown (helpful to keep things on track)
This is the view showing that the Reservable Resource is free to "use now" (helpful for squatters to reserve the room on demand):
The view showing End Meeting Early allows members to cancel their event early if they are finished with the conference room. Members do not get a refund or free time back for ending early. The system will bring up a warning making this clear.
The view showing Extend meeting time allows members to extend their reservation "in the moment" and will bill them appropriately (as long as there are no existing reservations immediately after).
External View
The External View would be used on a device that is placed outside of the resource (example: mounted outside of the conference room door)
This is the view showing the Reservable Resource schedule and room availability:
- By viewing the Reservable Resource schedule, members can also make local reservations "on-demand"
- Members can press the “use now” button to make a free 15-minute reservation - say if they need to pop in to make a phone call.
- It will show up on the reservation calendar as a “Local Reservation” while the reservation is active. The Use Now reservation does disappear after the reservation is over. The manager can view the calendar on the dashboard and check a box to view previous local reservations.
- This can be turned off in Settings.
This is the view showing a meeting is in progress:
PowerBX Astro Tablet
NOW AVAILABLE IN THE PROXIMITY STORE
Create Smart Spaces to Support Hybrid Work with the ASTRO All-In-One Room Display
A fresh take on integrated room scheduling systems, designed to meet the versatile needs of enterprise use. ASTRO makes managing your spaces easy from installation to the user interface. The ASTRO All-In-One Kiosk can be custom provisioned with Proximity Room View pre-installed prior to shipment.
Features:
- Touch screen
- LED Visibility on Room Availability
- Integrated Power over Ethernet
- Quick & Easy Installation
- Enterprise-grade Security
- Wall & Glass Mounting Options
To purchase, navigate to the Order tab in your dashboard.
Help! Room View is no longer working
Earlier versions of Room View have reached End Of Life and will no longer communicate with the server. Please be sure you are running the latest version by checking for updates in Google Play or Apple App Store
-
Updated by Alex Neil, Feb 01, 2023 at 1:59pm
The Proximity Room View app lets your members and visitors easily check in to conference rooms, see guest WiFi information, end their reservation early, or extend their reservation without leaving the room. Proximity Room View is included with the price of every Proximity subscription.
Room View for iOS
- Room View can be used with iOS devices that run on iOS 10.3 or later, however iOS 11 is highly suggested.
- Click here to find Proximity Room View for iOS in the
app storeApp Store.
Room View for Android
- Room View can be used with Android devices that run on 7.0 and up.
- Click here to find Proximity Room View for Android in the Google Play Store.
About the Room View App:
- There are two different views on the Room View app -- internal and external; each view serves a unique purpose.
- As a manager, you can switch the view (internal/external) by tapping once on the screen and clicking the gear icon in the lower right-hand corner.
- Remember to set your passcode on your Room View settings screen. This will help you prevent members from changing things they shouldn’t have access to.
Click here to assign the SSID for your resources - None, Static, RADIUS, or Meraki
Click here to assign the SSID for your resources - None, Static, RADIUS, or Meraki
Internal View
The Internal View would be used on a device that sits inside the resource (example: sitting on a conference room table)
This is the view showing the meeting details and guest wifi information (helpful for members to verify they are in the correct room):
- By viewing meeting details, your members will be able to see:
- Which conference room they are in (more useful than you think)
- When their reservation begins and when it ends
- The WiFi network name and password
- The time! (also more useful than you may think)
- Perhaps most importantly, attendees will receive verbal reminders to check-in and when their reservation is ending
This is the view to Require member check-in:
- The check-in process allows members to indicate that they are actually present for their reservation. This can be helpful to make sure that your resources don’t appear empty and unavailable.
- You can set your Reservable Resources to require Check-In.
- This is optional, and if you activate this setting, reservations will be canceled automatically if they have not checked in within the first 15 minutes of the scheduled reservation.
- To enable this option in Proximity for Cowoking, go to your Proximity dashboard and navigate to Manage Resources > Reservable Resources and edit the appropriate resource by clicking on its name or "Edit" next to the resource name. Scroll-down and check "Require Check In"
- To enable this option in Proximity for Workplace, go to your Proximity dashboard and navigate to Manage Resources > Workspaces and edit the appropriate resource by clicking on its name or "Edit" next to the resource name. Tab over to "Settings" and toggle "Abandoned Reservation Protection"
This is the view showing the 5-minute countdown (helpful to keep things on track)
This is the view showing that the Reservable Resource is free to "use now" (helpful for squatters to reserve the room on demand):
The view showing End Meeting Early allows members to cancel their event early if they are finished with the conference room. Members do not get a refund or free time back for ending early. The system will bring up a warning making this clear.
The view showing Extend meeting time allows members to extend their reservation "in the moment" and will bill them appropriately (as long as there are no existing reservations immediately after).
External View
The External View would be used on a device that is placed outside of the resource (example: mounted outside of the conference room door)
This is the view showing the Reservable Resource schedule and room availability:
- By viewing the Reservable Resource schedule, members can also make local reservations "on-demand"
- Members can press the “use now” button to make a free 15-minute reservation - say if they need to pop in to make a phone call.
- It will show up on the reservation calendar as a “Local Reservation” while the reservation is active. The Use Now reservation does disappear after the reservation is over. The manager can view the calendar on the dashboard and check a box to view previous local reservations.
- This can be turned off in Settings.
This is the view showing a meeting is in progress:
PowerBX Astro Tablet
NOW AVAILABLE IN THE PROXIMITY STORE
Create Smart Spaces to Support Hybrid Work with the ASTRO All-In-One Room Display
A fresh take on integrated room scheduling systems, designed to meet the versatile needs of enterprise use. ASTRO makes managing your spaces easy from installation to the user interface. The ASTRO All-In-One Kiosk can be custom provisioned with Proximity Room View pre-installed prior to shipment.
Features:
- Touch screen
- LED Visibility on Room Availability
- Integrated Power over Ethernet
- Quick & Easy Installation
- Enterprise-grade Security
- Wall & Glass Mounting Options
To purchase, navigate to the Order tab in your dashboard.
Help! Room View is no longer working
Earlier versions of Room View have reached End Of Life and will no longer communicate with the server. Please be sure you are running the latest version by checking for updates in Google Play or Apple App Store
-
Updated by Alex Neil, Dec 12, 2022 at 5:10pm
The Proximity Room View app lets your members and visitors easily check in to conference rooms, see guest WiFi information, end their reservation early, or extend their reservation without leaving the room. Proximity Room View is included with the price of every Proximity subscription.
Room View for iOS
- Room View can be used with iOS devices that run on iOS 10.3 or later, however iOS 11 is highly suggested.
- Click here to find Proximity Room View for iOS in the app store.
Room View for Android
- Room View can be used with Android devices that run on 7.0 and up.
- Click here to find Proximity Room View for Android in the Google Play Store.
About the Room View App:
- There are two different views on the Room View app -- internal and external; each view serves a unique purpose.
- As a manager, you can switch the view (internal/external) by tapping once on the screen and clicking the gear icon in the lower right-hand corner.
- Remember to set your passcode on your Room View settings screen. This will help you prevent members from changing things they shouldn’t have access to.
Click here to set up the SSID's for your resources if you use the Meraki Internet Integration.
Click here to assign the SSID for your resources - None, Static, RADIUS, or Meraki
Internal View
The Internal View would be used on a device that sits inside the resource (example: sitting on a conference room table)
This is the view showing the meeting details and guest wifi information (helpful for members to verify they are in the correct room):
- By viewing meeting details, your members will be able to see:
- Which conference room they are in (more useful than you think)
- When their reservation begins and when it ends
- The WiFi network name and password
(if you have our Advanced Meraki WiFi integration) - The time! (also more useful than you may think)
- Perhaps most importantly, attendees will receive verbal reminders to check-in and when their reservation is ending
This is the view to Require member check-in:
- The check-in process allows members to indicate that they are actually present for their reservation. This can be helpful to make sure that your resources don’t appear empty and unavailable.
- You can set your Reservable Resources to require Check-In.
- This is optional, and if you activate this setting, reservations will be canceled automatically if they have not checked in within the first 15 minutes of the scheduled reservation.
- To enable this option in Proximity for Cowoking,
usego to your Proximity dashboard and navigate to Manage Resources > Reservable Resources and edit the appropriate resource by clicking on its name or "Edit" next to the resource name. Scroll-down and check "Require Check In" - To enable this option in Proximity for Workplace, go to your Proximity dashboard and navigate to Manage Resources > Workspaces and edit the appropriate resource by clicking on its name or "Edit" next to the resource name. Tab over to "Settings" and toggle "Abandoned Reservation Protection"
This is the view showing the 5-minute countdown (helpful to keep things on track)
This is the view showing that the Reservable Resource is free to "use now" (helpful for squatters to reserve the room on demand):
The view showing End Meeting Early allows members to cancel their event early if they are finished with the conference room. Members do not get a refund or free time back for ending early. The system will bring up a warning making this clear.
The view showing Extend meeting time allows members to extend their reservation "in the moment" and will bill them appropriately (as long as there are no existing reservations immediately after).
External View
The External View would be used on a device that is placed outside of the resource (example: mounted outside of the conference room door)
This is the view showing the Reservable Resource schedule and room availability:
- By viewing the Reservable Resource schedule, members can also make local reservations "on-demand"
- Members can press the “use now” button to make a free 15-minute reservation - say if they need to pop in to make a phone call.
- It will show up on the reservation calendar as a “Local Reservation” while the reservation is active. The Use Now reservation does disappear after the reservation is over. The manager can view the calendar on the dashboard and check a box to view previous local reservations.
- This can be turned off in Settings.
This is the view showing a meeting is in progress:
PowerBX Astro Tablet
NOW AVAILABLE IN THE PROXIMITY STORE
Create Smart Spaces to Support Hybrid Work with the ASTRO All-In-One Room Display
A fresh take on integrated room scheduling systems, designed to meet the versatile needs of enterprise use. ASTRO makes managing your spaces easy from installation to the user interface. The ASTRO All-In-One Kiosk can be custom provisioned with Proximity Room View pre-installed prior to shipment.
Features:
- Touch screen
- LED Visibility on Room Availability
- Integrated Power over Ethernet
- Quick & Easy Installation
- Enterprise-grade Security
- Wall & Glass Mounting Options
To purchase, navigate to the Order tab in your dashboard.
Help! Room View is no longer working
Earlier versions of Room View have reached End Of Life and will no longer communicate with the server. Please be sure you are running the latest version by checking for updates in Google Play or Apple App Store
-
Updated by McKenna Yoder, Nov 16, 2022 at 9:25am
The Proximity Room View app lets your members and visitors easily check in to conference rooms, see guest WiFi information, end their reservation early, or extend their reservation without leaving the room. Proximity Room View is included with the price of every Proximity subscription.
Room View for iOS
- Room View can be used with iOS devices that run on iOS 10.3 or later, however iOS 11 is highly suggested.
- Click here to find Proximity Room View for iOS in the app store.
Room View for Android
- Room View can be used with Android devices that run on 7.0 and up.
- Click here to find Proximity Room View for Android in the Google Play Store.
About the Room View App:
- There are two different views on the Room View app -- internal and external; each view serves a unique purpose.
- As a manager, you can switch the view (internal/external) by tapping once on the screen and clicking the gear icon in the lower right-hand corner.
- Remember to set your passcode on your Room View settings screen. This will help you prevent members from changing things they shouldn’t have access to.
Click here to set up the SSID's for your resources if you use the Meraki Internet Integration.
Click here to set up the SSID's for your resources if you use the Meraki Internet Integration.
Internal View
The Internal View would be used on a device that sits inside the resource (example: sitting on a conference room table)
This is the view showing the meeting details and guest wifi information (helpful for members to verify they are in the correct room):
- By viewing meeting details, your members will be able to see:
- Which conference room they are in (more useful than you think)
- When their reservation begins and when it ends
- The WiFi network name and password (if you have our Advanced Meraki WiFi integration)
- The time! (also more useful than you may think)
- Perhaps most importantly, attendees will receive verbal reminders to check-in and when their reservation is ending
This is the view to Require member check-in:
- The check-in process allows members to indicate that they are actually present for their reservation. This can be helpful to make sure that your resources don’t appear empty and unavailable.
- You can set your Reservable Resources to require Check-In.
- This is optional, and if you activate this setting, reservations will be canceled automatically if they have not checked in within the first 15 minutes of the scheduled reservation.
- To enable this option, use your Proximity dashboard and navigate to Manage Resources > Reservable Resources and edit the appropriate resource by clicking on its name or "Edit" next to the resource name.
This is the view showing the 5-minute countdown (helpful to keep things on track)
This is the view showing that the Reservable Resource is free to "use now" (helpful for squatters to reserve the room on demand):
The view showing End Meeting Early allows members to cancel their event early if they are finished with the conference room. Members do not get a refund or free time back for ending early. The system will bring up a warning making this clear.
The view showing Extend meeting time allows members to extend their reservation "in the moment" and will bill them appropriately (as long as there are no existing reservations immediately after).
External View
The External View would be used on a device that is placed outside of the resource (example: mounted outside of the conference room door)
This is the view showing the Reservable Resource schedule and room availability:
- By viewing the Reservable Resource schedule, members can also make local reservations "on-demand"
- Members can press the “use now” button to make a free 15-minute reservation - say if they need to pop in to make a phone call.
- It will show up on the reservation calendar as a “Local Reservation” while the reservation is active. The Use Now reservation does disappear after the reservation is over. The manager can view the calendar on the dashboard and check a box to view previous local reservations.
- This can be turned off in Settings.
This is the view showing a meeting is in progress:
PowerBX Astro Tablet
NOW AVAILABLE IN THE PROXIMITY STORE
Create Smart Spaces to Support Hybrid Work with the ASTRO All-In-One Room Display
A fresh take on integrated room scheduling systems, designed to meet the versatile needs of enterprise use. ASTRO makes managing your spaces easy from installation to the user interface. The ASTRO All-In-One Kiosk can be custom provisioned with Proximity Room View pre-installed prior to shipment.
Features:
- Touch screen
- LED Visibility on Room Availability
- Integrated Power over Ethernet
- Quick & Easy Installation
- Enterprise-grade Security
- Wall & Glass Mounting Options
To purchase, navigate to the Order tab in your dashboard.
Help! Room View is no longer working
Earlier versions of Room View have reached End Of Life and will no longer communicate with the server. Please be sure you are running the latest version by checking for updates in Google Play or Apple App Store
-
Updated by Megan Pastor, Nov 02, 2022 at 2:00pm
The Proximity Room View app lets your members and visitors easily check in to conference rooms, see guest WiFi information, end their reservation early, or extend their reservation without leaving the room. Proximity Room View is included with the price of every Proximity subscription.
Room View for iOS
- Room View can be used with iOS devices that run on iOS 10.3 or later, however iOS 11 is highly suggested.
- Click here to find Proximity Room View for iOS in the app store.
Room View for Android
- Room View can be used with Android devices that run on 7.0 and up.
- Click here to find Proximity Room View for Android in the Google Play Store.
About the Room View App:
- There are two different views on the Room View app -- internal and external; each view serves a unique purpose.
- As a manager, you can switch the view (internal/external) by tapping once on the screen and clicking the gear icon in the lower right-hand corner.
- Remember to set your passcode on your Room View settings screen. This will help you prevent members from changing things they shouldn’t have access to.
Click here to set up the SSID's for your resources if you use the Meraki Internet Integration.
Click here to set up the SSID's for your resources if you use the Meraki Internet Integration.
Internal View
The Internal View would be used on a device that sits inside the resource (example: sitting on a conference room table)
This is the view showing the meeting details and guest wifi information (helpful for members to verify they are in the correct room):
- By viewing meeting details, your members will be able to see:
- Which conference room they are in (more useful than you think)
- When their reservation begins and when it ends
- The WiFi network name and password (if you have our Advanced Meraki WiFi integration)
- The time! (also more useful than you may think)
- Perhaps most importantly, attendees will receive verbal reminders to check-in and when their reservation is ending
This is the view to Require member check-in:
- The check-in process allows members to indicate that they are actually present for their reservation. This can be helpful to make sure that your resources don’t appear empty and unavailable.
- You can set your Reservable Resources to require Check-In.
- This is optional, and if you activate this setting, reservations will be canceled automatically if they have not checked in within the first 15 minutes of the scheduled reservation.
- To enable this option, use your Proximity dashboard and navigate to Manage Resources > Reservable Resources and edit the appropriate resource by clicking on its name or "Edit" next to the resource name.
This is the view showing the 5-minute countdown (helpful to keep things on track)
This is the view showing that the Reservable Resource is free to "use now" (helpful for squatters to reserve the room on demand):
The view showing End Meeting Early allows members to cancel their event early if they are finished with the conference room. Members do not get a refund or free time back for ending early. The system will bring up a warning making this clear.
The view showing Extend meeting time allows members to extend their reservation "in the moment" and will bill them appropriately (as long as there are no existing reservations immediately after).
External View
The External View would be used on a device that is placed outside of the resource (example: mounted outside of the conference room door)
This is the view showing the Reservable Resource schedule and room availability:
- By viewing the Reservable Resource schedule, members can also make local reservations "on-demand"
- Members can press the “use now” button to make a free 15-minute reservation - say if they need to pop in to make a phone call.
- It will show up on the reservation calendar as a “Local Reservation” while the reservation is active. The Use Now reservation does disappear after the reservation is over. The manager can view the calendar on the dashboard and check a box to view previous local reservations.
- This can be turned off in Settings.
This is the view showing a meeting is in progress:
PowerBX Astro Tablet
NOW AVAILABLE IN THE PROXIMITY STORE
Create Smart Spaces to Support Hybrid Work with the ASTRO All-In-One Room Display
A fresh take on integrated room scheduling systems, designed to meet the versatile needs of enterprise use. ASTRO makes managing your spaces easy from installation to the user interface. The ASTRO All-In-One Kiosk can be custom provisioned with Proximity Room View pre-installed prior to shipment.
Features:
- Touch screen
- LED Visibility on Room Availability
- Integrated Power over Ethernet
- Quick & Easy Installation
- Enterprise-grade Security
- Wall & Glass Mounting Options
To purchase, navigate to the Order tab in your dashboard.
Help! Room View is no longer working
Earlier versions of Room View have reached End Of Life and will no longer communicate with the server. Please be sure you are running the latest version by checking for updates in Google Play or Apple App Store
-
Updated by Megan Pastor, Nov 02, 2022 at 1:37pm
The Proximity Room View app lets your members and visitors easily check in to conference rooms, see guest WiFi information, end their reservation early, or extend their reservation without leaving the room. Proximity Room View is included with the price of every Proximity subscription.
Room View for iOS
- Room View can be used with iOS devices that run on iOS 10.3 or later, however iOS 11 is highly suggested.
- Click here to find Proximity Room View for iOS in the app store.
Room View for Android
- Room View can be used with Android devices that run on 7.0 and up.
- Click here to find Proximity Room View for Android in the Google Play Store.
About the Room View App:
- There are two different views on the Room View app -- internal and external; each view serves a unique purpose.
- As a manager, you can switch the view (internal/external) by tapping once on the screen and clicking the gear icon in the lower right-hand corner.
- Remember to set your passcode on your Room View settings screen. This will help you prevent members from changing things they shouldn’t have access to.
Click here to set up the SSID's for your resources if you use the Meraki Internet Integration.
Click here to set up the SSID's for your resources if you use the Meraki Internet Integration.
Internal View
The Internal View would be used on a device that sits inside the resource (example: sitting on a conference room table)
This is the view showing the meeting details and guest wifi information (helpful for members to verify they are in the correct room):
- By viewing meeting details, your members will be able to see:
- Which conference room they are in (more useful than you think)
- When their reservation begins and when it ends
- The WiFi network name and password (if you have our Advanced Meraki WiFi integration)
- The time! (also more useful than you may think)
- Perhaps most importantly, attendees will receive verbal reminders to check-in and when their reservation is ending
This is the view to Require member check-in:
- The check-in process allows members to indicate that they are actually present for their reservation. This can be helpful to make sure that your resources don’t appear empty and unavailable.
- You can set your Reservable Resources to require Check-In.
- This is optional, and if you activate this setting,
anyreservations will be canceled automatically if they have not checked in within the first 15 minutes of the scheduled reservation. - To enable this option, use your Proximity dashboard and navigate to Manage Resources > Reservable Resources and edit the appropriate resource by clicking on its name or "Edit" next to the resource name.
- This is optional, and if you activate this setting,
This is the view showing the 5-minute countdown (helpful to keep things on track)
This is the view showing that the Reservable Resource is free to "use now" (helpful for squatters to reserve the room on demand):
The view showing End Meeting Early allows members to cancel their event early if they are finished with the conference room. Members do not get a refund or free time back for ending early. The system will bring up a warning making this clear.
The view showing Extend meeting time allows members to extend their reservation "in the moment" and will bill them appropriately (as long as there are no existing reservations immediately after).
External View
The External View would be used on a device that is
heldplaced outside of the resource (example: mounted outside of the conference room door)This is the view showing the Reservable Resource schedule and room availability:
- By viewing the Reservable Resource schedule, members can also make local reservations "on-demand"
- Members can press the “use now” button to make a free 15-minute reservation - say if they need to pop in to make a phone call.
- It will show up on the reservation calendar as a “Local Reservation” while the reservation is active. The Use Now reservation does disappear after the reservation is over. The manager can view the calendar on the dashboard and check a box to view previous local reservations.
- This can be turned off in Settings.
This is the view showing a meeting is in progress:
PowerBX Astro Tablet
NOW AVAILABLE IN THE PROXIMITY STORE
Create Smart Spaces to Support Hybrid Work with the ASTRO All-In-One Room Display
A fresh take on integrated room scheduling systems, designed to meet the versatile needs of enterprise use. ASTRO makes managing your spaces easy from installation to the user interface. The ASTRO All-In-One Kiosk can be custom provisioned with Proximity Room View pre-installed prior to shipment.
Features:
- Touch screen
- LED Visibility on Room Availability
- Integrated Power over Ethernet
- Quick & Easy Installation
- Enterprise-grade Security
- Wall & Glass Mounting Options
To purchase, navigate to the Order tab in your dashboard.
Help! Room View is no longer working
Earlier versions of Room View have reached End Of Life and will no longer communicate with the server. Please be sure you are running the latest version by checking for updates in Google Play or Apple App Store
-
Updated by Megan Pastor, Nov 02, 2022 at 1:30pm
The Proximity Room View app lets your members and visitors easily check in to conference rooms, see guest WiFi information, end their reservation early, or extend their reservation without leaving the room. Proximity Room View is included with the price of every Proximity subscription.
Room View for iOS
- Room View can be used with iOS devices that run on iOS 10.3 or later, however iOS 11 is highly suggested.
- Click here to find Proximity Room View for iOS in the app store.
Room View for Android
- Room View can be used with Android devices that run on 7.0 and up.
- Click here to find Proximity Room View for Android in the Google Play Store.
About the Room View App:
- There are two different views on the Room View app -- internal and external; each view serves a unique purpose.
- As a manager, you can switch the view (internal/external) by tapping once on the screen and clicking the gear icon in the lower right-hand corner.
- Remember to set your passcode on your Room View settings screen. This will help you prevent members from changing things they shouldn’t have access to.
Click here to set up the SSID's for your resources if you use the Meraki Internet Integration.
Click here to set up the SSID's for your resources if you use the Meraki Internet Integration.
Internal View
The Internal View would be used on a device that sits inside the resource (example: sitting on a conference room table)
This is the view showing the meeting details and guest wifi information (helpful for members to verify they are in the correct room):
- By viewing meeting details, your members will be able to see:
- Which conference room they are in (more useful than you think)
- When their reservation begins and when it ends
- The WiFi network name and password (if you have our Advanced Meraki WiFi integration)
- The time! (also more useful than you may think)
- Perhaps most importantly, attendees will receive verbal reminders to check-in and when their reservation is ending
This is the view to Require member check-in:
- The check-in process allows members to indicate that they are actually present for their reservation. This can be helpful to make sure that your resources don’t appear empty and unavailable.
- You can set your Reservable Resources to require Check-In.
- This is optional, and if you activate this setting, any reservations will be canceled automatically if they have not checked in within the first 15 minutes of the scheduled reservation.
- To enable this option, use your Proximity dashboard and navigate to Manage Resources > Reservable Resources and edit the appropriate resource by clicking on its name or "Edit" next to the resource name.
This is the view showing the 5-minute countdown (helpful to keep things on track)
This is the view showing that the Reservable Resource is free to "use now" (helpful for squatters to reserve the room on demand):
The view showing End Meeting Early allows members to cancel their event early if they are finished with the conference room. Members do not get a refund or free time back for ending early. The system will bring up a warning making this clear.
The view showing Extend meeting time allows members to extend their reservation "in the moment" and will bill them appropriately (as long as there are no existing reservations immediately after).
External View
The External View would be used on a device that is held outside the resource (example: mounted outside of the conference room door)
This is the view showing the Reservable Resource schedule and room availability:
- By viewing the Reservable Resource schedule, members can also make local reservations "on-demand"
- Members can press the “use now” button to make a free 15-minute reservation - say if they need to pop in to make a phone call.
- It will show up on the reservation calendar as a “Local Reservation” while the reservation is active. The Use Now reservation does disappear after the reservation is over. The manager can view the calendar on the dashboard and check a box to view previous local reservations.
- This can be turned off in Settings.
This is the view showing a meeting is in progress:
PowerBX Astro Tablet
NOW AVAILABLE IN THE PROXIMITY STORE
Create Smart Spaces to Support Hybrid Work with the ASTRO All-In-One Room Display
A fresh take on integrated room scheduling systems, designed to meet the versatile needs of enterprise use. ASTRO makes managing your spaces easy from installation to the user interface. The ASTRO All-In-One Kiosk can be custom provisioned with Proximity Room View pre-installed prior to shipment.
Features:
- Touch screen
- LED Visibility on Room Availability
- Integrated Power over Ethernet
- Quick & Easy Installation
- Enterprise-grade Security
- Wall & Glass Mounting Options
To purchase, navigate to the Order tab in your dashboard.
Help! Room View is no longer working
Earlier versions of Room View have reached End Of Life and will no longer communicate with the server. Please be sure you are running the latest version by checking for updates in Google Play or Apple App Store
-
Updated by Megan Pastor, Nov 02, 2022 at 1:27pm
The Proximity Room View app lets your members and visitors easily check in to conference rooms, see guest WiFi information, end their reservation early,
and evenor extendreservationstheir reservation withoutevenleaving the room. Proximity Room Viewcomesis included with the price of every Proximity subscription.Room View for iOS
- Room View can be used with iOS devices that run on iOS 10.3 or later, however iOS 11 is highly suggested.
- Click here to find Proximity Room View for iOS in the app store.
Room View for Android
- Room View can be used with Android devices that run on 7.0 and up.
- Click here to find Proximity Room View for Android in the Google Play Store.
About the App:
- There are two different views on the Room View app -- internal and external; each view serves a unique purpose.
See below just a few features you can start using with the Proximity Room View app which comes included with the price of your Proximity subscription! - As a manager, you can switch the view (internal/external) by tapping once on the screen and clicking the gear icon in the lower right-hand corner.
- Remember to set your passcode on your Room View settings screen. This will help you prevent members from changing things they shouldn’t have access to.
Click here to set up the SSID's for your resources if you use the Meraki Internet Integration.
Click here to set up the SSID's for your resources if you use the Meraki Internet Integration.
Internal View
This viewThe Internal View would be used on a device that sits inside the resource(example: sitting on a(example: sitting on a conference room table)This is the view showing the meeting details and guest wifi information (helpful for members to verify they are in the correct room):
- By viewing meeting details, your members will be able to see:
- Which conference room they are in (more useful than you think)
- When their reservation begins and when it ends
- The WiFi network name and password (if you have our Advanced Meraki WiFi integration)
- The time! (also more useful than you may think)
- Perhaps most importantly, attendees will receive verbal reminders to check-in and when their reservation is ending
This is the view to Require member check-in:
- The check-in process allows members to indicate that they are actually present for their reservation. This can be helpful to make sure that your resources don’t appear empty and unavailable.
- You can set your Reservable Resources to require Check-In.
- This is optional, and if you activate this setting, any reservations will be canceled automatically if they have not checked in within the first 15 minutes of the scheduled reservation.
- To enable this option, use your Proximity dashboard and navigate to Manage Resources > Reservable Resources and edit the appropriate resource by clicking on its name or "Edit" next to the resource name.
This is the view showing the 5-minute countdown (helpful to keep things on track)
This is the view showing that the Reservable Resource is free to "use now" (helpful for squatters to reserve the room on demand):
The view showing End Meeting Early allows members to cancel their event early if they are finished with the conference room
table. Members do not get a refund or free time back for ending early. The system will bring up a warning making this clear.The view showing Extend meeting time allows members to extend their reservation "in the moment" and will bill them appropriately (as long as there are no existing reservations immediately after).
Require member check-inThe check-in process allows members to indicate that they are actually present for their reservation. This can be helpful to make sure that your resources don’t sit empty and unavailable.You can set your reservable resources to require check-in.This is optional, and if you activate this setting, any reservations will be canceled automaticallyif they have not checked in within the first 15 minutes of the reservation.To set this option, use your Proximity dashboard and navigate toManage Resources > Reservable Resourcesand edit the appropriate resource by clicking on its name or "Edit" next to the resource name.
View meeting detailsYour members will be able to see:Which conference room they are in (more useful than you think).When their reservation begins and when it ends.The WiFi network name and password (if you have our Advanced Meraki WiFi integration).The time! (also more useful than you may think.)Perhaps most importantly, attendees will receive verbal reminders to check-in and when their reservation is ending.
End meeting earlyMembers can use Room View to cancel their event early if they are finished with the conference room. Members do not get a refund or free time back for ending early. The system will bring up a warning making this clear.
Extend meeting timeMembers can also extend their reservation and will be billed appropriately (as long as there are no existing reservations immediately after).
External View
This viewThe External View would be used on a device that is held outside thereservableresource(example: mounted outside of(example: mounted outside of the conference room door)This is the
conferenceview showing the Reservable Resource schedule and roomdoor.)See conference room scheduleMake local reservations ("on-demand")Members can press the “use now” button to make a free 15 minute reservation - say if they need to pop in to make a phone call.It will show up on the reservation calendar as a “Local Reservation” while the reservation is active. It disappears after the reservation is over. The manager can view the calendar on the dashboard and check a box to view previous local reservations.This can be turned off in Settings.
Internal View Examplesavailability:View showing the meeting details and guest wifi information- By viewing the Reservable Resource schedule, members can also make local reservations "on-demand"
- Members can press the “use now” button to make a free 15-minute reservation - say if they need to pop in to make a phone call.
- It will show up on the reservation calendar as a “Local Reservation” while the reservation is active. The Use Now reservation does disappear after the reservation is over. The manager can view the calendar on the dashboard and check a box to view previous local reservations.
- This can be turned off in Settings.
View showing that the conference room is free to useThis is the view showing a meeting is in progress:View showing the reservation check-in screenView showing the 5-minute countdown for the time remainingExternal View ExamplesView showing the conference room schedule and room availabilityView showing a meeting in progressPowerBX Astro Tablet
NOW AVAILABLE IN THE PROXIMITY STORE
Create Smart Spaces to Support Hybrid Work with the ASTRO All-In-One Room Display
A fresh take on integrated room scheduling systems, designed to meet the versatile needs of enterprise use. ASTRO makes managing your spaces easy from installation to the user interface.
The ASTRO All-In-One Kiosk can be custom provisioned with Proximity Room View pre-installed prior to shipment.Features:
- Touch screen
- LED Visibility on Room Availability
- Integrated Power over Ethernet
- Quick & Easy Installation
- Enterprise-grade Security
- Wall & Glass Mounting Options
To purchase, navigate to the Order tab in your dashboard.
Help! Room View is no longer working
Earlier versions of Room View have reached End Of Life and will no longer communicate with the server. Please be sure you are running the latest version by checking for updates in Google Play or Apple App Store
-
Updated by Alex Neil, Jun 24, 2022 at 11:41am
The Proximity Room View app lets your members and visitors easily check in to conference rooms, see guest WiFi information, end their reservation early, and even extend reservations without even leaving the room. Proximity Room View comes included with the price of every Proximity subscription.
Room View for iOS
- Room View can be used with iOS devices that run on iOS 10.3 or later, however iOS 11 is highly suggested.
- Click here to find Proximity Room View for iOS in the app store.
Room View for Android
- Room View can be used with Android devices that run on 7.0 and up.
- Click here to find Proximity Room View for Android in the Google Play Store.
About the App:
- There are two different views on the Room View app -- internal and external; each view serves a unique purpose. See below just a few features you can start using with the Proximity Room View app which comes included with the price of your Proximity subscription!
- As a manager, you can switch the view (internal/external) by tapping once on the screen and clicking the gear icon in the lower right-hand corner.
- Remember to set your passcode on your Room View settings screen. This will help you prevent members from changing things they shouldn’t have access to.
Click here to set up the SSID's for your resources if you use the Meraki Internet Integration.
Click here to set up the SSID's for your resources if you use the Meraki Internet Integration.
Internal View
This view would be used on a device that sits inside the resource (example: sitting on a conference room table.)
- Require member check-in
- The check-in process allows members to indicate that they are actually present for their reservation. This can be helpful to make sure that your resources don’t sit empty and unavailable.
- You can set your reservable resources to require check-in.
- This is optional, and if you activate this setting, any reservations will be canceled automatically if they have not checked in within the first 15 minutes of the reservation.
- To set this option, use your Proximity dashboard and navigate to Manage Resources > Reservable Resources and edit the appropriate resource by clicking on its name or "Edit" next to the resource name.
- View meeting details
- Your members will be able to see:
- Which conference room they are in (more useful than you think).
- When their reservation begins and when it ends.
- The WiFi network name and password (if you have our Advanced Meraki WiFi integration).
- The time! (also more useful than you may think.)
- Perhaps most importantly, attendees will receive verbal reminders to check-in and when their reservation is ending.
- Your members will be able to see:
- End meeting early
- Members can use Room View to cancel their event early if they are finished with the conference room. Members do not get a refund or free time back for ending early. The system will bring up a warning making this clear.
- Extend meeting time
- Members can also extend their reservation and will be billed appropriately (as long as there are no existing reservations immediately after).
External View
This view would be used on a device that is held outside the reservable resource (example: mounted outside of the conference room door.)
- See conference room schedule
- Make local reservations ("on-demand")
- Members can press the “use now” button to make a free 15 minute reservation - say if they need to pop in to make a phone call.
- It will show up on the reservation calendar as a “Local Reservation” while the reservation is active. It disappears after the reservation is over. The manager can view the calendar on the dashboard and check a box to view previous local reservations.
- This can be turned off in Settings.
Internal View Examples:
View showing the meeting details and guest wifi information
View showing that the conference room is free to use
View showing the reservation check-in screen
View showing the 5-minute countdown for the time remaining
External View Examples
View showing the conference room schedule and room availability
View showing a meeting in progress
PowerBX Astro Tablet
NOW AVAILABLE IN PROXIMITY STORE
Create Smart Spaces to Support Hybrid Work with the ASTRO All-In-One Room Display
A fresh take on integrated room scheduling systems, designed to meet the versatile needs of enterprise. ASTRO makes managing your spaces easy from installation to the user interface.
The ASTRO All-In-One Kiosk can be custom provisioned with Proximity Room View pre-installed prior to shipment.Features:
- Touch screen
- LED Visibility on Room Availability
- Integrated Power over Ethernet
- Quick & Easy Installation
- Enterprise
Grade-grade Security - Wall & Glass Mounting Options
To purchase, navigate to the Order tab in your dashboard.
Help! Room View is no longer working
Last Edit: 12.23.21 EREarlier versions of Room View have reached End Of Life and will no longer communicate with the server. Please be sure you are running the latest version by checking for updates in Google Play or Apple App Store -
Updated by Emma Reimer, Dec 22, 2021 at 11:49am
The Proximity Room View app lets your members and visitors easily check in to conference rooms, see guest WiFi information, end their reservation early, and even extend reservations without even leaving the room. Proximity Room View comes included with the price of every Proximity subscription.
Room View for iOS
- Room View can be used with iOS devices that run on iOS 10.3 or later, however iOS 11 is highly suggested.
- Click here to find Proximity Room View for iOS in the app store.
Room View for Android
- Room View can be used with Android devices that run on 7.0 and up.
- Click here to find Proximity Room View for Android in the Google Play Store.
About the App:
- There are two different views on the Room View app -- internal and external; each view serves a unique purpose. See below just a few features you can start using with the Proximity Room View app which comes included with the price of your Proximity subscription!
- As a manager, you can switch the view (internal/external) by tapping once on the screen and clicking the gear icon in the lower right-hand corner.
- Remember to set your passcode on your Room View settings screen. This will help you prevent members from changing things they shouldn’t have access to.
Click here to set up the SSID's for your resources if you use the Meraki Internet Integration.
Click here to set up the SSID's for your resources if you use the Meraki Internet Integration.
Internal View
This view would be used on a device that sits inside the resource (example: sitting on a conference room table.)
- Require member check-in
- The check-in process allows members to indicate that they are actually present for their reservation. This can be helpful to make sure that your resources don’t sit empty and unavailable.
- You can set your reservable resources to require check-in.
- This is optional, and if you activate this setting, any reservations will be canceled automatically if they have not checked in within the first 15 minutes of the reservation.
- To set this option, use your Proximity dashboard and navigate to Manage Resources > Reservable Resources and edit the appropriate resource by clicking on its name or "Edit" next to the resource name.
- View meeting details
- Your members will be able to see:
- Which conference room they are in (more useful than you think).
- When their reservation begins and when it ends.
- The WiFi network name and password (if you have our Advanced Meraki WiFi integration).
- The time! (also more useful than you may think.)
- Perhaps most importantly, attendees will receive verbal reminders to check-in and when their reservation is ending.
- Your members will be able to see:
- End meeting early
- Members can use Room View to cancel their event early if they are finished with the conference room. Members do not get a refund or free time back for ending early. The system will bring up a warning making this clear.
- Extend meeting time
- Members can also extend their reservation and will be billed appropriately (as long as there are no existing reservations immediately after).
External View
This view would be used on a device that is held outside the reservable resource (example: mounted outside of the conference room door.)
- See conference room schedule
- Make local reservations ("on-demand")
- Members can press the “use now” button to make a free 15 minute reservation - say if they need to pop in to make a phone call.
- It will show up on the reservation calendar as a “Local Reservation” while the reservation is active. It disappears after the reservation is over. The manager can view the calendar on the dashboard and check a box to view previous local reservations.
- This can be turned off in Settings.
Internal View Examples:
View showing the meeting details and guest wifi information
View showing that the conference room is free to use
View showing the reservation check-in screen
View showing the 5-minute countdown for the time remaining
External View Examples
View showing the conference room schedule and room availability
View showing a meeting in progress
PowerBX Astro Tablet
NOW AVAILABLE IN PROXIMITY STORE
Create Smart Spaces to Support Hybrid Work with the ASTRO All-In-One Room Display
A fresh take on integrated room scheduling systems, designed to meet the versatile needs of enterprise. ASTRO makes managing your spaces easy from installation to user interface.
The ASTRO All-In-One Kiosk can be custom provisioned with Proximity Room View pre-installed prior to shipment.Features:
- Touch screen
- LED Visibility on Room Availability
- Integrated Power over Ethernet
- Quick & Easy Installation
- Enterprise Grade Security
- Wall & Glass Mounting Options
To purchase, navigate to the Order tab in your dashboard.
Last Edit: 12.23.21 ER
-
Updated by Emma Reimer, Dec 22, 2021 at 9:20am
The Proximity Room View app lets your members and visitors easily check in to conference rooms, see guest WiFi information, end their reservation early, and even extend reservations without even leaving the room. Proximity Room View comes included with the price of every Proximity subscription.
Room View for iOS
- Room View can be used with iOS devices that run on iOS 10.3 or later, however iOS 11 is highly suggested.
- Click here to find Proximity Room View for iOS in the app store.
Room View for Android
- Room View can be used with Android devices that run on 7.0 and up.
- Click here to find Proximity Room View for Android in the Google Play Store.
About the App:
- There are two different views on the Room View app -- internal and external; each view serves a unique purpose. See below just a few features you can start using with the Proximity Room View app which comes included with the price of your Proximity subscription!
- As a manager, you can switch the view (internal/external) by tapping once on the screen and clicking the gear icon in the lower right-hand corner.
- Remember to set your passcode on your Room View settings screen. This will help you prevent members from changing things they shouldn’t have access to.
Click here to set up the SSID's for your resources if you use the Meraki Internet Integration.
Click here to set up the SSID's for your resources if you use the Meraki Internet Integration.
Internal View
This view would be used on a device that sits inside the resource (example: sitting on a conference room table.)
- Require member check-in
- The check-in process allows members to indicate that they are actually present for their reservation. This can be helpful to make sure that your resources don’t sit empty and unavailable.
- You can set your reservable resources to require check-in.
- This is optional, and if you activate this setting, any reservations will be canceled automatically if they have not checked in within the first 15 minutes of the reservation.
- To set this option, use your Proximity dashboard and navigate to Manage Resources > Reservable Resources and edit the appropriate resource by clicking on its name or "Edit" next to the resource name.
- View meeting details
- Your members will be able to see:
- Which conference room they are in (more useful than you think).
- When their reservation begins and when it ends.
- The WiFi network name and password (if you have our Advanced Meraki WiFi integration).
- The time! (also more useful than you may think.)
- Perhaps most importantly, attendees will receive verbal reminders to check-in and when their reservation is ending.
- Your members will be able to see:
- End meeting early
- Members can use Room View to cancel their event early if they are finished with the conference room. Members do not get a refund or free time back for ending early. The system will bring up a warning making this clear.
- Extend meeting time
- Members can also extend their reservation and will be billed appropriately (as long as there are no existing reservations immediately after).
External View
This view would be used on a device that is held outside the reservable resource (example: mounted outside of the conference room door.)
- See conference room schedule
- Make local reservations ("on-demand")
- Members can press the “use now” button to make a free 15 minute reservation - say if they need to pop in to make a phone call.
- It will show up on the reservation calendar as a “Local Reservation” while the reservation is active. It disappears after the reservation is over. The manager can view the calendar on the dashboard and check a box to view previous local reservations.
- This can be turned off in Settings.
Internal View Examples:
View showing the meeting details and guest wifi information
View showing that the conference room is free to use
View showing the reservation check-in screen
View showing the 5-minute countdown for the time remaining
External View Examples
View showing the conference room schedule and room availability
View showing a meeting in progress
PowerBX Astro Tablet
NOW AVAILABLE IN PROXIMITY STORE
Create Smart Spaces to Support Hybrid Work with the ASTRO All-In-One Room Display
A fresh take on integrated room scheduling systems, designed to meet the versatile needs of enterprise. ASTRO makes managing your spaces easy from installation to user interface.
The ASTRO All-In-One Kiosk can be custom provisioned with Proximity pre-installed prior to shipment.Features:
- Touch screen
- LED Visibility on Room Availability
- Integrated Power over Ethernet
- Quick & Easy Installation
- Enterprise Grade Security
- Wall & Glass Mounting Options
To purchase, navigate to the Order tab in your dashboard.
Last Edit:
9.16.2112.23.21 ER -
Updated by Emma Reimer, Nov 18, 2021 at 3:37pm
Proximity Room View App for Reservable ResourcesThe Proximity Room View app lets your members and visitors easily check in to conference rooms, see guest WiFi information, end their reservation early, and even extend reservations without even leaving the room. Proximity Room View comes included with the price of every Proximity subscription.
Room View for iOS
- Room View can be used with iOS devices that run on iOS 10.3 or later, however iOS 11 is highly suggested.
- Click here to find Proximity Room View for iOS in the app store.
Room View for Android
- Room View can be used with Android devices that run on 7.0 and up.
- Click here to find Proximity Room View for Android in the Google Play Store.
About the App:
- There are two different views on the Room View app -- internal and external; each view serves a unique purpose. See below just a few features you can start using with the Proximity Room View app which comes included with the price of your Proximity subscription!
- As a manager, you can switch the view (internal/external) by tapping once on the screen and clicking the gear icon in the lower right-hand corner.
- Remember to set your passcode on your Room View settings screen. This will help you prevent members from changing things they shouldn’t have access to.
Click here to set up the SSID's for your resources if you use the Meraki Internet Integration.
Click here to set up the SSID's for your resources if you use the Meraki Internet Integration.
Internal View
This view would be used on a device that sits inside the resource (example: sitting on a conference room table.)
- Require member check-in
- The check-in process allows members to indicate that they are actually present for their reservation. This can be helpful to make sure that your resources don’t sit empty and unavailable.
- You can set your reservable resources to require check-in.
- This is optional, and if you activate this setting, any reservations will be canceled automatically if they have not checked in within the first 15 minutes of the reservation.
- To set this option, use your Proximity dashboard and navigate to Manage Resources > Reservable Resources and edit the appropriate resource by clicking on its name or "Edit" next to the resource name.
- View meeting details
- Your members will be able to see:
- Which conference room they are in (more useful than you think).
- When their reservation begins and when it ends.
- The WiFi network name and password (if you have our Advanced Meraki WiFi integration).
- The time! (also more useful than you may think.)
- Perhaps most importantly, attendees will receive verbal reminders to check-in and when their reservation is ending.
- Your members will be able to see:
- End meeting early
- Members can use Room View to cancel their event early if they are finished with the conference room. Members do not get a refund or free time back for ending early. The system will bring up a warning making this clear.
- Extend meeting time
- Members can also extend their reservation and will be billed appropriately (as long as there are no existing reservations immediately after).
External View
This view would be used on a device that is held outside the reservable resource (example: mounted outside of the conference room door.)
- See conference room schedule
- Make local reservations ("on-demand")
- Members can press the “use now” button to make a free 15 minute reservation - say if they need to pop in to make a phone call.
- It will show up on the reservation calendar as a “Local Reservation” while the reservation is active. It disappears after the reservation is over. The manager can view the calendar on the dashboard and check a box to view previous local reservations.
- This can be turned off in Settings.
Internal View Examples:
View showing the meeting details and guest wifi information
View showing that the conference room is free to use
View showing the reservation check-in screen
View showing the 5-minute countdown for the time remaining
External View Examples
View showing the conference room schedule and room availability
View showing a meeting in progress
Last Edit: 9.16.21 ER
-
Created by Emma Reimer, Nov 18, 2021 at 3:37pm